Materials needed:
Felt 2 pcs. Brown 8" x 10"
1 pc. Tan 5" x 7"
Caron Watercolours: approximately 1 yd (or less) each of 7 colors:
Mediterranean (#068), Spice (#123), Black Forest (#063), Sandstone
(#001), Fresh Pink (#117), Cherry (#101), Marigold (#052)
For color substitutions, see * note below
Polyester Stuffing
Dressmaker's Tracing Paper
White Chalk or Black Magic Marker with Fine or Medium Point
Darning Needle
Straight Pins
Scissors
*You may substitute other colors for the felt above,
with any light and dark color combination. You may also substitute
any colors you like for the Watercolours threads listed above.
You will need 2 colors for the bear's eyes and 1 color each for
his nose, mouth, paws and ears (same color for both) and the
buttonhole stitching around the outside edge of bear pattern.
Instructions:
1. Print out the bear pattern.
Click here for Pattern to print out.
Print out a copy of stitch diagrams for the stitches you will
be using from our previous Kid's Embroidered Denim Pouch Project
at http://www.caron-net.com/nov99files/nv99kdf.html
These will include directions for the straight stitch, satin
stitch, backstitch and buttonhole stitch used in this project.
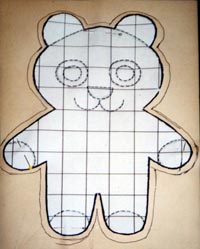
2. Lay the dressmaker's tracing paper face down over both
pieces of brown felt, one right on top of the other. Then lay
the bear pattern face up, centered over brown felt. Hold in place
with straight pins.
3. Cut around the outside of bear pattern, through both layers
of felt, leaving about 3/8" of extra felt around entire
shape (this extra 3/8" of fabric will become the seam)
4. Remove the bottom piece of felt, but keep the pattern and
tracing paper in place over the top piece of felt. Re-pin to
secure. Using a blunt pencil, go over all the dotted lines for
the paws, eyes, nose, ears and mouth to transfer these lines
to the felt fabric.
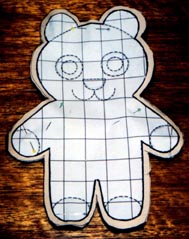
5. Remove pins, tracing paper and pattern. If the traced lines
marking the eyes, nose, ears, mouth and paws are too faint, go
over these with a piece of chalk or with the black magic marker
to make them clearly visible as you stitch.
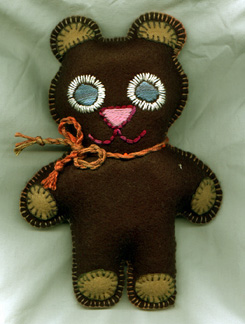
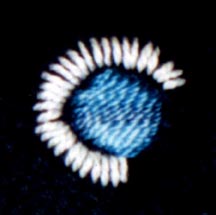
6. Thread your needle with one ply of the Mediterranean Watercolours
thread and then begin to embroider one eye (the inner circle
making up the eye shape) using a Satin Stitch to fill in the
shape, stitching from bottom to top. Repeat with the other eye.
7. Now use one ply of Sandstone Watercolours thread to make
a series of straight stitches to fill in the area around the
inner part of the eye, stitching from the outer edge of the larger
circle around each eye, toward the center, which you have already
filled in.
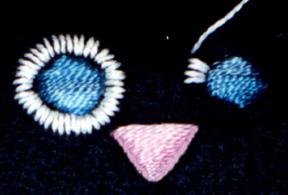
8. Using one ply of the Fresh Pink Watercolours, fill in the
half-moon shape making up the bear's nose, using a Satin Stitch
and working from the bottom up, following the outline.
9. Using 2 ply of the Cherry Watercolours thread, use a Backstitch
to outline the half-moon shape around the nose you have just
stitched and then continue to stitch the mouth shape with the
same backstitch following the outlines of the mouth shape.
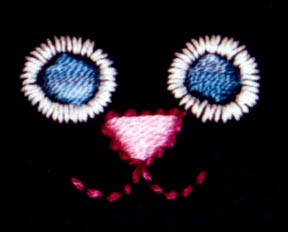
10. Now your teddy bear has a face and a personality all his
own. It may be time to start thinking of a suitable name for
him!
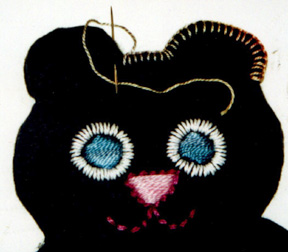
11. Take the piece of felt with the bear's face on it and
place it face side up over the other blank piece of felt that
is cut to the shape of the bear's body. Match up all the edges
so that the arms, legs, head etc. line up together. Pin the shape
all around the border, about 1/2 inch in from the edges with
your straight pins.
12. Thread your needle with one ply of the Spice Watercolours
thread. Starting with the bottom part of the right ear, using
a buttonhole stitch, begin to stitch counter clockwise, to the
top of the ear and then across the top of the head, joining the
front and back of the bear together. Space the stitches about
1/4 to 3/8 inch apart and continue stitching all around the bear
until you have stitched the bear together everywhere except for
the right side of the head. Do not cut your thread, but do not
stitch any further because you will need that open space to fill
the inside of the bear with the polyester filling. Stay tuned
for Part II of this project next month, when your bear will have
a special surprise in store for you!
Click here
for Part II