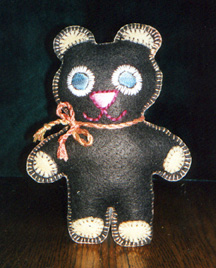
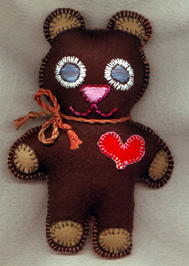
Surprise! Our Jaunty Teddy
may be small in stature, but he's got lots of Heart!
Additional Materials Needed:
Red Felt 1 piece approximately 2" x 2"
Step 1. By now you should have connected the front
of your teddy bear to the back, using a buttonhole stitch, except
for the right side of his head between the neck and the left
ear. Take your original printed bear pattern and cut out the
shapes of the 2 ears and 4 paws on the dotted lines.

Step 2. Attach each of the 2 paper ear patterns to
the tan felt with straight pins. Attach each of the 4 paw patterns
to the tan felt with straight pins. Now cut each piece of tan
felt to the shape of each pattern piece. Take one of the ears
cut from the tan felt and position it about 1/4 inch in from
edge of brown felt on one ear. Hold the felt in place with straight
pins while you use one ply of the Black Forest Watercolour thread,
with a buttonhole stitch, to attach the tan felt. Repeat same
procedure with the other ear and then with each of the 4 paws.
For the buttonhole stitch diagram, refer to Part I of this project.
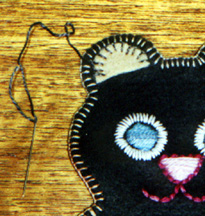
Step 3. After attaching the tan felt for both ears
and the four paws, you're ready to stuff your bear! This is where
he really starts coming to life! Take the polyester stuffing
and begin to fill the bear's body with it. First pack the stuffing
into the bear's legs and arms so that it fills them and plumps
out the shape. Then add stuffing to the ears. Next fill the body
of the bear with the stuffing, and lastly the head. Try to squeeze
as much stuffing as you can into the bear and still be able to
bring together the front and back pieces of felt on the right
side of the head.
Step 4. Use some straight pins to hold the front and
back pieces of brown felt making up the left side of the head
together. Then use one ply of the Spice Watercolour thread to
continue with the buttonhole stitch where you left off at the
neck to close up the right side of the head.
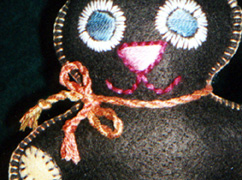
Step 5. Measure out approximately 4 feet (48 inches)
of the Marigold Watercolour thread. Follow the directions of
Step 3 and 4 of our previous Kid's Project for Rainbow Shoelaces
with Pom-Poms to make a twisted cord to tie around your teddy's
neck.
For instructions to make the braided cord go to:
http://www.caron-net.com/kidfiles/kidsept.html
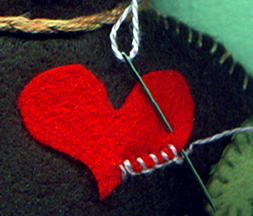
Step 6. And now, to give your teddy his heart! Print
out the pattern for the heart shape. Cut extra paper away, leaving
only about 1/2" of border outside the heart shape. Pin the
paper with straight pins, within the heart pattern, to your piece
of red felt. Cut the red felt following the heart shaped pattern.
 Click on image for link to print out.
Step 7. Using the same color you used for your teddy's
nose, Fresh Pink Watercolours, use one ply of thread and a buttonhole
stitch, to attach the heart to the left side of your teddy's
chest.
Yippee! Your teddy is done! If you haven't given him a name
yet, now's the time! Feel free to add other decorations to your
bear, such as adding bells or beads to his "braided"
collar bow. Or you can make "him" a "her"
by adding a bow (made from braided cord, like the collar on the
bear's neck) using Fresh Pink Watercolours and attaching it right
on her head between her ears. Either way, this teddy is sure
to win Your Heart!
COPYRIGHT NOTICE: No part of these instructions/project
nor the included diagrams/illustrations can be reproduced or
distributed in any form (including electronic) or used as a teaching
tool without the prior written permission of the CARON Collection
Ltd. One time reproduction privileges provided to our web site
visitors for and limited to personal use only.

 -
-