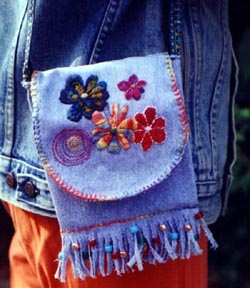
If you made the pouch we presented in our Kids Class Project
back in August, you have a bag with one colorful embroidered
flower on it. In Part II of this project you will learn how to
embellish your bag with an additional 4 flowers, each using a
different color thread and composed of different stitching techniques.
If you have not yet made a bag and want to start on it now, refer
to our previous Kids Projects and go to the Flower
Power Pouch Class. Also, any of the flower designs shown
can be used to decorate any number of other items such as sweatshirts,
jeans, tee-shirts etc. Lets get going!
Materials needed:
1. Watercolours Thread - 1 skein
each of #18- Peacock, #73- Charcoal, #12- Wildberries, #45 Flame,
#100- Snow White and #21- Peach Melba
2. Scissors
3. Pencil with blunt end
4. Needles - 1 each size 18 and 22 or any needle large enough
for the thread to fit through the eye, with a point sharp enough
to sew through denim fabric
5. Dressmaker's Tracing Paper ( Choose a color several shades
either lighter or darker than the denim color of the jeans.)
6. Embroidery hoop - about 6 inches in diameter
7. Straight pins - about 4
8. Ball point pen with medium point or fine point magic marker
in dark color

Instructions:
1. Print out the line drawing showing the patterns of the
five flowers to be transferred to the flap of your bag (or any
other fabric you want to decorate).
2. Print out the stitch diagrams and instructions for the
various stitches to be used.
3. Place the dressmaker's tracing paper face down over the
top of the flap on your bag. Cut away the excess paper around
the flower pattern leaving about one to two inches of white border
all around the design. Place this pattern face up over the tracing
paper. Using straight pins, attach the design at the top, bottom
and sides in the white border part around the design going through
the design, tracing paper and fabric. This will secure the pattern
so that it will not shift while you are tracing it. Place the
flower pattern over the flap so that the one flower design you
have already stitched lines up with that flower on your pattern
paper.
4. Using the blunt pencil, trace the design, pressing down
hard, while copying each flower. You may have to trace each flower
several times. To make sure the pattern is transferring to the
fabric, remove one straight pin and fold up one side to see if
the tracing paper is transferring the design so that you can
easily make it out. Keep doing this until you have traced all
the additional flowers and checked to see that they are visible
on the denim.
5. After the pattern is transferred, remove the pattern and
tracing paper and go over the design of each flower again with
a dark ball point pen or fine point magic marker right on the
fabric, to make the pattern more obvious and also to ensure that
the traced design does not fade while you are stitching and handling
it. The threads you embroider with will cover these lines as
you work on it.
6. Attach the embroidery hoop so that the design is centered
inside it. You can move the hoop as you work on the pattern as
you need to. The hoop will make it easier to stitch on the denim
by keeping it smooth and taut.
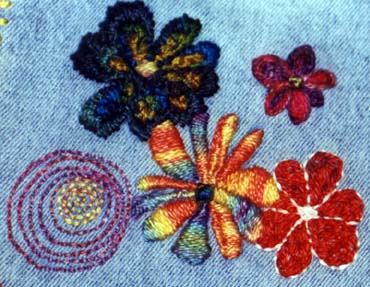
7. For flower #1, use the Long and Short Stitch to fill in
the petals of the flower. Use the 3 ply Charcoal Watercolours
thread, exactly as it comes off the skein, consisting of 3 strands,
with the larger size needle for the first outermost row of stitches
to outline the shape of each petal. For the inner part of each
petal, use 3 ply Peacock Watercolours thread, continuing to use
the Long and Short Stitch to fill in each petal. For the center
of the flower, use the yellow color from a length of the Peach
Melba Watercolours thread, also 3 ply, using the Satin Stitch.
8. For flower #2 you will be using 2 ply of the Wildberries
Watercolours thread. Cut a length of the thread ( about 12 to
15 inches long) and separate 1 strand from the other two. Use
the 2 ply strand with either size needle. Use the Lazy Daisy
Stitch to create each individual petal outline. Then stitch successively
smaller lazy Daisy Stitches within the initial outside stitch
until you have filled in each entire petal with a series of stitches
each smaller than the one before. Use a contrasting color of
Watercolours thread, such as the lime green in the Peacock Watercolours
thread, 3 ply, to make a cross across the center, with a single
satin stitch. Then make more stitches across the center between
the stitches of the first cross design, This will creat an "asterick"
(*) shaped or star shaped design in the center of the flower.
9. For flower #4 use the Chain Stitch with 1 ply of the Flame
Watercolours thread to stitch the outline of each petal. Use
the smaller needle when using just 1 ply of the thread. Then
you can either fill in the inside area of each petal using the
Satin Stitch, with a 2 ply thread. For the center of the flower
you can use a straight stitch to make a cross across the center
circle and then make more stitches between the first cross you
made, to make an "asterisk" shaped (*) or star-shaped
pattern in the center, like on flower #2. Use 1 ply of the Snow
White Watercolours thread and make a series of Backstitches to
outline each petal and define its shape.
10. For flower #5 use 1 ply of the Peach Melba Watercolours
thread and a make a series of Backstitches to follow the outline
of the spiral design, working from the center of the design toward
the outside in ever larger circles. Make the stitches fairly
small, about 1/8 inch long to create the curved shape smoothly.
Satin Stitch: Work straight stitches across the shape as
shown. Conform stitches to the shape you will be filling in.
Care should be taken to keep a good edge. Do not make the stitches
too long as then they could be pulled out of position. Butt each
consecutive stitch to the one before it to create solid patch
of color in area to be stitched |
Chain Stitch: Bring the thread out at the top of the
line and hold down with your left thumb (if right-handed). Insert
the needle where it last emerged from the fabric and bring the
point of the needle out a distance away. Pull the thread through,
keeping the working thread under the point of the needle. |

Long and Short Stitch: This is a form of Satin Stitch
that got its name because all the stitches are of uneven lengths.
It is often used to fill in a shape which is too large or too
irregular to be covered by using only the satin stitch. It is
also used to create a shaded effect, as shown in diagram. In
the top (first) row, the stitches are alternately long and short
and closely follow the outline of the shape to be filled in.
In the succeeding rows, long and short stitches are worked to
fill in the rest of the shape and to give a smooth texture. |
Lazy Daisy Stitch: Work in the same way as the Chain
Stitch (A), but secure each loop at the center with a small stitch
(B). This stitch may be worked singly or in groups to form flower
petals. |
Backstitch: Bring the thread through on the stitch
line, then take a small backward stitch through the fabric. Bring
the needle through again a little in front of the first stitch,
take another backward stitch, pushing the needle in at the point
where it first came through. |
Buttonhole Stitch: Bring the thread out on the lower
line, insert the needle in position on the upper line, taking
a straight downward stitch with the thread under the point of
the needle. Pull the thread up to form a loop and then repeat. |
Tra-La! Your Flower Power Pouch is now truly more powerful
and more flower-full, as well! It will jazz-up just about any
outfit or you can just hang it on your mirror, closet door or
doorknob and keep your jewelry or any other little special treasures
in it.
COPYRIGHT NOTICE: No part of these instructions/project
nor the included diagrams/illustrations can be reproduced or
distributed in any form (including electronic) or used as a teaching
tool without the prior written permission of the CARON Collection
Ltd. One time reproduction privileges provided to our web site
visitors for and limited to personal use only.