Continuing our "Flower
Power" theme we Present a
by Rita
Vainius
The term "Flower Power" became a favorite slogan of
the "Flower Children" of the 1960's, also known as
"Hippies." This project typifies style and spirit of
those years and would have fit in perfectly with the traditional
Hippie costume of tie-dyed shirt, fringed suede vest, frayed
bell bottom jeans, beads galore, floppy hats or embroidered headbands
over "hair down to there" and of course, flowers -
the emblem of beauty, joy and goodwill. It's all part of our
century, so you're really recreating a piece of history! Let's
go for it!
Materials needed:
1. Watercolours Thread - 1 skein each of # 18- Peacock, and #
86- Tahiti
2. 1 pair outgrown or worn jeans
3. Scissors
4. Pencil with blunt end
5. Needle - size 22 or any needle large enough for the thread
to fit through the eye, with a point sharp enough to sew through
denim fabric
6. Dressmaker's Tracing Paper ( Choose a color several shades
either lighter or darker than the denim color of the jeans.)
7. Length of embroidered band, strip of leather, rope, heavyweight
ribbon, twisted cord or braid for the strap, about 35 to 50 inches
in length.
8. Embroidery hoop - about 6 inches in diameter
9. Straight pins - about 4
10.Ball point pen with medium point or fine point magic marker
in dark color
- 11. Ruler
Step-by-Step Instructions:
-
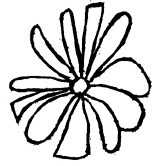
1. Print out flower pattern (above) to be transferred to the
denim fabric.
2. Print out the stitch diagrams and
instructions for the 3 stitches to be used.
3. Watercolours is a 3 ply thread (3 strands twisted together).
For the flower you will use only 2 of these strands. When you
cut a piece the thread to stitch with, gently pull to separate
1 strand from the other 2.. Aside from the flower, you will be
using all 3 strands to stitch with.
4. Lay a pair of jeans flat, zipper side up on a smooth surface
(either floor or table).
5. Starting about 2 to 3 inches below the "crotch"
of the jeans, cut across one leg in a straight line from left
to right. Before cutting use your ruler to make the line on the
fabric with your pen to use as a guide. (Figure 1)
-
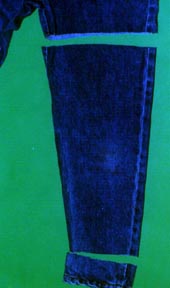
6. Measure about 15 inches down the same leg from this cut and
cut across the leg, above the bottom of the jeans leg. Again,
make a line with your pen and ruler as a guide for cutting. (Figure
1)
7. Starting at the top of the pants leg you have cut off, cut
down along the inside seam to about 6 ½ inches on both
sides. Make this cut in front of the reinforced seams on each
side of the jeans. (Figure 2)
-
8. Fold down the flap you have made by cutting, and cut this
flap off in a straight line from left to right. Again use your
ruler and pen to mark this line. Leave the fabric on the back
part of the leg intact.
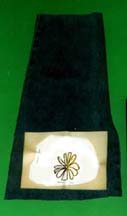
9. Fold this back part over the front over the pants leg. This
will become the from flap of the pouch which we will embroider.
10. Spread the pants leg out flat so that the flap is face up
directly on a hard surface, such as a table or wood or other
smooth floor.
11. Place the dressmaker's tracing paper face down over the flap.
Cut away he excess paper around the flower pattern leaving about
1 to 2 inches of white paper around the flower design. Place
this face up on top of the tracing paper. Using straight pins,
pin the design at the top, bottom and sides in the extra border
of white around the pattern to the tracing paper and fabric so
that it does not shift position while you are copying it. Attach
the pattern so it is centered on the flap. (Figure 3)
-
12. Using the blunt pencil, trace the design, pressing down hard,
while copying each flower. You may have to trace the flower several
times. To make sure the pattern is transferring to the fabric,
remove one straight pin and fold up one side to see if the tracing
paper is transferring the design so that you can easily make
it out. Keep doing this until you are sure the design is visible
on the denim.
13. After the pattern is transferred, remove the pattern and
tracing paper and go over the design of the flower again with
a dark ball point pen or fine point magic marker right on the
fabric, to make the pattern more obvious and also to ensure that
the traced design does not fade while you are stitching and handling
it. The threads you embroider with will cover these lines as
you work on it.
14. Attach the embroidery hoop so that the design is centered
inside it. You can move the hoop as you work on the pattern as
you need to. The hoop will make it easier to stitch on the denim
by keeping it smooth and taut.
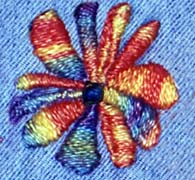
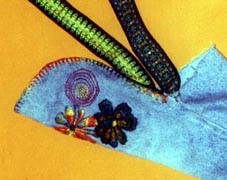
15. Use stitch diagrams with the stitch instructions to start
embroidering the flower. Use the Satin Stitch with 2 ply Tahiti
Watercolours thread starting at the top of each petal and stitching
from side to side until you have filled in the shape of the petal.
Do the same with all the other petals. Use a contrasting color,
such as the turquoise in the Peacock thread, also 2 ply, to fill
in the center of the flower with the satin stitch (Figure 4)
-
16. When you have finished stitching the flower, lay the embroidery
hoop over the design and center it on the flap, with one part
of the hoop lining up with the bottom, middle of the flap piece.
Using the outside edge of the hoop as a guide, trace the shape
of the hoop with a ball point pen to define the curved shape
of the flap and then cut along the guide lines you have made.
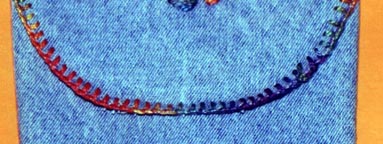
- 17. Use the Buttonhole Stitch to stitch around the outside
edge of the embroidered flap from left to right with 3 ply of
the Tahiti Watercolours thread. (Figure 6) Do the same along
the edge of the fabric which forms the top of the inside of the
bag, when the flap is up.
-
-
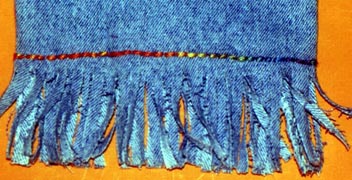
#7. Use the Backstitch to close the bottom of the bag with 3
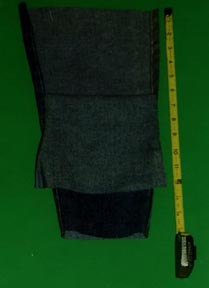
ply of the Tahiti Watercolours thread working from left to right.
Measure about 2 to 2 1/2 inches up from the bottom of the bag
and mark a straight line across the fabric with your pen and
ruler as a guide to follow for the stitches. (Figure 7)
18. After the bottom of the bag is stitched closed, use a sharp
pair of scissors to create the fringed border by cutting from
the bottom edge of the fabric to about 1/4 to 1/2 inch below
the row of stitches you made across the bag. Cut these strips
to be about 1/2" to 3/4" wide and don't be concerned
about making them all even. (Figure 7)
19. Use your embroidered band, leather strip, braid, ribbon or
twisted cord to make the shoulder strap. Cut it to whatever length
you prefer and secure the strap by sewing one end of the strap
to the inside seam of each side of the bag. You will need to
fold the flap over to the back to do this. You can use either
the Watercolours threads in any color, or a regular sewing thread
and needle to do this as you won't really see this stitching,
especially if you just sew the strap to the reinforced seam on
the inside of the bag (on each side). (Figure 8)
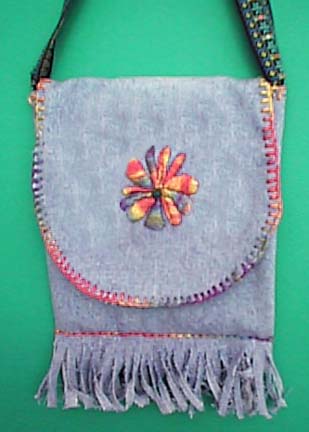
That's it! Well done! You've created an authentic "Flower
Power Pouch" and I'll bet you get some pretty awesome compliments
when your friends see it!
-
- Watch in the fall for our Part II of this project when
we show you how to add more embroidered flowers and beads to
the finge!
-
- COPYRIGHT NOTICE: This pattern/chart
is provided for our visitors use only. None of these designs
or instructions can be reproduced or distributed in any form
(including electronic) without the prior written permission of
Lois Caron.
-
-
-
-
- COPYRIGHT NOTICE: No part of these instructions/project
nor the included diagrams/illustrations can be reproduced or
distributed in any form (including electronic) or used as a teaching
tool without the prior written permission of the CARON Collection
Ltd. One time reproduction privileges provided to our web site
visitors for and limited to personal use only.
|
