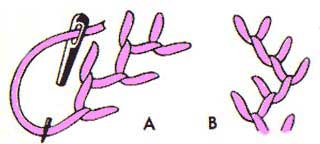
Feather Stitch - Bring the needle out at the top center,
hold the thread down with the left thumb, insert the needle a
little to the right on the same level and take a small stitch
down to the center, keeping the thread under the needlepoint.
Next, insert the needle a little to the left on the same level
and take a stitch to the center (A), keeping the thread under
the needle point. Work these two movements alternately.
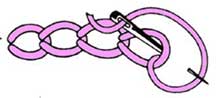
Chain Stitch - Bring the thread out at the top of the
line and hold down with your left thumb (if right-handed). Insert
the needle where it last emerged from the fabric and bring the
point of the needle out a distance away. Pull the thread through,
keeping the working thread under the point of the needle.
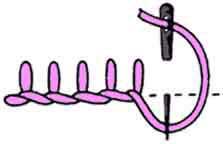
Buttonhole Stitch - Bring the thread out on the lower
line, insert the needle in position on the upper line, taking
a straight downward stitch with the thread under the point of
the needle. Pull the thread up to form a loop and then repeat.
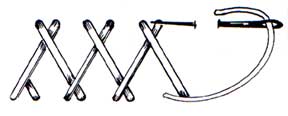
Herringbone Stitch This stitch is worked from left
to right and lies evenly on both sides of the seam. It is created
by taking a small horizontal back stitch on each side of the
seam. Be sure to keep the horizontal stitches even as this creates
the design.
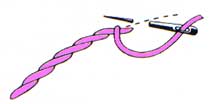
Stem Stitch Work from left to right, taking regaular,
slightly slanting stitches along the line of the design. The
thread should always emerge on the left side of the previous
stitch. This stitch can be used for flower stems, outlines, etc.
Note from Bonnie: An alternate stem stitch that I find effective
that adds just a touch different twist to the stitch is to draw
your stem line and work from right to left.
Work from the top of the line on a slant towards the left
and come out on the bottom of the line just next to where the
thread originates. The thread itself should be held above your
line. The stitch can be small or large depending on the effect
that you're looking for.
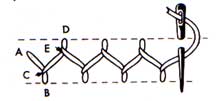
Cretan Stitch Bring the thread through at (A) and
with the thread above the needle, insert the needle at (B) and
bring it through at (C). With the thread below the needle, insert
the needle at (D) and bring it through at (E). All stitches lie
at right angles to the guiding lines as shown on the diagram
and are spaced at regular intervals.
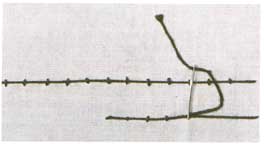
Couching This is a decorative way to hold long threads
in place. Lay down long threads as desired. With either matching
or contrasting thread, come up at regular intervals and wrap
a small tight stitch over the long thread.
