|
|
 |
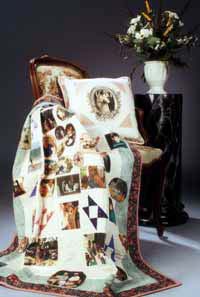
Photo Memory Foundation Pieced
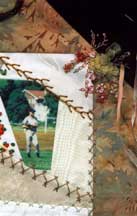
Crazy Quilt by Bonnie Turner I was first motivated to try crazy quilting because I enjoy trying new techniques. I always admired the beauty of the fabrics, the intricacy of the embroidery and the amazing use of embellishments found in crazy quilts. This media affords the designer the freedom to be as creative as he or she would like and also allows them to make it personal in so many ways. The use of special motifs to signify a special event was of great appeal to me as a quilter. I think because I was a hospice nurse at one time and have made many memory quilts for people (not just after the death of a loved one, but also for weddings, anniversaries even a quilt as a special gift from a stepmom to her stepdaughter), this has been the beginning of a great adventure for me.
Supplies for "Aren't They Great!": 2 - 4 photos (transferred to Fabric see photo paragraph for more specific info) An assortment of cotton fabric scraps. This is a great opportunity to use something that specifically relates to the people in the photos i.e. shirting, favorite colors, theme related fabrics, etc. USE YOUR IMAGINATION! A few fancy fabrics such as ties, silks, scarves, velvet, etc. These add "glitz" to your piece. Basic sewing supplies scissors, ecru or light gray 100% cotton thread, assorted embroidery needles, a watersoluble fabric marker to transfer pattern to muslin 1 fat quarter muslin for the foundation David K. Small's "Crazy Quilt Workbook" This book includes more instructions for foundation piecing, some basic stitch information, many block patterns and some very helpful, as well as funny, comments. Threads - I especially enjoy using Caron Variegated Threads. You can accomplish many different effects from just one thread and they allow you to introduce new color schemes you might not have otherwise considered. Then you can expand your embellishments from there. You may include different weight threads and introduce different fibers, such as Watercolours in addition to the threads I selected. Embellishments: silk ribbons, buttons, charms, old costume jewelry and beads - keeping in mind that whatever you add will enhance your piece as well as add interest. Remember the piece is crazy - you'll be surprised how many people will say "wow I didn't see that before." Your color theme for threads and ribbons will depend on the color of your fabrics and the desired effect you're looking to achieve.
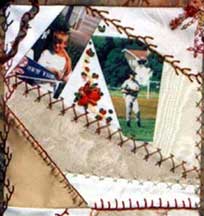
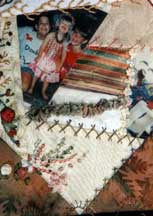
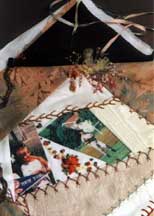
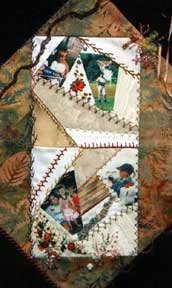
When you choose your photos they can be color, black and white or even a combination of both has a lovely look. I look for a clear photo with the feature person somewhat centered in the photo. I have to admit to some satisfaction in being able to cut someone out of a picture and even throw him or her away (something you can't do in real life). What a great secret to chuckle about when you see that person the next time. You may opt to transfer the photos onto fabric yourself but I prefer to skip that and get right to sewing. Fortunately I found a local copy place that does the transfers for me. Paulette at Spectra Graphics (Web information included) is also an artist and painter who does an excellent job with the color and clarity of the photo. I provide my photos, the muslin or photo transfer fabric and information about seam allowances and she does the rest. If you use muslin try to choose it with as few flecks of cotton as possible so they don't show through onto the photo.
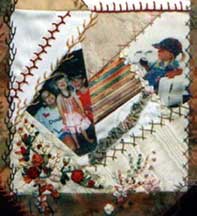
The photos can be enlarged, reduced, color can become black and white, you can even add borders and frames. At first I was concerned something might happen to the photos but they are perfectly safe. Old black and white photos turn out especially nice. The photos in my piece are of my children so that became my theme. I did one for my dad with his parents and siblings at various ages of his youth and the photos have an ascepia tint to them which gives the piece a manly feel. You can do anything you'd like - be creative. I give myself plenty of seam allowance because I may not use all the photos I planned on so I might be able to use it for some other project. I also prefer to do my own cropping (remember the secret).
I suggest David Small's Crazy Quilt Workbook, which contains many foundation or paper piece block options. If you haven't paper pieced yet, try it - it's great fun. This book provides blocks for traditional crazy quilt squares; my favorite - fans, mirror image options, and even a stained glass pattern. When I choose my block I pick one I feel will best highlight the photo. I may need to combine two sections to accommodate the photo (see block sample). Foundation or paper piecing is as simple as paint by number only your going to sew by number. Two gets sewn to one, three gets sewn to two, four gets sewn to three etc. If this is your first time choose a block with fewer sewing sections (5 vs. 9 is much simpler). The workbook gives clear directions along with some very good illustrations. Choose your fabric carefully. It should not over shadow the picture but compliment it. I enjoy combining cottons (esp. Bali's) something with glitz or with shiny finish. There are a lot of cotton fabrics with gold or silver throughout the pattern that work just as well (the Hoffman Line is especially nice). The fun part about this being a crazy quilt is you have the freedom to put anything together. If something looks to busy you can change the effect with the embroidery so don't fret and remember everything you do adds to the individuality of the piece. I choose to make my blocks subdued, which I felt would highlight the photos and then added a more dramatic border. These blocks measure 6" finished (6 _" unfinished) with a 2" border. Finished piece 10"x 16".
Now you need to decide how large the piece will be. I plan to frame mine under glass. After you have created this heirloom piece I suggest you finish it not only to preserve it but also to highlight your work. I put a 2" border around my 2 blocks. You may put any size border you want; sometimes a 3" border makes a nice size pillow. I opted to sew the blocks one on top the other but you might like them side by side (this is your choice). Then I put the brown velvet triangles on the corners; it reminded me of those old-fashioned photo corners you used to put your photos in an old scrapbook. It seemed to give it a more finished look as well as draw your attention to the center. The blocks in David's book lend themselves to being enlarged or reduced (what a wonderful holiday ornament). Book is spiral bound.
When you crazy quilt you are looking to add interest so I use a wide variety of threads, silk ribbons (some I hand dyed myself also great fun), metallics and beads. The choices you make should compliment your piece. I work with a large number of Caron threads because the give me more flexibility.
Needles #22 Chenille & #18 Tapestry for silk ribbon, Assorted size embroidery needles (you will embroider with different weight threads). If beading you need beading needles and size D Nymo beading thread. Several skeins Caron Threads I used Wildflowers - Java, Bark, and Spice, as well as Waterlilies - Tobacco. Impressions are beautiful also. You may use one strand in one area and several strands in another. There is no right or wrong! Silk Ribbons in 2mm, 4mm & 7mm, YLI are esp. nice and they even have some available in variegations. Any embellishments such as charms, old costume jewelry, beads & buttons.
 -- --
Stitched used include Chain Stitch, Buttonhole, Herringbone (one of my favorites This stitch works well in combination with
other stitches.), Cretan, Feather (this is a very versatile
stitch and can look different depending on how you stitch the
thread. You can create your own patterns.), Couching (I
often do this to off set the block look. See the ribbon at the
top left corner. As in quilting when you have a block or quilt
that has a geometrical look you add curves when quilting. This
adds a new dimension to your piece and pleases the eye. The thread
or ribbon can be sewn down with beads or a variegated thread),
and Stem Stitch (An alternate stem stitch that I find
effective which adds just a touch different twist to the stitch
is to draw your stem line and work from right to left. Work from
the top of the line on a slant towards the left and come out
on the bottom of the line just next to where the thread originates.
The thread itself should be held above your line. The stitch
can be small or large depending on the effect that you're looking
for.)
 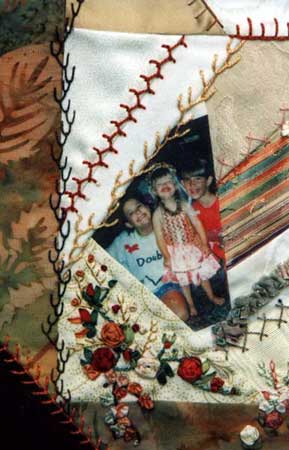
When using a variegated thread I start in one direction and then turn and go back the same way I came, which allows the color progression to change as I go. It often works out that the light ends up next to the dark, which makes it look like you've used more than one thread. When using a variegated green thread (Wildflowers-#121 Evergreen) to stem stitch it makes for a more true effect similar to what you'd find in nature.
The very last thing you do is apply the beads, buttons and/or charms. This is a great time to hide something or fill in a space you didn't quite know what to do with. This is a very forgiving art form and if there's a mistake no one will ever know except you. The one thing I hear all the time is, "there's a mistake right ________" and if you didn't tell me, I would probably not know so keep your secret!
"Aren't They Great.", featuring Bonnie's own family, will be framed for display. References: Crazy Quilt Workbook by David K. Small at Small
Expressions Look for David's new book Crazy Quilt Workbook
Beyond the Block Elegant Stitches by Judith Baker Montano C&T Publishing 1995 Floral Stitches by Judith Baker Montano C&T
Publishing 2000 A~Z of Embroidery Stitches from the publishers of Inspirations Magazine - Reprinted August 2000 Photography by Joann Hoose www.joannhoosephotography.com Photo Transfers by Spectra Graphics www.spectragraphicsbiz.com Supply Sources: Log Cabin Fabrics, Ravena, N.Y. @ www.logcabinfabrics.net Heartbeat Quilts, Hyannis, MA @ www.heartbeatquilts.com I would love to hear from you at bonnieturner@prodigy.net I am available for classes, workshops and lectures. For more
information write to:
Bonnie, a registered nurse who married her HS sweetheart, has 4 children, ages 18, 14, 12, & 7. During her nursing career, Bonnie was the 1st head nurse of the local Hospice. She continues, "As it turns out, my quilting has followed a similar route. I have made many memory quilts, anniversary quilts with photos, a wedding quilt. I incorporate creative stitches, specialty threads, silk ribbons, embellishments, photos or anything else the family would like. This is a very meaningful expression of love."
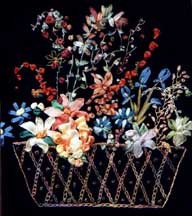 Detail from Oriental Crazy Quilt Basket Block surrounded by 4 crazy quilt squares. Bonnie considers herself a fairly traditional quilter, who incorporates a variety of embellishments, photo transfers and stitches using specialty threads and ribbons. Bonnie favors using variegated threads as they add the most interest and offer the most flexibility. She adds, "I love the freedom that crazy quilting affords you in the use of velvets, brocades, silks and anything else you can come up with." Most of her pieces are custom designed to suit a specific person. The family is encouraged to be actively involved by supplying clothing or any other keepsake of importance (buttons, linens, jewelry, photos, etc). Bonnie adds, "I have often found that most of these projects take on a life of their own, often with surprising results."
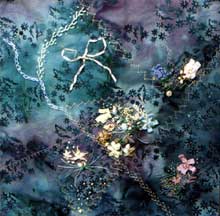
Teaching Sample of hand dyed cloth Bonnie finds it to be a great way for beginners to learn the stitches. Bonnie draws lines to represent a crazy quilt square without the piecing and uses this as a way for beginners to learn the stitches used in crazy quilting. Bonnie has taught at numerous other local venues as well as being a guest speaker. She regularly teaches at after-school programs for kids from 2nd to 5th grade. She relates, "In my daughter's 2nd grade class we are getting ready to make 2 quilts for ABC quilts as a service project. These will hang in a local quilt show. This is a great way to foster their interest in quilting but also history and math." For more information or for a brochure of classes offered
at the Quilter's Studio, Etc. contact:
|