Back to Main Online Class Page
Leslie Levison's
Part II
Click here if you missed Part I
-
-
More Stitch Diagrams

Cretan Stitch
Guess what? A-B-C!! A comes up below the seam, B is above the seam,
and anywhere from 1/4" to 1/2" to the right of A. C is directly
below B. This may look like the buttonhole stitch the difference
is that C is about 1/8" above the seam. The second part of the stitch
is worked from below the seam. The needle always points toward the seam
but does not come out at the seam. The thread is always under the needle.
After you've done a few, it will look like a wishbone. Since this stitch
creates a lot of legs and negative space, it is ideal for adding straight
stitch trios or lazy daisy stitches. (A lazy daisy is a single chain.)
Variations include working a second row in another color over the first
row, weaving a strand of Rachel through it, or working it in a leaf pattern.
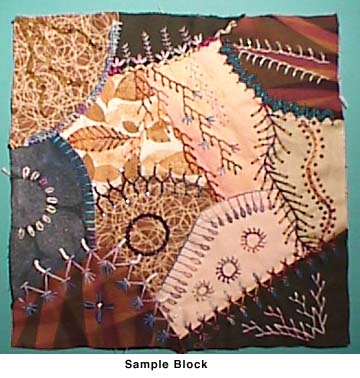
On the sample the cretan stitch was worked over a leaf print in Watercolours,
woven with turquoise Rachel, and tipped with single beads.
Herringbone Stitch
A-B-C. Note that B-C is a backstitch. The herringbone is actually just
an elongated cross-stitch. The working thread is just kept out of the way.
Once you bring the thread through at C, make a backstitch at D-E. This
stitch goes rather quickly. A pretty addition is a small "+"
done in another color over the "x" part of the stitch, as shown.
On the sample, there is a herringbone done in Watercolours, the "+"
is done in Wildflowers, and a lazy daisy tops it.
Chevron Stitch
Chevron stitch is difficult to illustrate and so probably is not as
popular as it should be. It's A-B-C again, with B-C as a small backstitch.
Push the working thread out of the way, and take another small backstitch
from D-E. (Note: E should come out right next to B) Swing down diagonally
and take a small backstitch from F-G. I thought that was already too many
letters to keep track of so I'm going to cheat a little. The stitch you
just made from F-G was the same as B-C, only now you are on the "down"
side. So just repeat the D-E stitch, next to the F-G stitch. You can call
it H-I if it makes you happy. What you end up with is a large zig-zag stitch
with the ends of the Z-Z covered with a straight stitch. You can see this
on the sample worked in Wildflowers with turquoise straight stitches crowning
it. The fuzzy looking white things on the other side of the chevron are
bullion stitches worked in Snow, which we'll get to in a minute.
French Knot
Bring your needle up at A. Wrap the thread around the needle (close
to the fabric) 3-4 times. Generally the thicker the thread, the less wraps.
Hold on to your working thread and pivot the needle so that you can insert
B right next to A. Hold on to the working thread until you have to let
go. This is the key to a perfect French Knot. If you let go too soon, your
knot will go "boing". If I was computer savvy enough, I guess
I could have had a sound effect there for your entertainment. Do 10 of
them to really get the hang of it. My current favorite thing to do with
FK's is this: chain stitch in an "S" curve, then do FK's on either
side of the chain, as shown on the sample.
Bullion Stitch
Perfect bullion escaped me for years until I discovered the importance
of holding on to the coils! This stitch calls for a milliner's needle.
A-B-C. Do not bring the needle all the way through. Just let it sit in
the fabric as the illustration. Wrap the working thread around the needle
enough times to equal the distance between B and C. In other words, you
want your stitch to cover the distance taken up by the needle in the fabric.
Wrap it firmly but not overly tight. Hold on to the coil of thread on your
needle, and pull your needle through the coil. Before you take the needle
back down at B, check to make sure the coils are lined up and behaving
themselves. Sometimes the "lead" coil ends up at the back of
the line just nudge it toward the front of the coil so that they
all lay smooth. Now take the needle down at B and you have just made a
bullion stitch. As mentioned before, this looks very cool in Snow. On the
sample showing the same stitches in various threads, notice the overlapping
lines of bullion stitch. I love the texture created for stems.
Palestrina Knot
I first saw this stitch in Jacqueline Entoven's "Stitches with
Variations". It is not easy to master, but it will click eventually.
A-B-C. The needle is under the thread. This creates what I call a "bridge"
stitch. Slide your needle down under the bridge stitch. The needle will
come out on the left side of the stitch. Now slide your needle under the
bridge stitch again, this time on the right-hand side, with the needle
coming over the thread. Pull gently to form the knot. Move down the seam
a little (1/8" to1/4") and insert the needle at D and come up
at E. This creates another bridge stitch. Continue as in the first stitch.
Practice this on a short seam first. It has the appearance of a crochet
edge. It is best worked in Watercolours, Impressions, or 2 strands of Wildflowers.
Once you get the hang of it, try it in Snow.
Making a Quilt
For more information about Leslie Levison's classes (listed below) please
contact her at: [email protected]
Dragonflies and Bellydancers - Introduction to Crazy Quilts,
stitches and beadwork.
When the Stitch Hits the Fan - Additional stitches, intro to
ribbon flowers, beaded wire flowers, and Brazillian embroidery techniques.
Patience is a Virtue - Concentrates on large embroidery and beadwork
motifs.
Step into My Parlor - Finishing techniques for Crazy Quilts
The Tattooed Mermaid - 45-minute Trunk show featuring 15 Quilts
and accompanying stories
Time for a Garage Sale - What happens when your fabrics stop
speaking to you? Features 3 crazy quilts and 10 sketches in patchwork.
COPYRIGHT NOTICE: No part of these instructions nor the included designs/charts
can be reproduced or distributed in any form (including electronic) or
used as a teaching tool without the prior written permission of Leslie
Levison. One time reproduction privileges provided to our web site visitors
for and limited to personal use only.
|
