We are pleased to present, this month's online class teacher, Leslie
Levison, "Crazy Quilter Extraordinaire", who has been active
in the New York City quilting scene for 20 years, involved in the Manhattan
Quilters Guild for 15 years, and a pioneer founding member of the Empire
Quilters Guild in 1982. Leslie has always been a collector, starting with
seashells, and moving on to beads and fabrics in high school. During her
career in the textile field, Ms. Levison has seen the quilting industry
grow from a small venture to the major force it is today. Being a crazy
quilt enthusiast, as well as teacher, she is very pleased to see that major
exhibitions are finally being devoted exclusively to "Crazy Quilts".
The needlework and fabric industries have joined forces to present the
best products available to quilters and needleworkers, and Crazy Quilters
are one of the beneficiaries of this new collaboration and expansion. In
addition to her interest in fabrics, beads, fibers and threads, Ms. Levison
also enjoys cooking, traveling, and the roar of a Harley-Davidson on the
open road. She lives in a walk-up apartment in Manhattan, which she currently
does not share with any cats.
Even if you never tried Crazy Quilting, this beatifully instructed class
will get you hooked! The following Online Class presents an introduction
to developing a "Crazy Quilt Patchwork Block", step by step,
from start to finish; and for really adventurous needleworkers, even beyond.
Leslie teaches at "Sew Brooklyn" in Park Slope, Brooklyn and
at "City Quilter" in New York City. She will also be teaching
at the "Crazy Quilt Symposium" in Omaha, Nebraska this summer.
For additional information, please e- mail her at [email protected]
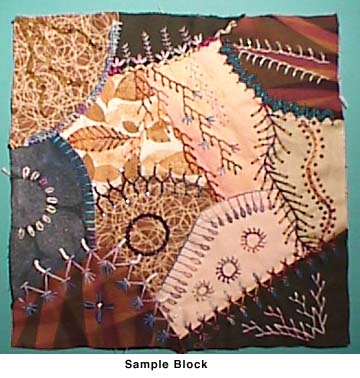
This lesson introduces you to the art of making Crazy Quilts (CQ's). CQ's
originally appeared in the mid 1880's and have made a great resurgence
100 years later.
Materials Needed
Getting Started
If you've done patchwork or counted thread embroidery, throw most of
what you know in the corner for now. There are no rules here, only creative
flaws. It doesn't matter what the back of your block looks like, and it's
ok if your stitches aren't all the same size or going in the same direction.
No Inhibitions!
First we will construct a crazy quilt block on which to embroider. Make
a little cut every 12" along one selvage of your muslin. Rip along
the crosswise grain, giving you three strips each 12" wide by about
44" long. Now rip the selvages off of the strips. Measure 12"
intervals along the long edge of the strips, cut and rip. This will yield
you 9 12" x12" squares of muslin (plus some left over pieces)
all ripped on the straight of grain. Iron one block to start with, mark
one side with the measurement of your block 12" and now
you are ready to begin. (You'll have to read to the end to find out why
we mark the blocks!)
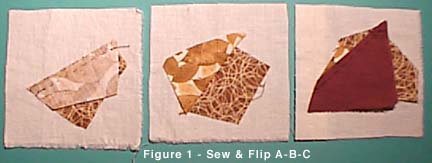
Figure 1 (a-c)
There are two methods commonly used to construct a CQ (crazy patch)
block. The first is known as sew & flip. Begin by placing a fabric
scrap somewhere on your muslin, right side up. Cut a piece of another fabric
and place wrong side down over the first fabric, lining up one edge. The
fabric pieces do not have to be the same size or shape, just have one common
edge. Sew along this one edge, about a 1/4", through both fabric layers
and the muslin. Now flip the top fabric over to its' right side. Cut a
third piece of fabric with one edge long enough to cover the first two
pieces, lay it right side down, sew, and flip. Continue until you have
covered the whole muslin. Sew and flip can be done by machine or hand.
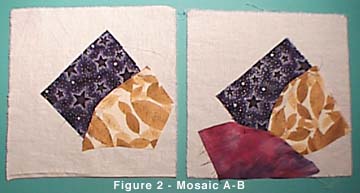
Figure 2 (a-b)
The second method I call mosaic. I feel this gives a more old-fashioned
and intriguing look to your quilt. Begin by placing a scrap on the muslin,
face up. Cut a second fabric with a curved or shaped edge. Place it right
side up along one edge of the first fabric, covering one raw edge of the
first piece with the second piece. Finger press the shaped edge of the
second piece and baste in place. ( I know this sounds like the Marx Bros.'
"Sanity Claus" routine). Continue covering the muslin in this
manner.
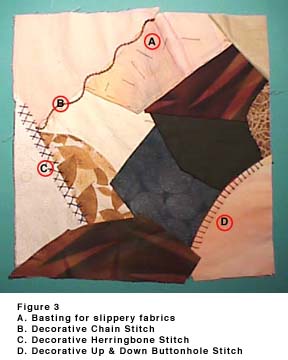
Figure 3
Embroidery (this is the fun part)
Each seam is covered with stitches in a crazy quilt. I want to emphasize
that this is not an exact science. Your stitches reflect your personality,
how agile your fingers are, and generally what kind of a day you've had.
I thrive in chaos and my stitches reflect that. Yours may be neat and ordered;
whatever you do, do what pleases you. Experimentation is an important part
of making your crazy quilt.
As you can see, I stitch far better than I draw. Some needles are drawn
extra heavy to emphasize where the thread is in relation to the needle.
In most stitches, the working thread is under the needle.
With Watercolours, Impressions, and Wildflowers, use the #1 or #3 embroidery
needle. If you are using 2-3 strands of Waterlilies, use the #9 embroidery
needle. To add Rachel, use the #18 Chenille.
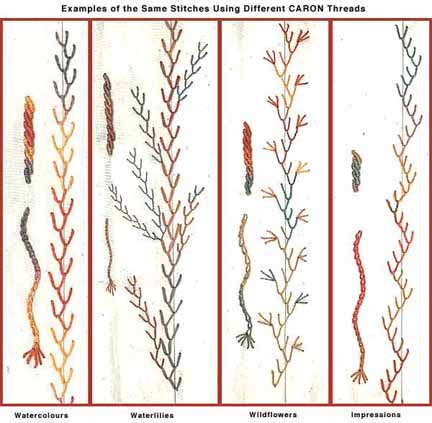
Try the stitches with various threads to get
the feel for different effects you can achieve. Below are a few stitches
you can begin experimenting with. Come back next month for Part II for
more stitch diagrams plus instructions on how to make a full size quilt.
The Stitches
Note: Since so many of the stitches begin with "come up at A, down
at B, up at C" I will use A-B-C as a standard instruction where applicable.
Chain Stitch
A-B-C. Needle is over the thread. Pull the needle through until you
have formed a chain link. The longer the distance between B and C, the
narrower your stitch will be. About 1/8" is ideal. To continue, insert
the needle inside the chain, as shown, and make second stitch. Do a chain
stitch in 2 strands of Wildflowers, and then in 1 strand of Waterlilies
to see the difference the size of a thread makes.
Buttonhole (or Blanket) Stitch
A-B-C. Needle is over the thread. Spacing from A to B is about 3/8"
diagonally. I am right-handed so I mostly work from the left side of the
seam toward the right side. If you are left handed, it may be easier to
work in the opposite direction. To continue, repeat the first step. As
a variation, alternate the size of the "legs" of the stitch.
It is also pretty worked in a circle. The 3 buttonhole circles worked on
the sample are two strands of Wildflowers.
Up and Down Buttonhole Stitch
A-B-C. Begin the same way as you did for the buttonhole. After you have
pulled the needle all the way through at C, move the working thread so
it lays above your stitches, as shown. Insert the needle at D, and come
out at E. The needle is over the thread. As you pull the needle through,
it is facing away from you. Once it is through, continue pulling the needle
toward you. The thread will slide down the stitch to form a little loop
around the bottom of the stitch. A swag effect is created along the bottom.
Feather Stitch
Here is one of the countless variations of featherstitch.
A-B-C. This forms a U or V shape. Make another stitch, moving slightly
to the right. The third stitch moves to the left. This will require you
to turn your wrist. Be sure that your thread is always under your needle.
As a variation, make multiple stitches in each direction. On the sample,
featherstitch is worked in Watercolours and Waterlilies.
Fern Stitch
The fern stitch is nothing more than a series of straight stitches.
A-B-C. Note that the stitch is worked from the top of a seam down; A to
B is a backstitch. The center leg is always worked as a backstitch, then
the side legs come back to the center (A). Once you've completed the D-A
stitch, bring your needle up at E, and backstitch into the preceding stitch.
The centers always connect, and the legs on either side fan out. This stitch
can be worked straight on a seam, or meandered over a patch. On the sample,
fern stitch is worked in a single strand of Waterlilies.
Cick here for Part II of this class.
For more information about Leslie Levison's classes (listed below) please
contact her at: [email protected]
Dragonflies and Bellydancers - Introduction to Crazy Quilts,
stitches and beadwork.
When the Stitch Hits the Fan - Additional stitches, intro to
ribbon flowers, beaded wire flowers, and Brazillian embroidery techniques.
Patience is a Virtue - Concentrates on large embroidery and beadwork
motifs.
Step into My Parlor - Finishing techniques for Crazy Quilts
The Tattooed Mermaid - 45-minute Trunk show featuring 15 Quilts
and accompanying stories
Time for a Garage Sale - What happens when your fabrics stop
speaking to you? Features 3 crazy quilts and 10 sketches in patchwork.
Leslie currently teaches regularly scheduled classes at the City Quilter
in New York City, NY and at Sew Brooklyn, Brooklyn, NY.
COPYRIGHT NOTICE: No part of these instructions nor the included designs/charts
can be reproduced or distributed in any form (including electronic) or
used as a teaching tool without the prior written permission of Leslie
Levison. One time reproduction privileges provided to our web site visitors
for and limited to personal use only.