| Dyed and Gone to Heaven – An Online Magazine and Needlework Resource |
|
 |
We bring back a past favorite to be presented in 3 parts
Small Treasures Box - Part I
by Sandra Resnick
One way to test whether a project is a good one to use for teaching kids is to use the oooh factor. When I went around the elementary school where we were going to teach an after school needlecraft class to drum up students, I showed them some of the projects we could be working on. This particular project not only prompted entire classrooms to erupt in oohs but it actually was responsible for motivating kids to sign up.
Another way to test whether a project is a good one to use for teaching kids is to see how many of the kids actually finish the project. Not only did almost every kid finish this project but some kids made two and a couple kids made three boxes.
Volunteers from the St. Paul Needleworkers chapter of the Embroiderer's Guild of America and the Needleworker Guild of Minnesota helped me teach classes after school last year at both a Minneapolis public elementary and middle school. We had a lot of fun and we learned a lot about coming absolutely prepared since we had about 45 minutes of classroom time to work with. We also discovered that one stitching adult for every 4 stitching kids was a good ratio. Many thanks to all the people who donated their time and materials to this effort with special thanks to fellow teachers, Pat Philip and Linda Wyszynkski.
This box is one of the projects we designed for these classes. Since members from both guilds and various vendors including the Caron Company donated materials, we found ourselves designing by donation. That is, we had to come up with designs that used what was donated. We had enough Caron Watercolors thread and plastic canvas to make these boxes and they were a big success.
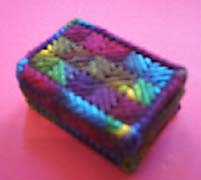
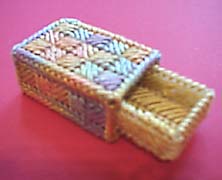
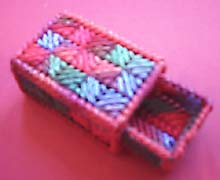
This box is small, 1 by 1 3/4 by 2 1/2 inches. It has a drawer that pulls out like a matchbox for keeping special treasures. It is made by stitching small separate pieces of plastic canvas and then stitching the pieces together to make an outside box cover and an inside drawer.
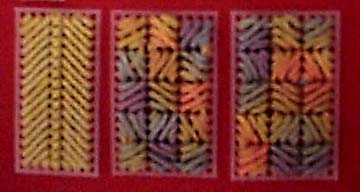
There are three ways to use Caron threads to make this box. First, you can stitch it all in one color (Variation 1). Second, you can stitch the outside in one color and the inside drawer in a complementary color (Variation 2). Third, you can stitch the outside and the inside drawer in one color and bind it together using a complementary color (Variation 3). Here are pictures of all three ways.
If you make this box, you may find yourself in the same predicament that some of our students did. They wanted to keep it for themselves but had made it for someone else so they had to make another one.
What you will need:
Watercolors Thread: either two skeins of one color, or two complementary skeins
Scissors for cutting thread
Scissors for cutting plastic canvas
Plastic canvas: one sheet of 7-count (this is enough to make more than one box)
Tapestry needle size 16
Step 1 - Cutting out the plastic canvas pieces
Cut the plastic canvas carefully into the following pieces using your scissors. Don't use the same scissors for cutting the plastic canvas that you will use to cut your threads. Cutting plastic canvas is hard on your scissors and you want to save your stitching scissors for cutting thread. After this, you can use your stitching scissors.
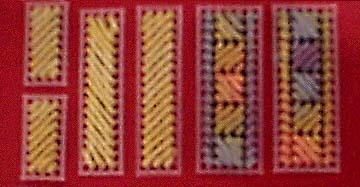
You should have nine pieces for each box. Be careful to trim off the spikes so your pieces are pretty smooth.
Outside box cover
Top and bottom - cut two pieces 11 by 17 bars
Outside sides - cut two pieces 7 by 17 bars
Inside box drawer
Bottom - cut one piece 9 by 17 bars
Inside short sides - cut two pieces 5 by 9 bars
Inside long sides - cut two pieces 5 by 17 barsBelow are what the stitched pieces look like before you assemble them.
- Step 2 - Making the top and bottom of the outside of the box
Decide on variation 1, 2 or 3. Stitch the separate pieces using one strand of Caron Watercolors thread. If you follow the stitching charts below, you will have a box that looks nice on the front and the back also.
Thread one strand of Caron Watercolors thread into your size 16 tapestry needle. Use a piece of thread that is about 36 inches long. Leave about four inches hanging on the short side and when you pull the thread through the holes, hold the needle at the eye where the thread is doubled so that the thread doesn't come out of the needle.
To start a new thread the first time, count down to the third hole from the top on the right edge of the piece of plastic canvas you cut out for the top of the outside box. (See diagram A for starting point) Bring your needle up in that hole. Look at the diagram and notice that hole matches the diagram dot marked 1. Pull the thread through the hole but leave a short piece of thread (like an inch long) on the back side of the plastic canvas and hold onto it with your other hand (the one that doesn't have the needle in it). As you make the first four or five stitches, make sure that the loose end you are holding with your other hand on the back side is covered by your new stitches. Try to cover all that loose end up with your new stitches.
You should have come up with your needle from underneath the plastic canvas where the dot is numbered 1. Now, go down from the front to the back where the arrow is numbered 2. Then come up at 3 and go down at 4, and keep going until you have about 3 inches left of your thread or you are done with that piece of plastic canvas. When you are done with a thread, make sure your thread is now coming out of the back of the piece, and run the thread underneath in the back about 6 or 7 stitches so that it doesn't come loose later and then carefully cut off the extra thread.
Don't pull too tightly when you stitch but pull tightly enough so that the thread is not floppy loose on the front. You can use the pointer finger of your other hand to hold onto the last stitch you make so it doesn't get loose as you make the next stitch.
Notice that you always come up from the bottom at the odd numbers on the diagram and you always go down from the top at the even numbers on the diagram. Also notice that some stitches share the same hole, like 10 and 12 and some holes are shared four times, like the hole for stitches 6, 16, 85, and 95. See diagram A.
You are making a pattern of little squares of 5 stitches, each square going in opposite directions from the one next to it. This stitch is called the Alternating Scotch Stitch.
Try not to end a thread in the middle of a little square. Try to end a thread after you finish a little square even if you have a little extra thread left over. This makes your colors come out nicer.
When you get to stitch 50, stitch 51 is below it on the next line. To make the back look nicer, while your thread is on the back of the plastic canvas, slip it under the two stitches you must go by on your way to stitch 51. The same thing happens when you get to stitch 100 and 101. See diagram A.
End your thread after your last stitch and then make another piece just like this one.
Now you have the top and bottom of the outside of your box stitched.
Step 3 - Making the sides of the outside of the box
Follow the stitching diagram below and stitch two outside sides. Start and stop your thread the same way as you did before. See diagram B.
COPYRIGHT NOTICE: This pattern/chart is provided for our visitors use only. None of these designs or instructions can be reproduced or distributed in any form (including electronic) without the prior written permission of Sandy Resnick.
COPYRIGHT NOTICE: No part of these instructions/project nor the included diagrams/illustrations can be reproduced or distributed in any form (including electronic) or used as a teaching tool without the prior written permission of the CARON Collection Ltd. One time reproduction privileges provided to our web site visitors for and limited to personal use only.
© 1999 The Caron Collection / Voice: (203) 381-9999, Fax: 203 381-9003
CARON email: mail@caron-net.com