© 1998 Martina Weber/Châtelaine
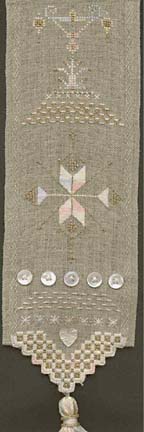
Materials for "Misty Day"
One piece of naturally dark coloured linen banding, approx. 13"
long and 4" wide.
(for example Vaupel & Heilenbeck banding ) with 25 threads per inch
Caron Watercolours # 124 Sunglow
Caron Waterlilies # 124 Sunglow
Kreinik Very Fine Braid # 4 col.: 202 HL
MillHill Glass Treasures # 12214 pink heart
Mill Hill Seed Beads # 275
MillHill Petite Beads # 40557
5 old mother-of-pearl shirt buttons
Click here for CHARTS for Misty Day
INSTRUCTIONS
Start with the hemming of the upper seam sew the seam as invisibly
as possible by only taking one thread from the "right" side
so it will not show on the front.
Then carefully count the threads of your linen band to find the center
and begin with
Band 1
Start by stitching the buttonhole edge of the Hardanger lace (Band 1)
Stitch from the center to the left or right side first, then go to the
other side using one strand of the Watercolours . When the buttonhole edge
is completed, stitch the Kloster blocks ( groups of five satin stitches
over four fabric threads). After this step do the backstitching in gold:
Stitch straight stitches over four threads in each indicated free space
using Kreinik Braid # 4.
Cutting:
Carefully cut around the bottom edge of the buttonhole stitches with
a very sharp pair of scissors.(See chart for dotted line) Leave a little
bit of fabric uncut on the left and right side, so you can bend it to the
wrong side and tack it down there with tiny stitches for a neat look.
You can now sew on the beads or leave them for the last step important
is only that you take a very small beading needle and a thread which mathces
the colour of the fabric, preferably a synthetic thread, as it is not as
prone to breaking as cotton.Put a small amount of beads on a piece of double
sided sticky tape or some corrugated paper so they do not escape
so fast.Then stitch the beads on following the chart with a slanted stitch
over two threads like a half cross stitch.
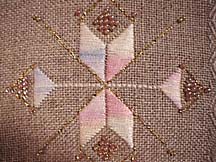
Band 2
Now stitch the stars with two strands of Waterlilies silk. Please pull
out the single strands first and re-unite them then again so you will
achieve the best lustre of the stitched silk. Finish each star as you go
doing the "+" first and then the "X". Add the
beads as you go or leave them till you finish.
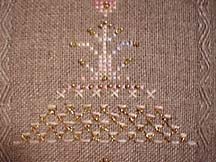
Band 3
Stitch straight stitches over four threads with one strand of Watercolours,
leaving a free space of four threads between the stitches. Follow the drawing
in the chart for placement.
Then thread your needle with the golden braid and, coming from the wrong
side wind in a wave-like manner between the stitches of the first and then
all following rows.The needle with the golden thread does only go through
to the wrong side at each end and beginning of a row.
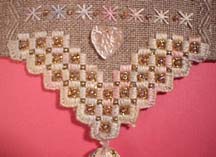
Band 4
Sew on the old Mother of Pearl buttons, using one strand of Watercolours.
Sew a cross in the center of each button, if it has four holes if
not use a simple straight stitch.
Band 5
Stitch the satin stitch ornament with three strands of Waterlilies Again
strand the plies carefully and reunite them so you will have very
smooth stitches where the single strands lie as parallel as possible
this gives the real "satin" effect!
Stitch the large golden "X" and the backstitched shapes with
the golden braid. Add the beads following the placement on the chart.
Band 6
Stitch rows of straight stitches over four threads, as in Band 3
then add large cross stitches over four threads with the gold braid.
Band 7
Again stitch a row of cross stitches over four threads, but now use
Waterlilies silk (two strands)
Band 8
Stitch the cross stitch ornament (separate sheet) using two strands
of Waterlilies silk and finishing each cross as you go. Finally add the
beads.
Finishing instructions:
Now carefully iron your embroidery with the right side down in a soft
towel with medium heat.Sew on the Mill Hill Glass treasure on the indicated
place by coming up from the wrong side, going through the heart, stringing
on one petite golden bead, going down the hole in the heart and stitching
through to the wrong side again. Repeat this sewing through one time for
enforced strength.
You can add now a tassel at the bottom center (if you finish this piece
as a bell pull) or in the center of the bottom folding edge (if you finish
it as a little pouch)
For a pouch fold the piece of linen in a manner that the Hardanger tip
will be the flap and the cross stitch ornament is the front side . Sew
the sides together with tiny stitches.
To make the tassel wind all remnants of yarn (silk, cotton and gold)
around a piece of stiff cardboard (about 3" high). Make this tassel
as generous as you like. Pull a thread through the loops at the upper edge
of the cardboard and knot tightly. Take the loops from the cardboard and
bind tightly together approximately 1/3 inch from the top using a strong
thread of your choice. Knot the end and pull it into the tassel with a
needle. Cut the loops and trim with a sharp pair of scissors.
As a variation, string on some beads and fasten them at the head of
the tassel .
Voilá! - your self stitched treasure is ready now: as a gift
or to keep, for a powder compact , a lipstick or handkerchiefs or maybe
even for a bride's necessaire ?
I strive to publish my designs without mistakes, however, human and
mechanical errors are possible. I invite your comments!
Your Châtelaine
The following designs are available:
"Spring"(Frühling)CHAT 001, "Summer" (Sommer)CHAT 002, "Autumn" (Herbst)CHAT 003, "Winter" (Winter) CHAT 004 and "Weihnachten" (Christmas) CHAT 005
"Country Kitchen"(x-stitch) CHAT 006 "Flamiongo
Elegance" CHAT 007
