"Imagination is more
important than knowledge, for knowledge is limited while imagination embraces
the entire world."
Albert Einstein
Are you envious of creative people? Do you wish you could come up with
clever ways of making your needlework unique and exciting? There's good
news -- no one has an exclusive on creativity. Everyone -- yes, that includes
you -- is creative.
Perhaps inventive ideas are buried more deeply in some people than in
others, but there are ways to coax them from even the deepest recesses.
I grew to adulthood believing that I had no imagination and no artistic
ability, in large part due to a grammar school art teacher who laughed
at me when I said I wanted to grow up to be a fashion designer. It was
another twenty years before I would even consider trying anything to do
with art. Even then I was still immensely shy and terrified of asking questions,
so my early attempts at needlework and needlepoint design were made on
my own by trial and error. Gradually, I learned to observe, to trust my
intuition and, finally, to accept the suggestions and criticisms of others.
As a result, I have gained a self confidence which has stood me in good
stead in all areas of my life and I have built a successful business based
on creativity.
PRACTICE, PLANNING and ATTITUDE are three elements that can help you
develop your innovative abilities. Attitude is by far the most important. The need for approval is a part of all of us, but fear of failure, the
desire to be right most of the time and a reluctance to take risks are
the greatest roadblocks to learning and development. I think this is why
so many of us feel that we must follow a purchased pattern to the letter,
doing things exactly the way the designer has instructed. Have you ever
considered that the designer had to make a number of choices? For the sake
of clarity and space, most patterns do not give alternatives, even though
lots of equally good color combinations or stitching possibilities exist
for a particular design. Once we learn to give a fair chance to all our
thoughts, new avenues open up almost magically.
You, as a stitcher, have the freedom to make choices and a solid grounding
in good technique will help you, but a willingness to stretch beyond what
you know is just as important.
PRACTICE
We'll discuss three ways of adding interest to needlework: pattern,
texture and color. You've heard of all of these things before. Hopefully,
we'll be approaching them from a slightly different angle.
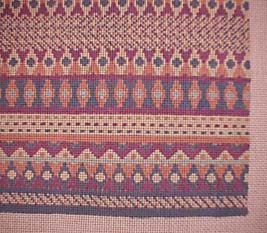
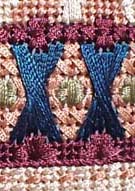
PATTERN. We will deal here with just one small segment of pattern
-- diaper patterns, small all-over repeat patterns.
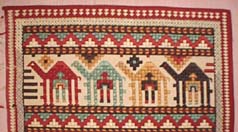
1) Rather than accept what someone else tells you you should
see, look for yourself. How many patterns, for instance, do you see in
the motif below? Experiment a bit on your own, then click on the picture
for some possibilities we've come up with.
You can practice this exercise almost everywhere you go and sometimes
turn frustration and boredom into fun, as well. I was once kept waiting
interminably for an appointment, but at last I noticed the interesting
tile work on the floor and started sketching ideas. Suddenly, time flew.
2) Build your own patterns. Start with a simple cross (+ or x)
and let your imagination run wild. Scale, spacing, additions, deletions
-- all these factors will change your patterns in innumerable ways. For
example:
 ----
----
For more ideas and exercises, refer back to our Archives for a review
of the article, "Are You Caught in Design Gridlock?"
TEXTURE is created by stitches and fibers.
Stitches. It is sometimes tempting to use an array of stitches.
This is fine for a sampler or a piece of crazy patchwork and you may impress
people with your knowledge and skill, but indiscriminate use of stitches
may actually detract from your design. Stitches can, and often do, create
the entire interest in a piece of needlework, but to be effective they
should relate to the design and to one another. If in doubt, remember less
is more. Just like weight, it's easier to add than to take away.
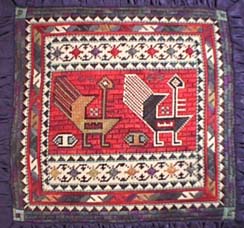
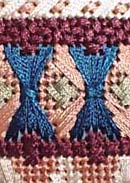
Don't always feel that you must rely on books for stitch instructions.
If you have a space to fill, fashion your stitches to suit what you are
doing. In the following example each half of the design is a mirror image
of the other but the spaces have been interpreted in different stitch configurations.
Threads. Today, there is an overwhelming array of threads, including
ours, to choose from in executing your embroideries. No pun intended, but
that's exactly what can happen with overkill! Be judicious in selecting
threads. A hand-dyed variegated thread can add extra punch, but if it overtakes
the design, it's not the right choice for that particular project. Likewise
with metallics. It's quite possible to stitch an entire design in metallics
for a smashing or elegant effect, but it's just as easy to end up with
a glitzy mess.
Be careful in your selection of varieties of threads. Too many different
textures vie for attention and confuse the viewer.
Don't be afraid to use unorthodox materials. Be sure whatever materials
you use won't harm your embroidery, however. Certain seeds, for instance,
might stain the fabric and the other threads and deteriorate over time,
but beads might achieve much the same effect or you can find a fiber to
simulate the look of beads (or seeds), and so on. The materials you use
don't need to be exotic to capture attention. Have you ever considered
using twine or crochet cotton instead of more traditional threads?
Do be sure to consider the ultimate use of your project and how long
you expect it to last. For instance, nubby knitting yarns worked in big,
textured stitches on a chair seat or rug probably won't hold up for long.
If you expect your work to end up in a museum for posterity, choose materials
which are likely to be colorfast and stand up to the vagaries of time.
Look for more than one way to create the same effect and select the
most exciting, the most effective or the most practical. Take into consideration
durability and suitability of materials, but don't cheat yourself by restricting
your use of fibers simply because "It's always been done that way."
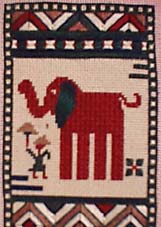
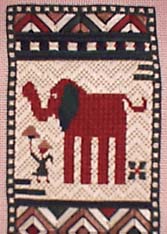
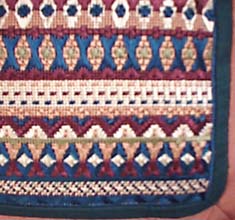
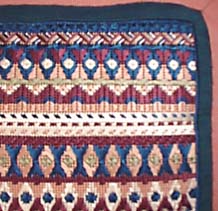
The following examples are from a series of related designs, all with
the same color theme. Each has been stitched with different materials and
stitches.
 ---
---
COLOR. We plan to add to the volumes which have been written
on this subject by devoting an entire month of our website to the delights
of color. Until then, here are a few observations.
1) If you're developing a color theme for a piece of needlework,
or changing the one offered by the designer, follow your initial intuition
even if it looks like it won't work while in progress. This is scary, and
sometimes the end result is awful. More often, though, it's even better
than you originally thought it would be.
I am frequently told that my sense of color is one of my strongest assets.
This hasn't always been so and I owe much of my development to countless
customers who have asked me to change the colors in my designs to ones
of their own choosing. I can't tell you how often I resisted, only to find
out that the new combination was better than my original.
Here are two ways to play with color and gain confidence:
a) from your bag of scrap yarns select two colors at random and make
them work in a pleasing pattern. Doodling with whatever threads happen
to be handy to try out a stitch or a technique or a pattern can lead to
many startling and pleasant color experiences.
b) select the two colors you hate the most together and do something
smashing with them. This may seem nearly impossible, but I've seen dozens
of students despite their initial groans do exactly that.
2) Even though you may end up with 25-30 different shades of
yarns in a complicated piece, try to limit the actual number of color families
to three to five which will predominate. For instance, you may want mostly
blues, corals and creamy colors in your design. Put these colors in the
major areas of interest.
3) Balance
the distribution of color. After the major color areas have been determined,
add touches of other colors or shades throughout. Color distribution doesn't
need to be symmetrical, but should be pleasing to the eye.
4) When you
want two colors together and they don't seem to work because they clash
or are too close in value, add another color to separate them and see the
immediate difference. For example the addition of an ivory colored outline
will make a distinct difference between red and burgundy or teal and navy.
5) You can
change the intensity of color by adding pattern or texture. A tone on tone
might give your design just the subtlety it needs. If a solid patch of
color stands out glaringly, try using a variegated thread such as Watercolours
or Waterlilies, or add a small all over pattern in white or a pastel to
soften the effect.
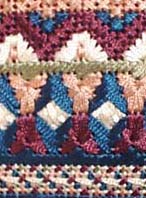
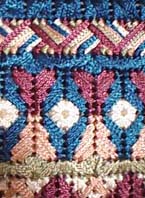
In the example below, each of the strategies we've
discussed has been put into practice.
Pattern
Pattern has been used tin the background to create
interest.
Texture
Both stitches and choice of threads enhance the
pattern. The flowers are stitched entirely in needlepoint with Watercolours.
The pattern in the background and borders are interpreted in stitchery.
Only two threads are used in the entire design Watercolours cotton
and Waterlilies silk. The light reflective qualities of the silk add dimension
without overpowering the design.
Color
The background colors are kept subtle, so as not
to detract from the focal point of the design, the flowers.

COPYRIGHT NOTICE: No part of this feature story nor the included designs/charts
can be reproduced or distributed in any form (including electronic) or
used as a teaching tool without the prior written permission of the CARON
Collection Ltd. or the featured designers. One time reproduction privileges
provided to our web site visitors for and limited to personal use only

 ----
----
 ---
---
 ---
---