Back
to Designer Spotlight Page
from a Series of Elegant Eggs
General Instructions
Read through the entire stitching instructions section before
beginning to stitch. The numbers on the instructions correspond
to the numbers on the canvas outline and the figures showing
the stitch details on the first page of charts and diagrams to
be printed out.
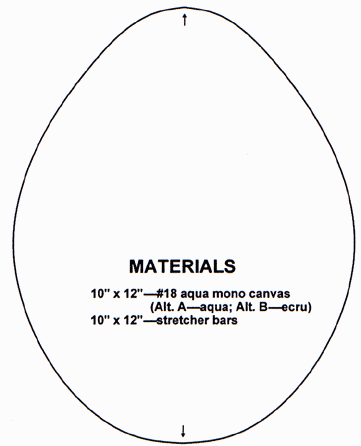
Secure the canvas to stretcher bars. Print out the page showing
the Egg Outline and Materials needed. Trace the egg outline on
the canvas using a Nepo Canvas Marker. Measure or count and then
mark the center of the design at the top and bottom of the egg
(see arrows on the egg outline).
Use a laying tool when stitching with Neon Rays or Floss.
Stitching Instructions
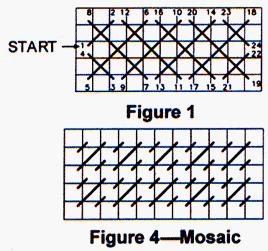
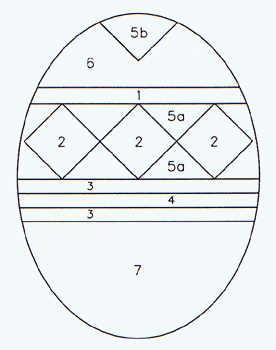
1. At the top center of the egg, count down 26 threads of
the canvas. On this canvas row, move all the way to the left
of the egg outline. This is the starting point for the stitch
in Figure 1 (on first page of diagrams to print out). Fill Area
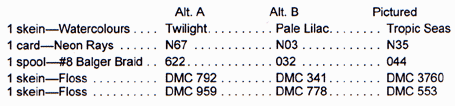
# 1 on the map, using Neon Rays (N35).
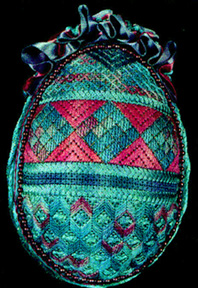
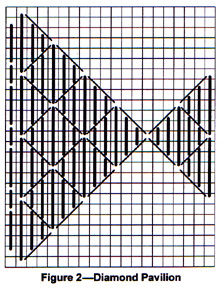
2. All Areas marked # 2 on the map (three large diamonds)
are filled with the Diamond Pavilion stitch using a single strand
of Watercolours, Tropic Seas. Each large diamond area contains
four diagonal rows of the stitch pattern (best seen on the photo
image of the completed egg). See Figure 2 on first page of diagrams.
Center the diamonds below the first row of stitches by counting
to find the center of the design, then starting the center diamond
in the middle of the Diamond Pavilion stitch. Place an equal
number of stitches on each side of the center to make sure the
egg will be symmetrical when complete.
3. Both #3 Areas are filled with the same stitch as in Area
# 1 using Neon Rays (N35). The top of the stitches in Area #
3 will share holes with the bottom of the diamond patterns. There
are four open rows of canvas (Area # 4) between the two # 3 Areas.
4. Area # 4 is filled with two rows of Mosaic Stitch shown
in Figure 4 on first page of diagrams. Use 4 strands of Floss
(DMC 3760).
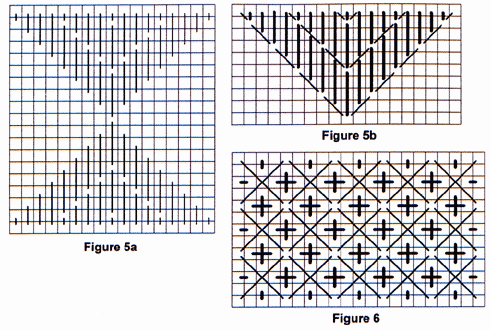
5. Fill in around all the large diamonds (# 5a on the map,
on the 2nd page of diagrams to print out) with vertical long
stitches in the "stairstep" pattern shown in Figure
5a. The long stitches are over four rows of canvas. Use five
strands of Floss (DMC 553). Separate the strands, then put back
together; use a laying tool for nice smooth stitches. Repeat
the long stitch pattern shown in Figure 5a to fill the "V-shaped"
Area 5b at the very top of the egg. Use five strands of Floss
(DMC 3760) and make sure the center of the "V" is centered
on the diamond directly below it.
6. Fill in Area #6 with the stitch shown in Figure 6 on the
2nd page of diagrams. This area will look better if you turn
the canvas upside down and start the first row so it shares canvas
holes with the long stitches in Area # 1. Use Watercolours, Tropic
Seas, for the "X's" and the Balger Braid (044) for
the "+'s."
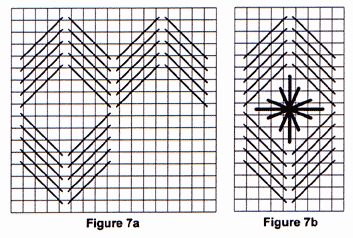
7. Fill in Area # 7 with the stitch shown in Figure 7a on
the 2nd page of diagrams, using Watercolours, Tropic Seas. Stitch
five diagonal long stitches (over 4) in a vertical line first,
covering the back of the canvas by "wrapping" the stitches
to get to the next row. Then go on to the next set of five stitches
without carrying the fiber across the open areas left by the
stitch pattern. The open areas are filled in with the "triple
cross" pattern shown in Figure 7b, using Neon Rays (N35).
It doesn't matter which sequence you use to place the stitches
of the cross, but be sure to always use the same sequence so
the final stitch is going the same direction on all crosses.
8. Outline the Diamond Pavilion pattern of Area # 2 using
Balger Braid (044). See light lines on Figure 2 on first page
of diagrams.
9. Outline Chevron Pattern in Area 5b with Balger Braid (044).
See light lines on Figure 5b on 2nd page of diagrams.
Additional Julie Sackett Designs:
A Series of Elegant Eggs - Mosaic, Florentine, Moorish, Maltese
Christmas Ornaments - D'Elegance, The Jewel, Bows, Imperial
Pillows - Four Corners, Painted Desert, Prescott
Julie Sackett's Designs are distributed to needlework retailers
through
Quail Run Designs
©2000 Julie Sackett
(Permission
to reproduce this has been granted by Julie Sackett for personal use only. These charts cannot be reproduced,
electronically or otherwise, or sold without the express written
permission of Julie Sackett . To do so
is a violation of the copyright laws)
