STITCHING THE DESIGN
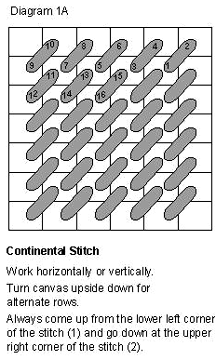
Step 1. Continental Stitch. Symbol on Chart: O
With two plies of Watercolours, stitch the outermost square
outline in Continental Stitch. This is the opposite of half-cross.
Instead of working from left to right, you should work from right
to left. Start with an away waste knot and begin stitching at
the top right corner and work across the top, skipping seven
stitches in the middle to allow for the diamond shape, then down
the left side. Turn trhe canvas upside down to complete the bottom
and the right side.
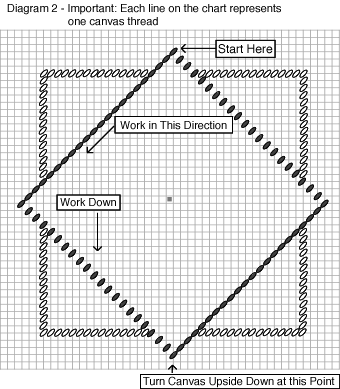
Step 2. Outlining with Diagonal Continental Stitch. Symbol
on Chart:
With three strands of Wildflowers, start stitching the diamond
shape at the top point. Work toward the left. Your stitches will
look like backstitches in a cross stitch design. When you start
doing the stitches on the descending side of the diamond, your
stitches will look as if they are spaced too far apart. Don't
worry. Subsequent rows will fill in the blank areas and the design
will look alright. When you reach the bottom of the diamond,
turn your canvas upside down to complete the other half of the
diamond. Then return your canvas to its original position again.
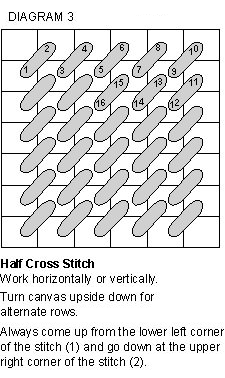
Step 3. Continental Stitch. Symbol on Chart: V
With two strands of Impressions, stitch the inner square border
line. Optional: if you want to see the difference between
half cross and continental stitch, this would be a good place
to practice. To do half cross, work your needlepoint stitches
from the left top corner to the right. See Diagram 3 below.
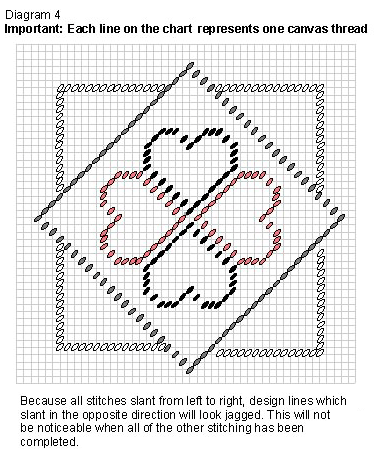
Step 4. Outlinining an Irregular Shape. Symbol on Chart:
Stitch the outlines of the heart shaped petals of the flower
with two plies of Watercolours. Separate all three plies and
put two back together again. Save the extra ply to put with another
"orphan".
It is easiest to start at the pointed end of one petal and
stitch all around that petal, following the chart. You will need
to decide when to hold the canvas upright and when to turn it
upside down. Be sure never to turn the canvas one-quarter turn
or your stitches will end up doing in opposite directions. Note
how parts of the outline will look smooth and others jagged.
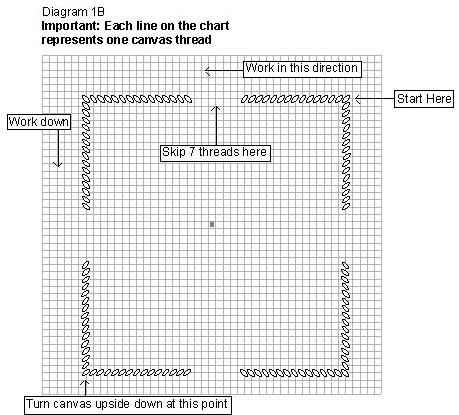
Step 5. Multiple Rows of Continental Stitch. Symbol on
Chart: blank
Fill in the narrow border created by the two single lines
you've already stitched. Use six plies of Waterlilies and work
the Continental Stitch. "Strip" the Waterlilies just
as you would floss. Separate all the plies and put six of them
back together smoothly. Start at the upper right corner and work
across the row until you meet the diamond outline. to stitch
the next row, turn your canvas upside down, referring to the
master chart for placement. Never turn the canvas only one-quarter
turn. This will result in stitches that face at angles to
one another.
If you have chosen to work with a variegated thread that has
a lot of contrast in color, you will find that continental stitch
forms stripes of color. Unless you wish to achieve this effect
intentionally, for a sunset or water for instance, this stitch
is not a good choice to use for large areas of needlepoint when
stitching with multi-colored threads.
We will include a more complete discussion of the merits of
half-cross, continental and basketweave stitches at the end of
Part II.
We will continue this lesson next month, learning how to
do basketweave in nearly any situation.
NOTES
1. This design may be stitched on other sizes of canvas,
but 13 or 14 is the easiest to work with if you are a beginner.
2. Before starting the stitching, mark the center of the canvas.
Then mount it on a frame with thumbtacks. Artists stretcher bars,
available in most art stores, or special lightweight frames made
for needlework, or roller frames, are all suitable. Hoops do
not work well since the canvas is stiffened with sizing and is
not flexible like fabric. Keep the canvas taut.
3. Mark the TOP of your canvas with a permanent marker. It is
important to keep your canvas upright unless otherwise directed
to ensure that your stitches will always face in the same direction.
If you have a piece of canvas with a selvedge, be sure that it
is on the left when you mark the top. You will see the importance
of this in Part II when we discuss basketweave.
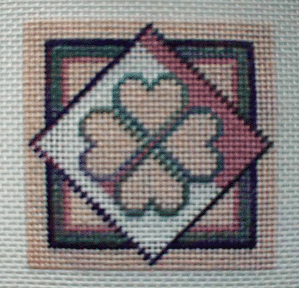
4. On the stitched model,illustrated here, not all of the background
in the diamond shape has been stitched. See Part II, Section
6 for an explanation.
4. This same design can also be used to practice decorative stitches
once you have mastered the basics of needlepoint.
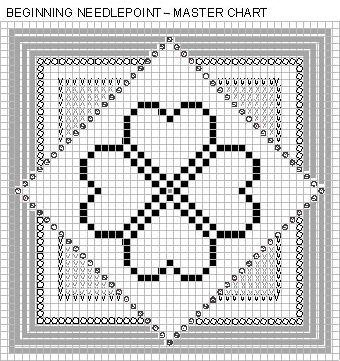
5. IMPORTANT! The symbols on the master chart represent different
steps of working the design, not different colors or threads.
You may choose whatever threads or colors you wish for each part
of the design. The Materials list above indicates what we have
used in the model. In the Instructions which follow, we will
tell you which thread we have used in our model for each step.