Make this lovely and fairly simple, yet very practical, Potholder Scissors Holder as a gift for your mom for Mother's
Day and you'll surely surprise her! It will let her know
how very much she means to you and how much you appreciate everything
she does for you. Each and every time she reaches for her scissors,
she will be reminded of your love for her and it will make her
smile. This is truly a gift that will keep giving and giving
and giving just like the Duracell Bunny keeps going and
going and going!
Materials needed:
1. 1 Potholder in a solid color fabric,
in a square shape and with the loop of the
potholder attached at a corner
2. 1 pair Scissors
3. Sewing thread to match the color of the Potholder
4. Needle for sewing thread
5. Watercolours Thread in your choice of 2 or 3 different colors
about 1 yard of each color
6. Needle, which 1 strand (1 ply) of Watercolours thread will
fit through
7. Straight pins
Instructions:
Position of Potholder to Begin Project
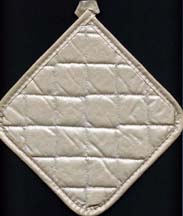
Step 1. Place the potholder, good side up, on a flat surface,
with the loop at the top, so that the potholder has a diamond
shape, rather than a square shape, when looking down at it.
Step 2. Take the left hand corner of the potholder and fold
it over toward the center of the potholder. Pretend there is
an imaginary line going straight down the center of the diamond
shape from the loop at the top to the bottom corner. Fold over
the left corner of the potholder so that it is even with this
imaginary line running from top to bottom.
Step 3. Pin the folded over fabric of the potholder a few
inches in from the edge to hold it in place.
Step 4. Repeat Step 2 (but in reverse) folding over the right
corner of the potholder toward the center, until it lines up
with the imaginary line from the top loop of the potholder to
the bottom corner. Butt the edge of the right side of the potholder
up against the edge of the potholder from the left side. Pin
the right side in place. (If the sides don't match up evenly,
take out the pins and readjust them as necessary.)
Step 5. Once both sides are in place, check that they are
both pretty even. DO NOT overlap the edges of one side over the
other, but just pin them together so they both meet in a line
down the center. This should result in a cone shaped "pocket"
or "pouch," with the pointy end at the bottom and the
loop of the potholder at the top.

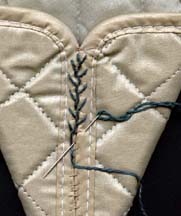
Potholder Folded and Stitched
Step 6. Thread your smaller needle with the sewing thread
and beginning at the top of the pocket (the wider part), sew
the 2 edges of the potholder together. Double up the thread so
that it will hold the 2 sides together securely. Be sure NOT
to stitch through the back of the potholder. You want to
stitch through ONLY the two folded over pieces, making
up the front of the "pocket" to join them together.
Continue sewing the 2 sides together until you reach the bottom
point and add a few extra stitches there to make sure it is secure.
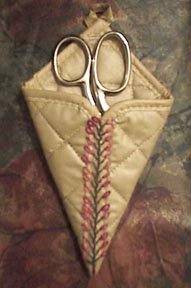
Step 7. At this point, you already have made the Potholder
Scissors Holder! Pretty neat, don't you think? But now comes
the fun part decorating it! Refer to the first stitch diagram
and instructions for the feather stitch below.
Feather Stitch
Feather Stitch Instructions -- Bring the needle out at
the top center, hold the thread down with the left thumb, insert
the needle a little to the right on the same level and take a
small stitch down to the center, keeping the thread under the
needlepoint. Next, insert the needle a little to the left on
the same level and take a stitch to the center (A), keeping the
thread under the needlework. Work these two movements alternately.
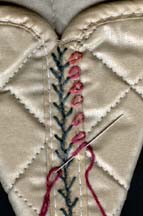
Step 8. Using 1 strand of Watercolours thread, work the feather
stitch down the middle of the potholder, from top to bottom.
The stitching should proceed directly over the seam where the
two sides of the potholder are joined(where you sewed them together).
We used a green shade of thread, but you can use any color you
like, depending on what looks good with the color of the potholder
you chose. Continue this stitch over the seam to the bottom pointy
end.
Step 9. Refer to the next stitch diagram and instructions
for the lazy daisy stitch below.
Lazy Daisy Stitch Diagram
Lazy Daisy Stitch Instructions- Work in the same way as
the Chain Stitch (A), but secure each loop at the center with
a small stitch (B). This stitch may be worked singly or in groups
to form flower buds or petals.
Step 10. Using 1 strand of Watercolours thread, work the
lazy daisy stitch to add 1 flower bud to each of the stitches
of the feather stitch that go out from the center part toward
the right side. Again, your choice of colors is up to you. We
used a rose color for all the buds, but you can make each a different
color or mix it up however you like!
Step 11. Now using 1 strand of Watercolours thread, work
the lazy daisy stitch to add 1 flower bud to each of the stitches
of the feather stitch that go out from the center part toward
the left side. Again, the choice of colors is up to you. We used
a rose color for all the buds, but you can make each a different
color. If you used all one color on the right side, you might
want to use a different color for all the buds on the left side.
You can even get fancier, by adding beads, buttons or other
decorations after you have finished the embroidery part.
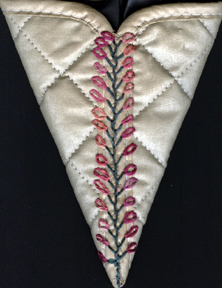
Step 12. Your Embroidered Potholder Scissors Holder is finished! You did it! You're amazing! And that's exactly what
your mom is going to think when you give it to her!
OH ! By the way, one last suggestion If you're
wrapping this project up to give to your mom, don't put her
scissors in the Scissors Holder! Because if she need them
in the meantime, it might get a bit tricky if she asks you whether
you've seen them!!
