Our project for this month was isnpired
by the fabulous Victorian
Crazy Quilts
Part II
Click here if you missed Part I.
Materials you will need:
15" ribbon about 1/2" or 3/4"
wide (color of your choice)
Fine mesh fabric, gauze or cheesecloth about 20" x 40"
Scissors
Regular sewing needle and thread
Potpourri about 1/2 cup to 3/4 cupful (any scent)
Crazy Quilt Heart from last month's project
You can make the sachet using the the Crazy Quilt Heart you made in last
month's project or you can make a larger heart for the sachet - it will
hold more potpourri and smell even better! To make the larger heart, print
out the 2 new heart patterns (below), one for the backing and the other
for the size and shape of the patches to cut that will be pieced together.
Then follow the directions for last month's Crazy Quilt Heart from Step
2 to Step 14 to make the Heart. After Step 14 you will have one more patch
to connect with embroidery on the seams. But by now you're a real "pro"
at this and will probably want to try out a variation on one of the other
stitches on your own. After your larger Crazy Quilt Heart is completed
and decorated with beads, buttons, lace, bells, applique etc. follow these
steps to make the sachet:
Step 1 - Cut the mesh fabric to a piece 20" by
20". If you are using gauze or cheesecloth, you will probably need
a piece 20" x 40" to start . Cut this piece into 2 pieces, each
20" x 20" in size (You will be cutting your original piece of
cloth in half). Then lay one piece right over the other. The opennings
in the cheesecloth or gauze are usually larger than in the fine mesh. You
need the 2 layers together so that the smaller bits of potpourri will not
fall out when you enclose them in the cloth.
Step 2 - Place the Crazy Quilt Heart face down and
lay your cloth (mesh, gauze or cheesecloth) over it so that the heart is
pretty well centered under it.
Step 3 - With the sewing needle and regular sewing
thread, use a simple in and out stitch to attach the mesh to the back of
the heart all around the outside edge. When you get back to where you started
sewing make an extra stitch right over your last one to secure the thread.
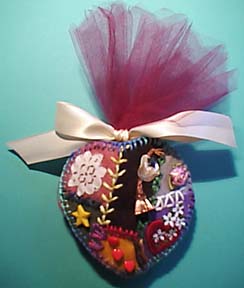
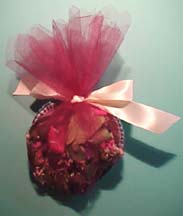
Step 4 - Place the potpourri over the back of the heart.
Now fold over the bottom of the mesh towards the top of the heart and pull
up the mesh on both sides of the heart, bunching it up together at the
top middle of the heart, creating a "pouch" of fabric in back
of the heart enclosing the potpourri. (Figure 1)
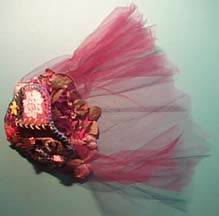
Step 5 - Tie your ribbon around the mesh where it is
bunched up. When you have the ribbon in place, pull up any loose cloth
around the potpourri by tugging at the ends of the cloth at the top sticking
out above the ribbon. Then make a knot in the ribbon to secure it tightly
around the potpourri. After this make the ribbon into a bow in the front
and trim the ends of extra ribbon that are too long. (Figure 2)
Step 6 - You can now trim the extra cloth fabric at
the top, leaving about 2" to 3" sticking out above the ribbon
or whatever length looks good to you. Now you have created a Crazy Quilt
Heart Sachet for your mom to keep in her dresser drawer to make her clothes
smell sweet and what a special treat that will be!
Crazy Quilt Heart Necklace
 Materials
you will need:
Materials
you will need:
1 skein Watercolours (any color you want)
1 piece felt 5" x 5" (any color)
Scissors
Assorted beads, buttons and bells
Crazy Quilt Heart (from last month's project)
12" Ruler
Needle large enough to thread the Watercolours through
Step 1 - Cut a heart from the felt using the same pattern
as Step 2 of last month's project.
Step 2 - Make a twisted cord with the Watercolours
thread about 30" to 35" long. To do this measure out a piece
of thread about 120" to 140" long. (10 - 11 ruler lengths). Follow
the directions for making the twisted cord in our archives of Kids' Projects:
look under Rainbow Shoelaces with Pom-Poms, Steps 3 and 4.
Step 3 - Knot the twisted cord at the place where it
will fit comfortably in a loop over your (or your mother's) head. You can
probably use your own head as a guide and make the loop a little bigger.
Step 4 - Untwist the threads below the knot.
Step 5 - Place the knot part of the twisted cord on
the back of the Crazy Quilt Heart so that it is right over the top center
of the heart with the loose threads hanging down below it.
Step 6 - Place the felt heart from Step 1 over the
back of the Crazy Quilt Heart with the twisted cord knot and the loose
threads sandwiched between the 2 heart shapes.
Step 7 - Using your needle threaded with the same Watercolours
thread as the twisted cord, stitch around the two hearts with a simple
stitch going in from the back and up through the front of the Crazy Quilt
Heart, then around the outside of both hearts and back through the back
of the heart to the front again. Repeat until stitched all the way around.
Place one stitch in between each stitch you made last month around the
outside of the Crazy Quilt Heart. As you stitch the 2 hearts together (back
and front), be sure to cover the knot in the twisted cord and keep all
the loose threads together in one bunch at bottom of heart.
Step 8 - Now the best part! Using your own imagination,
add the assorted beads, bells and buttons to the loose strands at the bottom
of the heart. I used 4 sets of threads to make 4 beaded strands each a
slightly different size in length (Figure 1). Be sure to leave enough thread
below each last bead you add to a strand so that you have enough thread
below the bead to make a knot to hold it in place. Get as creative and
colorful as you like! Now your Crazy Quilt Heart necklace is ready to put
over your Mom's Head to jazz-up any outfit she may be wearing!
Part I.
Make this genuine traditional Crazy Quilt Patchwork Heart for
Mom to present to her on Mother's Day and we guarantee you'll make her
day!
Materials you will need:
Step 1: Print out heart patterns.
There are 3 different ones: a blank heart outline, a heart divided into
sections and a heart divided into sections, with each section numbered.
Also print out one sheet which shows how to do the 2 stitches we will use:
straight stitch and buttonhole stitch.
Step 2: Put blank heart pattern
over felt (use any color). This is the backing and you will not see it
when the heart is done. Cut 1 heart to shape of heart pattern with scissors.
Try to keep all pieces you cut as close as possible in size and shape to
the pattern pieces on paper, so that everything fits together well. You
can pin the paper to the felt to help keep it in place when you cut it
out. (Figure 1)
 Figure 1
Step 3: Cut up the paper with the
heart sections (the one without the number on the sections) into separate
pieces. Then cut a different color felt for each different section. Again,
you may want to pin each paper section to the felt as you cut it , so they
all come out the right size (Figure 2). I used yellow for #1, purple for
#2, black for#3, green for#4 and white for #5.
 Figure 2
Step4: Place the cut pieces of felt
over your piece of felt in the heart shape. When in the right place, together
they should form the same heart shape as the one that's all in one piece.
Refer to the heart diagram with the sections and numbers if you get confused.
It's really just like a puzzle!(Figure 3)
 Figure 3
Step 5: Using Elmers glue place
a small circle or dab in the middle of each section of felt to attach it
to the felt heart in the proper place, The glue should be enough to hold
it in place, but not smeared around the edges. If the glue gets near the
edges it will be hard to stitch through the fabric. Now wait for the glue
to dry before you continue working with the heart.
Step 6 : Refer to your heart diagram
with the numbers for the next 7 steps. Starting with sections #3 &
#5, use a simple straight stitch (see your printout of the two stitches
you'll be using in this project), to decorate the seam between the two
sections. Begin by tying a knot at one end of your thread, (using the Watercolours
Threads) after you have threaded the other end through a needle. Put the
needle into the fabric from the bottom (through the one piece heart that
is the backing) then bring it up to the top of the fabric about 1/4"
from the seam, go over the seam and put the needle into the fabric from
the top to bottom, on the other side of the seam. This makes your first
straight stitch. Finish decorating the rest of the seam between section
#3 and #5 this way. (Figures 4 & 5)
 |
 |
Figure 4
|
Figure 5
|
Step 7: Using sections #4 &
#5, do a variation of the straight stitch by making one long stitch and
then one short stich across the seam, Keep alternating the long and short
stitches until you are finished with the seam. (Figure 5)
Step 8: Using sections #1 and #4,
make a straight stitch in a zig-zag, up and down "V" shaped pattern
across the seam. (Figure 7)
 Figure 7
Step 9: Using sections #2 and #4
make straight stitches in the shape of stars by criss- crossing the stitches
across the seam (Figure 8)
 Figure8
Step 10: Using sections #2 and #3
make a leaf type stitch by making a "V" and then adding another
stitch in the middle of the "V". (Figure 9)
 Figure 9
Step 11: Using sections #1 and #2
make "X" stitches across the seam. (Figure 10)
 Figure 10
Step 12: You have now stitched over
all the seams to connect all your sections to each other in typical Crazy
Quilt Embroidery Style. By now, you are probably ready to make up some
stitches of your own design! (Figure 11)
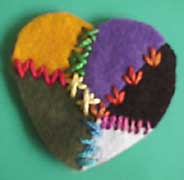 Figure 11
Step 13: Referring to your printed
out sheet containing the button hole stitch, choose a different color thread
to accent the outside of the heart.The buttonhole stitch will outline the
outside very neatly and evenly, while attaching it securely to the one
piece heart on back. If you'd rather continue with the straight stitch,
you can also stitch around the edges that way to give the outside a finished
look. (Figure 12)
Figure 12

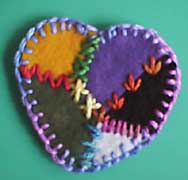
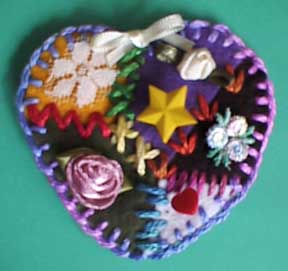
Step 14: Now comes the Really FUN
part! Decorate the middle of each of the 5 patchwork sections with a piece
of lace, a bead, shell, button, bell, ribbon or whatever else strikes your
fancy. I used some buttons (star and heart), some redi-made applique embroidery,
some redi-made tiny ribbon roses, some ribbon tied in a bow and some lace.
Use your own imagination run free! You will need the regular size sewing
needle and sewing thread to attach these decorations. (Also called embellishments;
when you give it to your Mom, you could surprise her and say, "So
Ma, how do you like the embellishments I put on?"(Figure 13)
Figure 13
Step15: There are 2 ways you can
use this patchwork heart (though you can probably think of more) You can
get a redi-made frame, size 5 x 7, and a piece of contrasting colored board
cut to the same size, and paste the heart on it. Voila! A lovely handmade
heart filled with love for your Mom , and ready for her to hang in a special
place. You could also include a greeting on it like we did. (Figure 14)
 Figure 14
Step 16: Another way to use it is
to decorate a tee-shirt for your Mom by putting the heart right over her
heart, on the shirt. Bet that would Knock her eyes out! (Figure 15)
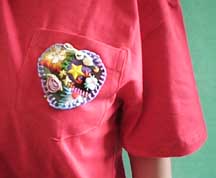 Figure 15
Last, but not least, you can give your Mom the patchwork heart and tell
her you're going to make something even more dramatic with it next month
when our crazy quilt theme continues. We'll also show you how to make a
larger heart to do in crazy patchwork to make into a sweet smelling sachet.
So if your Mom's the patient type, she might think an extra special hand
made gift is worth the extra wait!
COPYRIGHT NOTICE: No part of these instructions/project nor the included diagrams/illustrations
can be reproduced or distributed in any form (including electronic) or
used as a teaching tool without the prior written permission of the CARON
Collection Ltd. One time reproduction privileges provided to our web site
visitors for and limited to personal use only.
