Dyed and Gone to Heaven – An Online Magazine and Needlework Resource
Our project comes from "South of the Border".
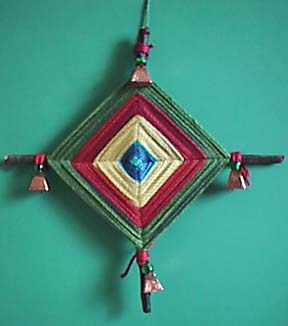
"God's Eyes"
The Huichol Indians of Mexico and the Aymara Indians of Bolivia weave brightly colored yarn on a simple frame of crossed sticks to make a design called "Ojo de Dios" or "Eye of God". Originally, "God's Eyes" were made to be placed on an altar so that the gods could watch over the praying people and protect them. They are now more often sold in markets, reminding us that God looks with love on people everywhere.
This project is divided into 2 steps. The first is a single "God's Eye" made with 2 crossed sticks. The other, at the bottom of the page, a multiple series of "God's Eyes" which should be attempted only after you have made the single one first.
Materials you will need:
2 small sticks, fairly straight and approximately 5" long OR 2 popsicle sticks (the sticks can be fairly smooth tree branches or dowels)
Scissors and pencil
1-3 skeins each of Watercolours thread in Buttercup, Emerald, Flame and Mediterranean
Small Bells for Decoration (optional)
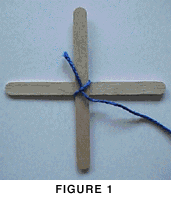
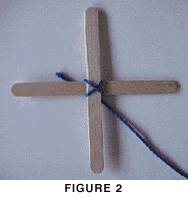
Step 1: Cross the sticks at the center. Tie them together with the end of a piece of yarn, making an X, but don't cut the yarn off its skein (Figure 2). Tie the yarn IN BACK of the 2 crossed sticks (Figure 1).
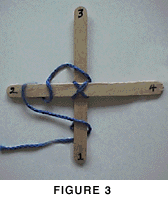
Step 2: With the pencil, number the sticks at the ends, in the center. (Figure 3)
Step 3 : Bring the yarn to the front between sticks 3 and 4. Pull the yarn over stick 3 and the next one too (stick 2), and bring it to the back between sticks 2 and 1. Wrap it behind stick 2 and bring it to the front again between sticks 2 and 3. Pull it over stick 2 and the next one too (stick 1), and wrap it behind stick 1 (Figure 3).
Step 4: Pull the yarn over stick 1 and the next one too (stick 4) and wrap it behind stick 4. Pull it over stick 4 and the next one too (stick 3) and wrap it behind stick 3. This is one complete round. Always lay the yarn next to, NOT on top of the yarn already in place.
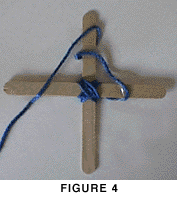
Step 5: Keep on wrapping the yarn behind each stick, over that stick and the next, and around behind that one, then over that stick and the next and behind that one. (Figure 4)As you continue making the rounds, always be sure that the yarn lies next to, but never on top of the yarn in the previous round. After the first few rounds, you will see the woven pattern of the "eye" beginning to form.
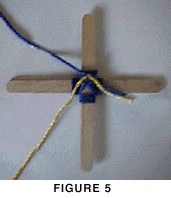
Step 6 : When you have an "eye" in one color of yarn, you can cut the yarn and tie on another color, and continue weaving. Make sure that the knot that you joined the 2 colors with, stays in the back (Figure 5).
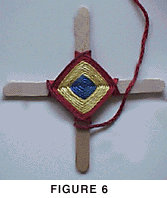
Step 7: Keep weaving the "God's Eye" until you are about 1/2 inch from the ends of the sticks. Cut the yarn, leaving approximately a 7-8" tail. Tie the tail in a knot in back .If you have bells for decoration, attach one to each of the 4 ends.
A "God's Eye" this size can be use as a decoration, hung almost anywhere. At Christmas you can even hang them on your tree. They can also be made in miniature with the thread wound on toothpicks, but these are delicate and much harder to handle.
Step 8: You can make a larger, more complicated Project with multiple "God's Eyes" by crossing 2 larger sticks ,12 inches or longer, and then crossing a short stick at the end of each long one. (See the picture of the finished "God's Eye".) Weave out only about 2-3 inches from the center of the shorter sticks, farther on the longer ones. To make this larger one, you are really just making 5 single "God's Eyes" the way you did in steps 1 to 7 above. Weave the center "God's Eye" first. Then weave each of the 4 smaller "Eyes", projecting out from the center, using the same method. Tie bells on the ends and where the individual "God's Eyes" meet, just for fun. You can also make individual "God's Eyes" in different sizes to make up a really neat mobile.
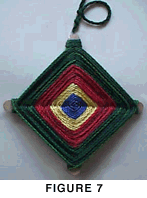
Step 9: Make a twisted cord to loop over the topmost "God's Eye" sticks that project from side to side, at the top.(See completed multiple "God's Eye".) For details about making a twisted cord see our Kid_s Project Archives for Rainbow Shoelaces with Pom-poms : Steps 3 and 4.
Wow! Great job! Bet you're the first one on your block to have a genuine "Ojo de Dios " weaving! And you learned a bit of Spanish besides! Bueno!
COPYRIGHT NOTICE: No part of these instructions/project nor the included diagrams/illustrations can be reproduced or distributed in any form (including electronic) or used as a teaching tool without the prior written permission of the CARON Collection Ltd. One time reproduction privileges provided to our web site visitors for and limited to personal use only.
© 1997 The Caron Collection / Voice: (203) 381-9999, Fax: 203 381-9003
CARON email: [email protected]