Since last featured, Anthony
Minieri has made the leap to a full time needlework career. When
offered the position of Designer and Teacher in Residence at
The Edwardian School of Needle Arts in Bloomfield, NJ, Tony insisted
on one condition - that the primary focus in developing the curriculum
be on education. For want of a better title, Tony refers to himself
as the Headmaster. He has developed a series of notebook classes
entitled Stitching Adventures in which Tony guides each
student on a Stitch Journey, Color Excursion and Thread Travel, in turn. Last year Tony designed and taught
a series of monthly projects using a band sampler format, each
highlighting a pertinent holiday theme. Wanting to initiate something
more extensive and challenging, he designed a Sampler Quilt on
Canvas project, Stars for a New Millennium, which will
span this entire year. Stitchers work on one block each month
using overdyed threads from four distinct color families. His
goal is to familiarize stitchers with color interaction and to
teach them how to create balance between colors, threads, stitches
and textures. In a class of 70 students, 52 different color combinations
have evolved. When complete, Tony intends to publish the project
as a commercial design, which will include many of the different
color, thread and stitch combinations used.
Additionally, Tony has
his own column in the publication needlepoint now,
entitled Adventures in Embellishment. Look for it in your
next issue of needlepoint now.
For more information on
Anthony Minieri Designs and Tony's teaching schedule contact
him at:
phone: (973) 523- 1368
e mail: stoocozzo@aol.com
For information on Anthony
Minieri's classes at The Edwardian School of Needle Arts, contact:
The Edwardian Needle
225 Belleville Ave.
Bloomfield, NJ 07003
phone: (973) 743- 9833
fax: (973) 680- 1162
e mail: edwneedle@aol.com
website: http://www.theedwardianneedle.com
For more information on needlepoint now magazine, contact them at:
P.O Box 729
Prince George, VA 23875
phone: (804) 732- 9140
fax: (804) 732- 5601
e mail: editorial2@needlepointnow.com
website: http://www.needlepointnow.com
To use Waterlilies, Impresssions and Soie Cristale, open the
skein and cut through the skein at the knot. You will have all
one-yard lengths. Use the number of strands or plies specified
in the instructions.
INSTRUCTIONS
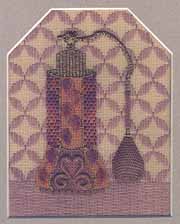
Start 3" down from the upper left corner of the
canvas and 3 l/4" to the right with the Rhodes stitch at
the top of the perfume bottle.
AREA 1. Perfume Bottle Top. Use one strand of metallic
throughout.
1. Rhodes stitch. The placement of the final stitch gives
each particular Rhodes its own personality and direction. Do
backstitches around the Rhodes as illustrated in the master chart.
2. Spray Spout. Gobelin stitch tied down with vertical stitches.
3. Connector to atomizer. Horizontal Cashmere -- see master
chart above
4. Neck below Rhodes stitch. Vertical encroaching gobelin.

5. Bottle cap. Gobelin stitches. See Master Chart and Diagram
3. Work in vertical rows, paying careful attention to the placement
of the stitches. Note that for the bottom stitches of the outer
rows three stitches share one hole.
6. Collar at base of cap. Diagonal tent surrounded by backstitches.
Note that the tent stitch changes direction for each side. The
backstitches will be whipped after the bottle has been stitched.
AREA 2. Perfume Bottle Upper Areas.
1. With one strand of metallic, work 2 rows of vertical "over
4" backstitches to delineate the central area from the two
side areas. When the central area and 2 side areas are completed,
whip these backstitches.
2. Thread your needle with 3 plies of Waterlilies in the following
manner. Cut the skein at the knot and strip off 3 plies from
one length of thread. Line up the variegations on two and turn
the other strand opposite to create a blend of colors.
3. Leaves, central area. With the Waterlilies stitch the 5
leaves in the central area in the Free-form Fly Stitch.
a) A fly stitch is formed by leaving a straight stitch loose
and tying it down so that you form a "V".
b) Follow the appropriate diagram to give either a right or
left slant to the leaf you are stitching. Begin with the bottom
leaf. Stitch 1-2 is a vertical straight stitch. Stitch 3-4, tied
down by 5-6, is your first fly stitch. As you bring your needle
to the surface for stitch 5-6, pull up and this action will give
the fly stitch its proper shape and placement.
 4.
Vine. With one strand of Impressions, stitch the vine in whipped
backstitch. First, work the backstitches from top to bottom.
When you reach the last backstitch, bring your needle to the
surface, sharing the hole at the bottom of the stitch. Wrap by
sliding the thread underneath each backstitch once. Begin at
the bottom and always approach the wrap from the same side and
pull the thread in the direction you are moving. When you reach
the top of the vine, plunge your needle to the back. This covers
the segmentation of the backstitches and creates a smooth unbroken
curve. See Diagram 6.
4.
Vine. With one strand of Impressions, stitch the vine in whipped
backstitch. First, work the backstitches from top to bottom.
When you reach the last backstitch, bring your needle to the
surface, sharing the hole at the bottom of the stitch. Wrap by
sliding the thread underneath each backstitch once. Begin at
the bottom and always approach the wrap from the same side and
pull the thread in the direction you are moving. When you reach
the top of the vine, plunge your needle to the back. This covers
the segmentation of the backstitches and creates a smooth unbroken
curve. See Diagram 6.
5. Background behind vine and leaves. With 2 plies of Soie
Cristale, work the background in basketweave. The left side should
be done in the traditional slant. For the right side, reverse
the slant of your stitches. You may find it easier to turn the
canvas one-quarter turn and work in the traditional manner to
achieve this.
6. Side sections, upper portion of bottle. With 3 plies of
Waterlilies, work the Florentine pattern from the top down on
each side. The first full row of each side is illustrated on
the Master Chart. The compensation for both the top and bottom
of each side is charted for you on Diagram 7.
7. Division between upper and lower portions of bottle. Use
metallic thread for the scalloped row of whipped backstitch.
Part II Autumnal Scentiment taught
by Anthony Minieri
Part III Autumnal Scentiment taught by Anthony Minieri
COPYRIGHT NOTICE: No part of these instructions nor the included designs/charts
can be reproduced or distributed in any form (including electronic)
or used as a teaching tool without the prior written permission
of Anthony Minieri. One time reproduction privileges provided
to our web site visitors for and limited to personal use only.