Back to
Designer Page
FREE PATTERN
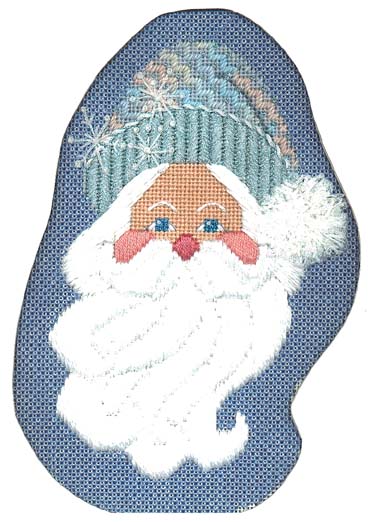
SNOWFLAKE SANTA MATERIALS LIST
- Canvas 10" X 11" - 18 Mesh white mono canvas
- Stretcher Bars 10" X 11"
- Needles #26, #22, and #20 Tapestry
- Brass Thumb Tacks or Staple Gun
- Permanent Marker
- Tape for edges: Masking Tape
- Ruler
- #8 Hard Lead Pencil
- White Eraser
-
- DMC Floss:
- #B5200 white
- #931 blue gray
- #754 flesh
- #760 pink
- #3731 dark pink
-
- Watercolours:
- #100 snow white
- #147 winter sky
-
- -----------------------------
|
Snow
- Candlelight:
- #D-15 light blue
- #D17 electric blue
-
- Rachelette:
- #A17 frosted blue
-
- Impressions:
- #7053 blue
- #7046 light blue
|
SNOWFLAKE SANTA DIRECTIONS
General Directions:
1. With the ruler find the center vertical and horizontal
threads of the canvas.
2. Lightly draw on these threads with the #8 hard lead pencil.
3. Match these threads up with the centers of the design.
4. Lightly draw the design onto the canvas with the permanent
magic marker.
5. Erase all the pencil lines with the white eraser.
6. Tape the canvas edges.
7. Stretch and staple or tack the canvas to the stretcher
bars keeping the canvas taut.
8. Use a #22 Tapestry needle unless directed otherwise
NOTE:
SANTA HEAD MUST BE ENLARGED TO 136%
-
Stitching Directions ·
Nose: First Basketweave the nose with 6 ply DMC Floss
# 3731 dark pink. Then Vertical Satin Stitch twice over the Basketweave
using the same thread. Satin Stitch between the rows as graphed.
Lay threads smoothly. ·
Cheeks: Basketweave the cheeks with 6 ply DMC Floss
# 760 pink. Then Vertical Satin Stitch once over the Basketweave
with the same thread as graphed. Lay smoothly. ·
Face: Basketweave the face with 6 ply DMC Floss # 754
flesh. Stay within the outlines and do not stitch over the eyes
including the white areas. ·
Eyes:
- 1. Stitch the white areas with 6 ply DMC Floss # B5200 white.
Follow the graph carefully for stitch direction.
- 2. Tent Stitch the eye center with 2 ply Candlelight #D-17
electric blue. Watch the stitch slants.
- 3. Add a 1 twist French Knot as graphed with 2 ply DMC Floss
# B5200 white.
- 4. Backstitch around the eyes with 1 ply DMC Floss # gray
blue in a #26 Tapestry needle ·
Eyebrows: Couch 1 ply Watercolours #100 snow white
in an arch following the graph. Use the same thread for the couching
thread.
Face Color Key ·
- Hair: Stitch the hair area in Long and Short stitches
using 1 ply Watercolours #100 snow white. Watch the stitch slant.
Layer more Watercolours , if necessary, to cover the areas. ·
-
- Beard:
- 1. Pad each curl area horizontally with 6 ply DMC Floss #
B5200 white. Pad every hole.
- 2. Stitch the whole beard in Long Vertical Straight Stitches,
one curl at a time with 2 ply Watercolours #100 snow white. Lay
very carefully. ·
-
- Mustache:
- 1. Tent Stitch center line under the nose with 1 ply Watercolours
#100 snow white.
- 2. Horizontally pad the center curl with 6 ply DMC Floss
# B5200 white. Pad every hole.
- 3. Vertically Long Stitch each curl with 2 ply Watercolours
#100 snow white.
- 4. Add a 2 twist French Knot to the mustache curl ends with
2 ply Watercolours #100 snow white as graphed. You may add more
French Knots as desired.
-
-
- Hat:
- Hat Fold Line: Reverse Tent Stitch the fold line with 6 ply
DMC Floss # 931 gray blue.
-
- Body of Hat:
- 1. Cut out the turquoise, peach and light yellow parts of
the Watercolours #147 winter sky. Use 1 ply of this Watercolours
combination and stitch the 2 thread part of the Jacquard pattern.
- 2. Fill in the over 1 thread Jacquard pattern with 1 ply
Impressions #7046 light blue.
- 3. Add 2 twist French Knots as graphed over the Jacquard
pattern with 1 ply Candlelight #D-15 light blue.
Hat Brim:
The Brim is stitched in the Long and Short Oblique. Use 2
needles. Thread up the #20 Tapestry needle with Rachelette #A-17
frosted blue and the #22 with 1 ply Candlelight D-15 light blue.
Stitch in vertical rows. Stitch the Long Oblique with the Rachelette
then immediately cross it (Short Oblique) with the Candlelight.
This is a slow stitch to work, but it is well worth it. Lay each
Rachelette stitch carefully.
Trim:
- 1. Make a 2 tone Monk's Cord with Snow and the light blue
Candlelight #D-15. Start with 20" of each. Bend the Snow
in half and thread the Candlelight through the bent end so the
centers meet interlocking them. Make the ends of each thread
even. Tape one end down to a table or have someone hold one end
tightly. Keeping the threads taut, twist the cord until it kinks
upon itself. Still keeping the threads tight, fold in half where
the two threads are joined and let them twist together. Tie the
ends together at the unfolded end.
- 2. Enlarge a hole on each end of the top brim. Thread a piece
of floss through the bent end of the Monk's Cord and through
the needle. Use the floss to pull the Monk's Cord through the
canvas, across the top of the brim and to plunge it to the back
of the canvas.
- 3. Couch the Monk's Cord down along the brim top edge using
1 ply DMC Floss # B5200 white.
- 4. On the canvas back, cut off excess Monk's Cord and Whip
Stitch the cord into place.
Pom-Pom:
Stitch the whole Pom-Pom in the Turkeywork Stitch using the
Snow. Keep the loops long. Start stitching at the bottom of the
pom-pom area. Stitch in every row only working left to right.
Cut and fluff the loops after the entire piece is stitched.
Snowflakes: With 1 ply Snow, stitch the snowflakes
over the hat. Refer to the original drawing for placement.
FRENCH KNOTS & STRAIGHT
STITCHES
Background: Stitch the whole Background in the Alicia
Lace Stitch using 1 ply Impressions #7053 blue. Follow the graph.
ALICIA LACE STITCH
Finishing: Finish as a padded flat ornament with a
Monk's Cord trim and hanger.
(Back to Designer Feature)
COPYRIGHT NOTICE: None of these designs
or instructions can be reproduced or distributed in any form
(including electronic) without the prior written permission of
Libby Sturdy.
|
