| Dyed and Gone to Heaven – An Online Magazine and Needlework Resource |
|
 |
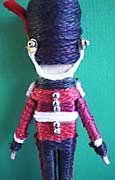
In keeping with our British theme, for our Kid's Project, we present a Buckingham Palace Guardsman in traditional uniform, best known for their impressive headgear called "bearskins." The Guardsmen protect the Queen and the Royal Family who live in the Palace. The regiments of the Guardsmen are identified by the plume on their "bearskins:" the Coldstreams have red plumes, the Grenadiers - white, the Irish Guards - blue, the Welch Guards - white with a green stripe and the Scots Guards have no plume at all. Our Guardsman will sport a red plume. Which regiment does he belong to?
A Clothespin Doll of a Buckingham Palace Guardsman Though the basic materials needed (wooden clothespin, threads and glue) are both simple and inexpensive, you can create some very interesting and detailed figures, by combining these simple elements with your own imagination. Our clothespin doll is a Buckingham Palace Guardsman in traditional uniform, complete with the impressive traditional headgear called "bearskins." Both boys and girls will enjoy making him. After you have mastered the basics, you can go on to create a virtually endless variety of dolls using this simple method. Start your own collection of clothespin dolls today!
by Rita Vainius
In keeping with our British theme, for our Kid's Project, we present a Buckingham Palace Guardsman in traditional uniform, best known for their impressive headgear called "bearskins." The Guardsmen protect the Queen and the Royal Family who live in the Palace. The regiments of the Guardsmen are identified by the plume on their "bearskins:" the Coldstreams have red plumes, the Grenadiers - white, the Irish Guards - blue, the Welch Guards - white with a green stripe and the Scots Guards have no plume at all. Our Guardsman will sport a red plume. Which regiment does he belong to?
What you will need:
Watercolours Thread: 1 skein each Midnight, Flame and Snow White
Scissors
Elmers glue
Double sided tape (also known as double stick tape)
Small pieces of felt in white and red
*1 Miniature wood candle cup -1 inch size
*2 Wood craft picks - 3 inches
*1 Wood clothes pin - 4 inches
Assorted miniature gold beads, sequins and stars
* Candle cups, craft picks and clothespins are available in most craft and hobby stores
Got everything you'll need? Well, here we go:
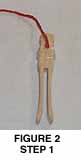
Step 1 - Take the clothespin and apply double stick tape to what will be the torso on our figure (the part of the body, directly below the rounded knob on top, which will be the head). Apply tape up to approximately " below the indentation which will mark the waist of your figure. Using Flame (red) Watercolours thread, begin wrapping the thread around the clothespin in one layer, laying the thread of the each layer right up the one before it, so that no wood shows through underneath (Figure 1). When starting to wrap a new thread, always start the thread on the back of the figure and cover the end of your thread by wrapping your layers of thread over it (Figure 2).
----------
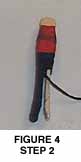
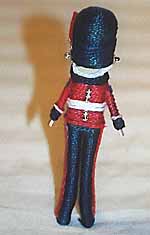
Step 2 - Apply double stick tape to bottom part of body. Apply tape all the way around body at hips and then, apply the tape to the 2 outside sides of the clothespin, which will form the legs on the figure. Using the Midnight (dark blue/black) Watercolour thread, wrap the new thread starting where you left off with the red colored thread (Figure 3). When you get to the part where the clothespin divides into two parts, wrap around left side first all the way to the bottom, covering all the wood of the clothespin completely (Figure 4). Cut thread closely and apply some glue to the underside of the figure's foot to hold thread in place. Then wrap the other (right) side of clothespin in the same way.
---------
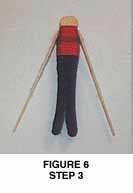
Step 3 - Take 1 craft pick and apply some glue to the wider, rounded flat end, on one side. Attach this part of your wood pick to left side of the figure directly below head, where you started wrapping with the red color (Figure 5). Do the same with the other craft pick on the right side. You have just attached the arms of your figure. They should be attached securely at the top of the body and then gradually start sticking out from the body below that (Figure 6).They're a little long, but we'll take care of that later!
------------
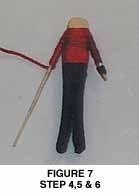
Step 4 - Wait for the glue to dry so that the picks are secure and then begin wrapping with the red thread over the top part of the body (over the red threads you wrapped earlier), so that it covers the wood picks on both sides creating the shoulders. After about 4 complete wraps, start wrapping the left pick separately where it begins to stick out from the body, creating the arm (Figure 7). Wrap about 3/4" with the red color. Glue in place in back and cut.
Step 5 - Then wrap 2 or 3 times around with the blue thread, starting where the red thread ends, to create the cuff. Secure the end of the thread with glue after cutting the extra thread off (Figure 7).
Step 6 - Using the Snow White thread, wrap 1 time around the arm right where the red and blue threads meet (Figure 7). This will make a white stripe between the red sleeve of the jacket and the blue cuff. Glue the ends of thread down on the back of the arm and cut. Leave approximately 1/4" of wood showing beyond the end of the blue thread, to form the hand and cut the rest of the pick off with your scissors. Then repeat the same procedure with the pick glued to the right side to make the right arm.
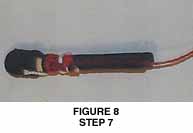
Step 7 - Run a thin bead of glue down the middle of the left leg, over the blue threads, on the outside side (of the pants), beginning right below the red thread (jacket). Secure a piece of red thread straight down the side, over the glue, making a red stripe down the blue pants leg (Figure 8). Then trim the extra red thread at bottom. Repeat same procedure for right leg.
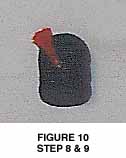
Step 8 - Take the small candle cup and cover it entirely with the double stick tape, including the underside of the rim where the hole is. Starting at the rounded end, opposite the end with the hole, wrap the blue thread around in layers, just like you did for the body (Figure 9). When you get to the narrower part of the cup, wrap each layer approximately 2 times around, so that the cup, which will be our figure's hat, is the same size (thickness) around, all the way from top to bottom. When you have finished wrapping the extra layers to make the bottom part of the hat even with the top part, continue wrapping the blue thread over the lip (rim) of the cup and around the hole at the bottom, including the underside lip of wood around the hole (Figure 10). Then cut the thread and tuck the rest of it into the hole.
---------
Step 9 - Cut a small piece of red felt into a thin long triangular shape to become the plume (feather), which will designate our Guardsman as belonging to the Coldstream Regiment.( Did you answer that question right?) Apply a dab of glue to the bottom, thinnest part of the felt piece and secure to the "bearskin" hat, with the wider part of the plume towards the top of the hat (Figure 10). Put a small dab of glue on the felt where it is attached to the hat and glue a miniature star or sequin at the bottom of the plume.
Step 10 - Using your white thread, start wrapping it over the red thread at the waist part of the figure (a little more than halfway down the wrapped red part of the jacket) (Figure 11). On the wood clothespin, it is notched, but once you wrap it with the thread it's not as obvious). Do 3 wraps with the white thread to make the belt. Cut the extra thread and glue the end in back.
----------------
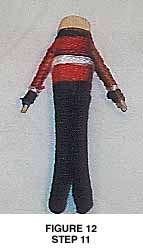
Step 11 - Using the blue thread, start wrapping it over the red thread right below the head for 2 turns to make the collar of the Guardsman's jacket (Figure 12 above). Cut extra thread and glue in back.
Step 12 - Now for all the little finishing touches that will really bring our little Coldstream Guardsman to life! Run a small bead of glue down the middle of the red jacket up to the waist, then skip the belt, and run the bead of glue to 1 to 2 thread layers above the bottom of the jacket. Place your miniature beads or sequins in a row over the glue to make the buttons on the jacket (Figure 13).
---------------
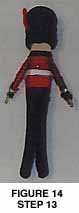
Step 13 - When the glue holding the buttons in place is dry, put some glue on the threads right around the hole of the bearskin hat and on the top, flat part of the wooden head. Allow the glue to dry a little bit and then put the hat on the figure's head, pushing it down as far as it will go over the head. (If you've ever seen an actual Guardsman or a picture of one, you've probably noticed that they wear their bearskins so low down over their foreheads, that you can't even see their eyes!) Attach the hat so that the red plume is on the left side of the head (approximately in the middle of the side) (Figure 14 above). Hold the hat in place while the glue dries.
Step 14 - Cut a piece of the white thread about 1 1/2 inches long. Put a dab of glue on one end of the thread and attach it about 1/4" from the bottom of the hat, on the left side, at a point a little bit wider than the figure"s face (Figure 15). This thread will make the chin strap of our bearskin hat. Then run a thin bead of glue along the bottom of the head across the face right above the first thread of the blue collar. Secure the white thread to the face over the glue. Then put a dab of glue on the right side of the hat, in a straight line across from where you attached the white thread on the left side, (about 1/4" above the bottom of the hat and a little to the right of the wooden head). Attach the other end of the chin strap to the hat If your thread is too long cut it to the right size after the glue dries. Then put a little dab of glue over the ends of the chin strap on both sides of the hat and attach a miniature star, bead or sequin over the ends of the thread. (With the bearskin practically covering the eyes and the chin strap covering the chin, all you can actually see of the Guardsman is his nose!)
Step 15 - Cut 2 tiny squares out of the white felt, about 1/4" on each side. Attach with a dab of glue, to the top of each arm on the side, right below the blue collar to make the epaulets on the jacket (see below). When the glue is dry, put another dab of glue in the middle of each of the white squares and attach a miniature star in the center of both epaulets (see below). That's it!
-----
Our Guardsman may be little but look how proudly he stands at attention guarding Buckingham Palace. Long Live The Queen!
COPYRIGHT NOTICE: No part of these instructions/project nor the included diagrams/illustrations can be reproduced or distributed in any form (including electronic) or used as a teaching tool without the prior written permission of the CARON Collection Ltd. One time reproduction privileges provided to our web site visitors for and limited to personal use only.