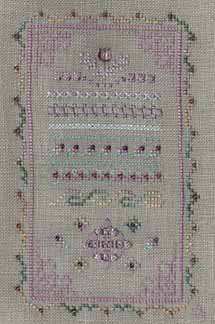
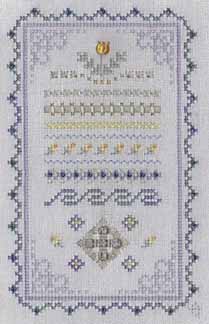
GENERAL INSTRUCTIONS
This sampler is designed for evenweave fabrics only.
Each band has a written description to explain the threads
used and the number of strands required .
Every square on the main chart represents working over two
threads of the fabric.
There is a choice of 2 colourways for this design. Choose
the colour threads and the matching fabric you prefer. Colourway
2 is quoted in parenthesis in the written instructions.
There are stitch diagrams which explain special stitches in
greater detail. Follow the numbered sequence of these diagrams
to complete the stitches. Please note that each square on these
diagrams represent the holes of the fabric and the lines represent
the threads of the fabric.
When working with more than 1 strand of a multi dyed thread,
remove each individual strand from the length of thread. Place
together the required number of strands and make sure that the
colours are realigned. Complete each individual stitch, when
working with this thread, before moving onto the next. This will
help to create a continuous colour flow.
Apply all beads when all other stitching has been completed.
Use a beading needle and a single strand of thread using the
Half Cross Stitch technique. Make sure all your beads are laying
in the same direction.
INSTRUCTIONS
Follow the key for stitches, beads and threads used
Extra instructions are included for special stitches for particular
bands.
Work the design as follows -
Outer border - See key above for threads and stitches
Inner border - See key above for threads and stitches
4 Corner Motifs - See key above for threads and stitches
Band 1
See key - for Cross Stitches
Work the Ray Stitch shown by the following symbol  using
1 strands of Perle 8 - 524
using
1 strands of Perle 8 - 524
( Perle 8 - 3042 ).
Work 1 Long Straight Stitch, as indicated on the main chart
by a solid black line, for the stem to the flower using the same
thread as the cross stitch leaves. Position the Mill Hill Glass
Treasure at the tip of the stem and apply to the fabric using
1 strand of Soie Cristale 4015 ( S.C. 1074 ). The position is
shown by the symbol
BAND 2
Work the Knotted Cross Stitch as follows -
Steps 1-4 (as indicated on the main chart by the following
symbol X) using 2
strands of Soie Cristale 5015 ( S.C. 7096 )
Steps 5 - 8 using 1 strand of Soie Cristale 1074 ( S.C. 6015
)
Work small Smyrna Crosses in-between the Knotted Cross Stitches
using 1 strand of Soie Cristale 1074 ( S.C. 6015 ).
Please note they are positioned off the normal square of the
chart and are shown by the following symbol 

BAND 3
Work the Cross Stitches - see key
Work the Cushion Stitches shown by the symbol  using
1 strand of Perle 8 - 524
using
1 strand of Perle 8 - 524
( Perle 8 - 3042 ). Avoid pulling these stitches tightly.
BAND 4
Work the double row of Herringbone as follows - please note
that only the first row is shown on the main chart.
The first row is worked using 2 strands of Soie Cristale 4015
( S.C. 1095 ).
The second row is worked using 1 strand of Soie Cristale 5015
(S.C. 7096 ).
BAND 5
Work the Zig Zags above and below the flowers using 1 strand
of Soie Cristale 7005
( S.C. 7094 ).
Work the Cross Stitches and apply the beads - see key.
Work the Back Stitch stems to the flowers using 2 strands of
Soie Cristale 7005 (S.C. 7094)
BAND 6
Work the Cross Stitches and apply the beads - see key.
Work the Backstitch on the bottom half of this band using 1 strand
of Soie Cristale 5015 (S.C. 7096).
Work the Lazy Daisy Stitches on the top half of this band by
using 1 strand of Soie Cristale 5015 (S.C. 7096).
BAND 7
Work Cross Stitches - see key.
BAND 8
Work Cross Stitches and beads - see key
Work Kloster Blocks using 1 strand of Perle No 8 - 524 (Perle
8 - 3042). Cut and remove the threads of the fabric as indicated
on the main chart by a series of small dots. On the threads of
the fabric that remain work Interwoven Bars using 1 strand of
Perle No 8 - 524 (Perle 8 - 3042). Work Doves Eye filling stitch
in the centre square and 3 cornered Doves Eye Stitch in the top,
bottom, right and left hand squares of the design using 1 strand
of Perle No 8 - 524 (Perle 8 - 3042).
Extra general instructions are included on how to work Hardanger
and cutting the threads of the fabric.
INSTRUCTIONS
CUTTING THE FABRIC:
Some people find this the most daunting, but if it is worked
through methodically and carefully, then everything should go
according to plan!! Read the following before embarking on the
cutting.
Cutting is done only after completing the Kloster Blocks and
other surface stitching. You must have very sharp, thin bladed
scissors that cut well at the tips. This is why the scissors
designed specifically for Hardanger are best.
Note that the lines of the graph paper represent the threads
of the fabric. The dots on the chart, which show where cutting
is to take place, are positioned on top of the threads to be
cut. When you cut the threads from the edge of one of the Kloster
Blocks, there will always be an opposite Kloster Block where
the threads are unravelled to and cut again to completely remove
them.
When there are five stitches to a block, there are four threads
of the fabric to cut and remove. I prefer to cut and remove each
individual thread of the fabric. I remove all the longest threads
first and then all the shorter threads.
Insert the needle under the thread to be cut. Lift the needle
'slightly', to slacken the thread of the fabric. Remove the needle
and insert the tips of the scissors. Tilt the scissors into the
Kloster Block stitches and snip. The thread you have cut will
spring back slightly to within the Kloster Block. If you lift
the scissors too much, you could distort the fabric and even
end up pulling out threads you did not want removing. This technique
helps to prevent those small stubs of fabric extending beyond
the end of your Kloster Block.
Carefully unravel the cut thread to it's opposite Kloster
Block and gently lift the thread up into the Kloster Block on
the back of you work and snip. The thread will again spring back
slightly to sit within the block. You may find a pair of tweezers
helpful.
If you have stubs remaining after cutting then you can either
carefully trim them or insert the thick end of your needle in
between the stitches of the Kloster Block and ease the stub through
to the back.
If you cut the wrong thread, all is not lost. Remove a thread
from the edge of the fabric and carefully re-weave it back into
the place where you have wrongly cut. If you cut a Kloster Block
stitch then you will need to remove the whole block and carefully
re-stitch it.
There will be vertical and horizontal threads remaining within
the shape. These are used to create decorative filling stitches.
KLOSTER BLOCKS: These are Satin Stitch blocks which
outline the design. They are long straight stitches which are
oversewn. The stitches alternate their direction by being worked
horizontally and then vertically. There are normally 5 stitches
to a Kloster Block over 4 threads of the fabric ( or 5 holes
of the fabric) , but always check your chart as this may vary,
depending on the effect desired.
There are 3 thickness' of thread normally used for Hardanger
embroidery, Perle No 5 is the thickest, Perle No 8 is a medium
thickness and Perle No 12 is the finest. Kloster Blocks are normally
worked with the thickest of the threads. This could either be
Perle No 5 or Perle No 8, depending on the count of the fabric
you are working on. One strand of Watercolours thread is equivalent
to a Perle No 5
To begin anchor the thread away with a waste knot on the right
side of the fabric. Either work your stitches over this thread
or work the thread into the back of the stitches later.
Always sew the Kloster Blocks by bringing the needle up on
the outside edge
of the block and take it down towards the central area of the
design which may be cut away later. Bring the needle up at A
and put it down at B. See the diagram below showing how to stitch
Kloster Blocks. Note that the first and last stitch of each set
of Kloster Blocks will share the same hole. At regular intervals,
look at the back of your work. The stitches will be slightly
slanted but should look the same as the front. If there are any
diagonal stitches or a tiny stitch which is worked into a neighbouring
hole then you have gone wrong. Carefully unpick your stitches
and take care to complete them correctly.
To finish feed the needle and thread through the back of the
stitches without encroaching the central area.
COPYRIGHT NOTICE: None of these designs
or instructions can be reproduced or distributed in any form
(including electronic) without the prior written permission of
Carol Tinson.

 --
--