We focus on the UK we're delighted to present this class by
a London based designer
Designed by Susan Albury of Hanging By A Thread
FREE ONLINE CLASS
Teaching our Online Class is Susan Albury, owner of Hanging
By A Thread, a specialty mail order business, established in
1996 and based in London, England. The company was created to
fill the gap at the "high end" of the UK needlecraft
market and to meet the needs of the adventurous experienced stitcher.
Susan's specialty lies in searching out and introducing to the
UK new designers, techniques, fibers, books, magazines and accessories,
importing the very best of whatever she discovers on her overseas
expeditions. In recognition of her achievements, "The Best
New Business" award was presented to Susan by Needleworker
Magazine. Of this accomplishment she is justifiably proud.
Customer feedback has reinforced Susan's belief that, in addition
to novel ideas and products, education is the commodity stitchers
desire most. She is a highly regarded teacher who takes her skills
on the road to needlecraft shows, guilds and stitching clubs.
A series of one day workshops is also offered regularly in London.
Highlights of the coming year will include a Historic Needlework
Guild event, in collaboration with Debbie Novak, the Guild's
founder, to take place in April. The program will consist of
a class taught by Debbie on April 24 and a private guided tour
of the famed Victoria and Albert Museum Sampler Collection, along
with other special activities. A residential Needlework Summer
School has been organized as well.
Susan's professional philosophy is inspiring: "I feel that
we are all perpetual students...The future of needlecraft, both
as a hand-craft and as an industry hinges on education at both
a consumer and retailer level. You cannot successfully teach
something that you have not mastered yourself. I am always learning
new skills and love taking classes with teachers and designers
I admire."
For more information on Susan's teaching schedule and itinerary
for 1999, please send a self- addressed, stamped envelope to:
Hanging By A Thread, PO Box 10723, London, SE3 0ZL, UK
For more information about products offered by her company contact
Susan at the above address, by phone at 00 44 (0) 181 318 3185
or fax at 00 44 (0) 181 318 1337
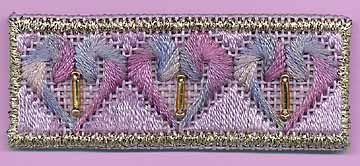
Hyacinth Hearts Brooch
Materials Needed
4" x 4" square of 18 count Mono Canvas - Shade
Lavendula
Waterlilies "Hyacinth"
Candlelight - Shade D1 Gold
Soie Cristale - Shade 6014
Mill Hill Small Bugle Beads - 72011
Mill Hill Seed Beads - 00557
Thread for Attaching Beads - either beading thread or floss to
match canvas
Size 24 Tapestry Needle
Beading Needle
Laying Tool
4" x 4" Stretcher Bars
Stitch Count: 52 threads x 19 threads
Design Size: 2 7/8" wide x 1 1/16" high
Preparation
1. Bind the edges of the canvas with masking tape so that
you won't catch the silk threads as you work. Attach the canvas
to stretcher bars, find and mark the centre point (shaded centre
square on master chart).
2. When using silk threads it is important to ensure that you
have clean, grease free hands and tidy nails so that they will
not catch the delicate silk fibres.
3. Always separate each strand of Waterlilies or Soie Cristale
from the length you are working with and then put them together
again for stitching - this ensures the best results. Candlelight
is a single ply thread i.e. used just as it comes off the bobbin.
Instructions
Hearts (Green Lines on Master Chart)
1. I recommend stitching the middle heart first to ensure that
you have centred the design on the canvas. The hearts are indicated
with green lines on the Mater Chart. Using a laying tool will
help you keep the long straight stitches flat and smooth. Do
not pull the stitches. Study the separate, large stitch diagrams
closely - you will see that the heart shape has been divided
in half and each side charted separately. Note that you will
be 'sharing holes' on the heart as you work your way up and around
to form the curve. Also note that the two sides of the heart
share holes at the centre base and centre top. Follow the stitching
sequence closely - once you have completed both halves of the
first heart you will have mastered this really pretty stitch.
Finish threads off neatly on the back of your work and don't
carry threads across the unworked centres of each heart as they
may show through to the front.
Satin Stitches (Blue Lines on Master Chart)
2. Once you have stitched the three hearts work the satin
stitches (blue lines on Master Chart) between them using 4 strands
of Soie Cristale. Again, a laying tool may help you to keep your
satin stitches smooth. Finish your threads off neatly on the
back.
Border (Black Lines on Master Chart & Separate Border
Chart)
3. The border is stitched using Candlelight. Refer to the
separate Border Chart. First of all come up at 'A' and take one
long stitch to 'D'. Then come up at 'C' and back down at 'D'.
Come up at 'A' and down at 'B' and up at 'C' and down at 'B'.
Then you will be 'couching' these long threads down with short
satin stitches over 2 threads all the way around (see chart)
come up at 'E' and work your way around the border either clockwise
or anticlockwise which ever is easier for you. Note that you
will be sharing holes with the hearts and satin stitches as you
work your way around. Finish your thread off neatly on the back.
Beads (Red Circles & Lines on Master Chart)
4. Attach beads using 2 strands of beading thread or DMC
to match the canvas and your chosen beading needle. Come up at
the centre base point pick up a seed bead then a bugle bead then
a seed bead again on your needle before going down into the canvas
again. I would suggest going through the beads a second time
with the needle to ensure that they are secure. Finish the thread
off securely on the reverse.
You are now ready to mount and finish your brooch.
Finishing
Materials
1 piece of card (measuring 7/8" wide x 1 1/16" high)
1 piece of fabric or felt to co-ordinate with colours chosen
for brooch
Thick PVA Craft Glue (such as Aleene's)
1 1/4" Gilt pin back
1. Make sure the edges of the card are straight and corners
square. A rotary cutter or craft knife will give a smoother edge
than scissors - but be very careful where you place your fingers
and use a straight edge such as a metal ruler so that you can
cut against the firm edge.
2. Remove canvas from stretcher bars and cut away canvas so
that you have 3/4" inch all the way around the finished
piece. Finger press along the edge of the stitching. Centre card
on wrong side of brooch. Cut out the corners of the canvas up
to the edge of the card - be very careful not to cut too far
here - and fold the sides in first then the top and bottom. Cutting
the canvas in this way prevents a build up of fabric as layers
are folded over each other. Once you are sure that the canvas
is centered on the card, glue down the edges only on the reverse
side of the card. Allow to dry.
Please be very careful with the glue, use just the smallest amount
- you don't want it to "seep" through to your stitching
on the front.
3. Cut a piece of felt or fabric to the correct size to cover
the back of the brooch. You may wish to use the mounted piece
as a template. If using fabric you may want to cut the piece
slightly larger and turn in a 'hem' so that you have a neat edge.
Glue the felt or fabric to the back of the brooch and allow to
dry thoroughly.
3. Glue the Gilt pin onto the back and your finished.
Your Hyacinth Hearts Brooch would look great on a black blazer
or sweater and it makes a lovely friendship gift for a fellow
stitcher!
Master Chart Key
Black Lines = Border using Candlelight
Blue Lines = Satin Stitches using Soie Cristale
Green Lines = Heart Stitch using Waterlilies
Red Circles/Lines = Beads
Scale For All Charts 1 Square = 1 Thread
Resources In The UK/Europe
Canvas West End Lace & Embroidery Supplies
Orchid Cottage, Drury Lane, Mortimer's Common
Reading
Tel: (0) 1189 332 670
Fax: (0) 1189 331 490
Caron Collection Macleod Craft Marketing
For Local Stockist Warlock Rd, Bridge of Weir, Renfrewshire
Contact Tel: (0) 1505 612 618
Mill Hill Beads Framecraft Miniatures Ltd
For Local Stockist 372 Summer Lane
Contact Hockley
Birmingham
Tel: (0) 121 212 0551
Fax: (0) 121 212 0552

 ------