Note to our visitors: Permission to reproduce these
patterns, instructions and charts has been granted by Sue Kerndt for our
visitors' personal use only. Any other use whether it be copied, electronically
reproduced, used as a teaching tool, in a class or for any other non personal
use represents a violation of the designer's copyright and requires the
express written permission of the designer for its use.
Back to Designer Spotlight Page
FREE pattern & instructions compliments
of Sue Kerndt
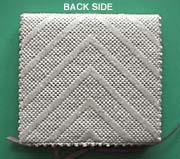
Florentine Needlecase
(Click here for charts)

 This
delightful needlecase is stitched in one piece. The 4 way pattern and background
is stitched on the right hand side of the canvas. The background stitch
is the same Florentine pattern without color changes. The background stitch
is continued on the left hand side of the canvas, which when folded over,
becomes the back of the needlecase. Palestrina knots combined with cross
stitches finishes the edges of the needlecase. This
delightful needlecase is stitched in one piece. The 4 way pattern and background
is stitched on the right hand side of the canvas. The background stitch
is the same Florentine pattern without color changes. The background stitch
is continued on the left hand side of the canvas, which when folded over,
becomes the back of the needlecase. Palestrina knots combined with cross
stitches finishes the edges of the needlecase.
LEVEL OF PROFICIENCY Intermediate
DESIGN SIZE Assembled Needlecase: 4" x 4"
68 threads x 138 threads
(72 threads x 142 threads with edging stitch)
MATERIALS
8" x 12" 18 count mono canvas
24 tapestry needle
8" x 12" stretcher bars
Basting Thread
Tacks
THREADS
1 skein Watercolours Abalone
3 skeins Impressions #7027
1 skein Impressions #7024
1 skein Impressions #7022
1 skein Soie Cristale #1091
1 skein Soie Cristale #1092
MATERIALS FOR FINISHING
5" x 9" lining material
2 pieces of felt 3 3/ 4 " x 7"
16" of 1/ 4 " ribbon cut in half
Sewing thread to match background
CANVAS PREPARATION
Locate and baste the horizontal and vertical center of the canvas.
Baste the outside borders according to the thread count (68 x 138). Secure
edges and mount on stretcher bars with tacks.
REMINDERS BEFORE STARTING
Separate and regroup threads using the number of plies indicated. Care
should be taken when using more than one strand or ply of a thread, to
make sure the threads lay parallel and are not twisting on each other.
Use a laying tool (rug needle, collar stay, bodkin, tekobari, etc.) for
this purpose
It is necessary to attach the canvas to stretcher bars to keep the canvas
taut. Using a frame weight or clamp will allow both hands free for laying
threads.
This is a four way pattern meaning that the design is repeated in each
quadrant at the miter line. Turn the canvas as necessary to work each quadrant
of the design.
Each line on the charts represents one canvas thread. When counting from
one area to another, count canvas threads, not holes.
Many of the stitch patterns used in this design consist of straight stitches.
Begin at the bottom of each stitch and end at the top.
The Florentine pattern used in this design has a series of upright stitches
worked in diagonal rows. It is beneficial to cover the back of the work
evenly with stitching threads. This can be achieved by working diagonal
rows in alternate directions (If the first row is stitched from left to
right then stitch the next row right to left.)
STEP 1 - SATIN DIAMOND STITCHES
5 plies Soie Cristale #1091
5 plies Soie Cristale #1092
From the vertical and horizontal center of the canvas, count 35 threads
to the right. The valley to the right of this canvas thread is the center
of the 4 way motif on the front of the needlecase. Stitch the Satin Diamonds
as indicated on the chart.
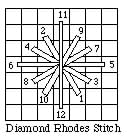 
STEP 2 - DIAMOND RHODES STITCHES
5 plies Soie Cristale #1092
In each of the four quadrants, stitch a Diamond Rhodes as indicated by
the chart.
STEP 3 - BACKSTITCHES
1 strand Impressions #7022
Backstitch between each Satin Diamond and Diamond Rhodes stitch.
STEP 4 - SATIN STITCHES
2 strands Impressions #7022
In each of the four quadrants, stitch the Satin stitches over 4 canvas
threads as indicated by the chart.
STEP 5 - FLORENTINE PATTERN
2 strands Impressions #7027
- 2 plies Watercolours #051
2 strands Impressions #7024
2 strands Impressions #7022
5 plies Soie Cristale #1092
5 plies Soie Cristale #1091
In each of the 4 quadrants, stitch the Florentine pattern as indicated
by the chart. The stitches will cover either 2 or 6 canvas threads.
STEP 6 - SATIN STITCHES
2 strands Impressions #7022
In each of the four quadrants, stitch the Satin stitches over 4 or 2 canvas
threads as indicated by the chart.
STEP 7 - DIAMOND RHODES STITCHES
5 plies Soie Cristale #1092
1 strand Impressions #7022
In each of the four quadrants, stitch a Diamond Rhodes as indicated by
the chart. Using 1 strand of Impressions, backstitch only the bottom of each diamond.
STEP 8 - BACKGROUND AREAS 1, 2 & 3
2 strands Impressions #7027
Following the same sequence set up by the Florentine pattern, continue
stitching the background, compensating at the edges. Work in diagonal rows
until each of the quadrants has been completed.
-
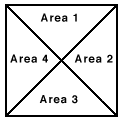
STEP 9 - BACKGROUND AREA 4 AND BACK OF NEEDLECASE
2 strands Impressions #7027
Following the same sequence set up by the Florentine pattern, continue
stitching in diagonal rows, reversing the direction at the horizontal center.
Note the center stitch covers 6 canvas threads. The entire back of the
needlecase is stitched in this pattern without a change in color or pattern.
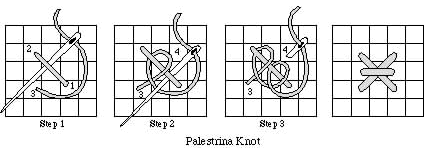
STEP 10 - EDGING
2 strands Impressions #7027
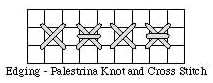
- Begin at the lower right edge, alternate cross
stitches with Palestrina knots. Work right to left, turning the canvas
for each side.
FINISHING
Remove the finished needlework from the stretcher bars. Trim sides to 1/
2 ".
Fold along the edging stitches.
Turn and press the raw edges of the lining piece so that it is the same
size as the finished canvas piece.
Attach the ribbons on each side.
Blind stitch the canvas piece and lining with wrong sides together.
Fold in half and press lightly using a pressing cloth.
Place the two pieces of felt inside the needlecase to make "pages."
Tack in place along the inside fold.
Fill with needles and enjoy!
|
