Back to Designer Spotlight Page
Class Compliments of Mary Duckworth
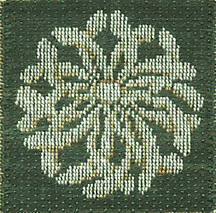
DESIGN SIZE: 3 1/2 " X 3 1/2"
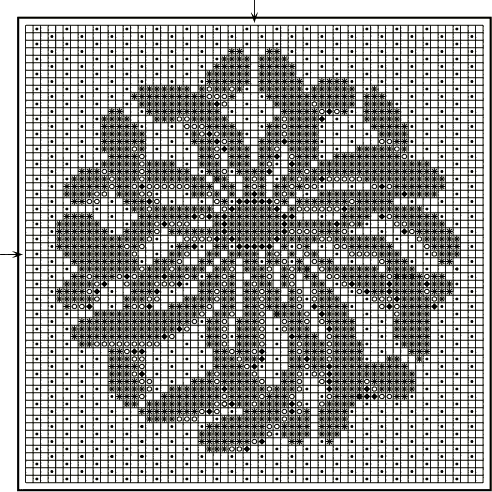
DESIGN CANVAS THREAD COUNT: 62 X 62
MATERIALS LIST:
1 Canvas cut, 18 mesh 9" x 9". This allows for the addition of
a
border if desired.
5 #24 needles.
1 9" x 9" stretcher strip frame, thumb tacks and masking tape.
Laying Thread:
Caron Watercolours-1 skein Pine Forest.
Background Couching Thread:
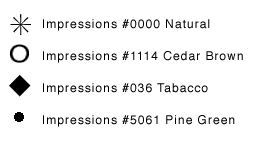
Caron Impressions-1 skein #5061 Pine Green
Design Couching Thread:
Caron Impressions-1 skein each: #0000 Natural, #1114 Cedar Brown and
#036 Tobacco
DESIGN BACKGROUND:
The "Chrysanthemum" was first presented as one of Duckworth Designs
"Simplified Classics from The Noh Collection" using the Tent Stitch.
It later appeared in a Leisure Arts publication of Mary's designs worked in Cross
Stitch as well as Tent Stitch. When the publication went out of print the design
rights reverted to Duckworth Designs. It is now being reborn as a design executed
in an Or Nué technique.
DESIGN GOAL:
To introduce stitchers to one of the ways to execute a design in the Or Nué technique. More importantly, to help the stitcher realize
that a given design is not always restricted to the technique as originally presented
but has, indeed, a life beyond its original interpretation.
OR NUÉ TECHNIQUE:
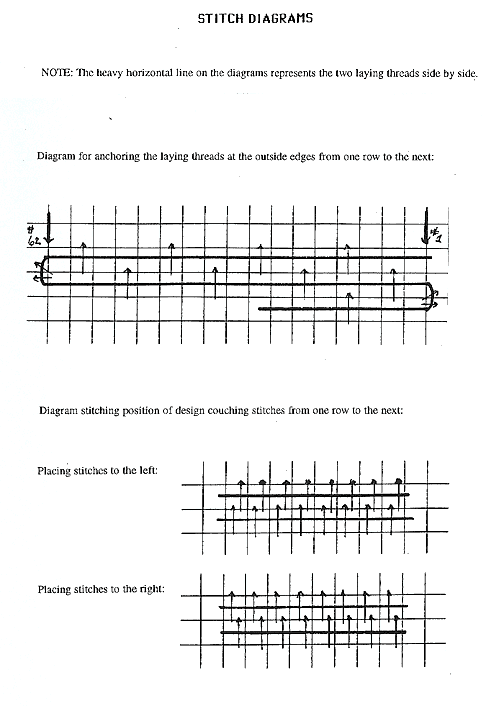
In this presentation, the laying threads are, from the beginning to the end, continuous surface threads laid and couched into position row
by row. The backgroundcouching stitches form a brick pattern. When the second row
placement of a design couching stitch is reached which is immediately below one above,it does not matter if the needle is inserted to the left or to the right of the
above stitch. What does matter is that the remainder of all couching stiches
are laid on thesame side. This is very important.
BEFORE STARTING:
If the stitcher is experienced in working with charts, whether for needlepoint or cross stitch, it is going to be necessary that a MENTAL
ADJUSTMENT takes place! Usually when one looks at a chart, the qrid squares represent
one intersection of canvas threads. In this instance, each square represents
one canvas void between the horizontal and vertical canvas threads. This is
necessary in order to indicate color placement of the upright couching stitches which
form the background pattern and create the design.
PREPARING TO STITCH:
Mount the canvas to the stretcher frame with thumb tacks and cover tacked edge with masking tape.
Measure 2 & 3/4 " in from the upper right corner on the diagonal. Mark the place by enlarging the void with a needle. The vertical canvas
thread to the left of the enlarged void will be design thread #1. Count 62 vertical
threads across on the same horizontal thread. Enlarge the void
"The Or Nué Chrysanthemum" 2. between the 62nd and 63rd
vertical threads.
The canvas thread to the right of the void will
be design thread #62.
PREPARING THE LAYING THREADS:
The Caron Watercolour skein is made up of a 5 yd. strand consisting
of three threads. Two of these three are used as the laying threads. Therefore,
one needs to be removed. Technically speaking, when working the design, the
laying threads should be continuous from the beginning to the end. Due to the
length of the strand, however, in this instance a technical cop out is hereby authorized. Simply open the skein and make one cut through all strands. Remove one
of the three threads from each strand as needed. Separate the remaining two threads
and realign.
TO BEGIN:
Thread the two laying threads in a needle. With a waste knot, sink to the back about 4" from outer right design edge. Bring to surface on
the right side of canvas vertical thread #1. Remove needle. Align side by side and lay
across the canvas to the left. Thread up the couching thread. Begin in the same manner, coming to the surface at the 1st couching stitch position. Proceed according
to the chart.
WORKING HINTS:
1. Always begin and end laying thread lengths at either the left or right side of the canvas. Never in mid-row. Use the anchoring procedure as outlined below.
2. Begin all threads with a waste knot and end all threads with a tail about three inches ahead of the stitching position. The ensuing couching stitches will anchor the threads and the knot and tail can be snipped away quickly.
3. Keep the laying threads free of twists and laying smoothly side by side. Before turning a corner for the next row, check the laying thread tension. Any errors in the tension of the laying threads can be corrected by either a gentle tug or easing with the tip of a needle. It
is important that a watchful eye be kept on the outside left and right vertical threads. It is essential these threads remain completely vertical.
4. It is necessary that the couching stitches be stitched into place smoothly and gently. Do not use a tight tension. Subsequent couching stitches in following rows will automatically tighten the previous stitches.
5. VERY IMPORTANT: There will be four threaded needles working on the canvas at the same time. As each unit of color is completed, look for its next position, either in the same row or in the next. Bring it to the surface in the correct position. If the reach seems to be too long at present or there are any doubts about the next position, then bring
it to the surface at the top of the canvas. ALWAYS have the needles parked on the surface of the canvas. If left on the back, the next thing that will happen is an incredible spaghetti mess!
6. Bind off each color of design couching thread as the end of the design is reached by bringing the thread to the surface as when a rethreading was done.
7. When the last row is reached, thread the two laying threads in a needle. Lay the threads on the canvas as in preceding rows and pass the needle to the back over the last vertical design thread. Bring to the surface about 4 inches in from the end. Remove needle. Check thread alignment and tension. Couch across therow as usual. Cut away the laying
thread tail. When the last couching stitch has been placed, turn the work over
and secure the couching thread by weaving in among the stitches on the back.
THAT'S ALL, FOLKS! ABOVE ALL, ENJOY!
Permission granted for shops and guilds to photocopy for
free distribution only.
COPYRIGHT NOTICE: None of these designs
or intructions can be reproduced or distributed in any form (including
electronic) without the prior written permission of Mary Duckworth.
|
