| Dyed and Gone to Heaven – An Online Magazine and Needlework Resource |
|
 |
Christmas Star Tin, Part I
by Rita Vainius
Click here for Pattern to print out
Materials needed:
Embroidery Hoop - 6" diameter
Cross Stitch Fabric - 18 count, 1 piece approx. 8" x 8"
Scissors for cutting fabric
1 Sheet Dressmakers Tracing Paper - approx. 4" x 4"
Rachel # B-5 (Royal Blue) & Rachel # B-18 (Sun Orange)-1 skein each
Rachelette # A 20 (Gold) - 1 skein
1 Crochet Hook - size C-2
Black Magic Markers, one with fine point, one with medium point.
Pencil with blunt end
1 Darning Needle or Yarn Needle - metal
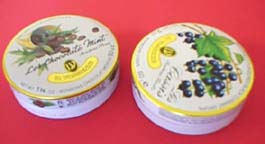
1 Tin of "La Vosgienne" brand of French pastilles or bon-bons - found in most larger drugstores, variety or candy stores (The tin measures 3" in diameter. Be sure to pick a flavor you like!)
1 Ribbon - 1//2" wide, either velvet or braided 9-10" long, in either gold to match the star or blue to match the background color
Elmers Glue
Deco Cement or other all-purpose household glue that will bond metal and fabric
4 - 6 straight pinsInstructions:
1. Print out the pattern of the star and cut away excess paper to make a square approx 3 1/2", with the star centered.
2. Lay out your cross stitch fabric on a smooth surface. Place your tracing paper face down over the center of fabric. Place star pattern face up over tracing paper. Secure edges of the pattern to the fabric with a few straight pins, so the design does not shift while you're tracing it. Trace over the star several times with a blunt-end pencil to transfer the design to the fabric. Once it has been transferred to the fabric, remove the pattern and tracing paper and go over the lines again, directly on the fabric, with a fine point marker, so the pattern lines do no fade as you work over them.
3. Place the fabric in the embroidery hoop so that your pattern is centered and adjust the tension so that the fabric is as taut as possible. As you work the design, adjust the tension as necessary to keep the fabric taut.
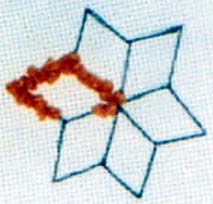
4. Use your darning needle to enlarge each hole as you work the design, following the lines. Start with the star outline. After enlarging the first hole, take your crochet hook and the Orange Rachel thread. Hold the thread in back of the fabric, put the crochet hook in through the front of the fabric into the hole you have enlarged with the needle, "pick-up" the thread from the back of the fabric with the hook, drawing the thread through to the front, creating a small loop. What we will be doing is adapting a rug hooking technique to create a sort of "miniature hooked rug!"
-----

5. Pull each loop out on top of the fabric to protrude about 1/8" to 1/4" long. Holding down the first loop, repeat this procedure of enlarging the next hole with your needle and then drawing the thread through the hole from the back with your crochet hook. Create the loops, in sequence, following the outline of the star pattern. Be sure to hold down each previous loop as you pull the next one through, otherwise you may unravel the previous loop. You can make this easier by making the loop longer when you pull it out (1" or more), holding it down and then pulling it to the shorter length specified after the next loop has been pulled to the front.
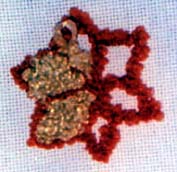
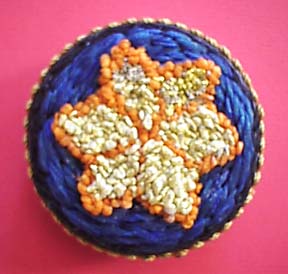
6. After you have completed the star outline, use the Gold thread to fill in the center of each diamond shape making up the star, in the same manner. You do not need to make a loop in each and every hole in the fabric. Just create enough loops to fill in each diamond pattern making up design so that the color fills in the shape and you cannot see the fabric underneath. Creating a loop in every other hole should be enough to do this.
7. After you have filled in the entire star, lay your hoop and fabric face up on a flat surface. Take the cover of the tin and place it over the star so that the star is approximately in the center of the tin cover. Then place your thumbs on the tin, one on each side and grasp the edges of the hoop on either side with your other fingers. Lift up the fabric with the tin over it and hold it up in front of you (with the back of the fabric facing you) toward a window or a light. You will see the outline of the tin edges through the fabric. Position the tin top so that the star design is centered within the round tin edges. Then holding the tin top securely in position over the fabric, lay it back down on a flat surface. With a fine point marker, draw around the outline of the tin top on the fabric, to mark the outside border of the design.
Be sure to come back for Part II next month
NOTE: Other applications for your miniature "hooked" design include lining the bottom with some cork, cut to the same size to make a coaster, to decorate some piece of clothing or a bag or as a rug for a doll house. Enjoy and Merry Christmas!
COPYRIGHT NOTICE: No part of these instructions/project nor the included diagrams/illustrations can be reproduced or distributed in any form (including electronic) or used as a teaching tool without the prior written permission of the CARON Collection Ltd. One time reproduction privileges provided to our web site visitors for and limited to personal use only.
© 1999 The Caron Collection / oice: (203) 381-9999, Fax: 203 381-9003
CARON email: mail@caron-net.com