This month in celebration of the Holidays...

MATERIALS:
- 1 sheet of 10 count plastic or vinyl canvas. The piece of canvas should
be at least 6" x 6".
1 skein each of the following colors of Rachel:
B4, White (optional)
B6, Black
B3, Red
B5, Blue
B9, Green
B17, Orange
B24, Purple
B8, Yellow
- #20 tapestry needle
ABOUT COLOR WHEELS When a beam of light is directed through a prism, the wavelengths separate
and a spectrum of pure colors becomes visible. These are the same colors
we see when we look at a rainbow. Sir Isaac Newton was the first person
to put these colors into the form of a circle, or color wheel. His color
wheel had seven colors, but nowadays the basic color wheel we most often
see has three primary colors (colors which can't be created from other
colors) and three secondary colors (colors which are created by mixing
two primary colors). The primary colors are red, blue and yellow. The secondary
colors are orange, purple and green.Color wheels are represented in many ways, but most often as a circle
or a series of overlapping triangles. We'll be using triangles and we'll
need six points -- one for each color in our color wheel.ABOUT DRAWING A SIX-POINTED STARA six-pointed star is basically two overlapping triangles and there
are many ways of drawing and arranging them. We've already drawn and charted
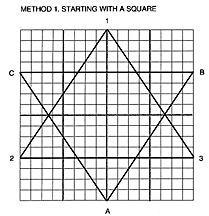
a star, but if you want to try doing your own, here's how.Method 1. To get our design, we started with a square
which we divided into 16 equal parts. (See the diagram below). We then
connected points 1 - 2, 2 - 3 and 3 - 1 to get the first triangle. To get
the second triangle connect points A - B, B - C and C - A. The result is
a six-pointed star which will be exactly the same height and width. The
problem with this star is that to our eyes it looks like it is wider than
it is tall. The advantage of this star is that it can be divided into smaller
triangles with each side exactly the same. This makes it much easier to
do our embroidery.
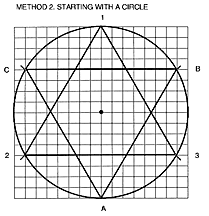
 Method 2. You can also draw a six-pointed star by beginning
with a circle. If you have studied geometry in school, you already know
how to divide a circle into six sections using a compass. (See diagram
below). The advantage of this star is that it looks like it is the same
width and height. In reality, it is taller than it is wide. For counted
thread embroidery, it is more difficult to work with because the larger
triangles do not easily divide into equal sized smaller triangles.
Method 2. You can also draw a six-pointed star by beginning
with a circle. If you have studied geometry in school, you already know
how to divide a circle into six sections using a compass. (See diagram
below). The advantage of this star is that it looks like it is the same
width and height. In reality, it is taller than it is wide. For counted
thread embroidery, it is more difficult to work with because the larger
triangles do not easily divide into equal sized smaller triangles.
 SPECIAL INSTRUCTIONS IF YOU WANT TO
DRAW AND STITCH YOUR OWN STARIf you wish to draw your own star, draw it on 10 count graph paper to
the size you want. Use either of the methods described earlier.Trace the outline of your star onto the canvas, being sure that the
points line up with one another and that the straight horizontal lines
are all on the same levelORConvert the outline you have drawn into a cross stitch chart by marking
each square of paper where the outline falls.ABOUT CROSS STITCHIf you don't already know how to do cross stitch, we have complete beginners
instructions in the Tips and Guides section of our website.When stitching this design, for the outline of the triangles,
complete each cross stitch as you go. When filling in the colors in the
triangles, do the cross stitch in the traditional manner, working across
the row from left to right and then back again from right to left.ABOUT RACHELRachel is a really cool thread to stitch with. It gives a shiny wet
look and the colors are deep and rich. It was named after the granddaughter
of the woman who introduced it in America. Because Rachel is a tubular
nylon yarn it can ravel easily while you are stitching with it, so special
precautions are necessary. Once it has been stitched though, it is practically
indestructible.It is best to work with shorter lengths of thread because the more you
pull it through the canvas, the more chance that the friction will cause
the thread to ravel. About 18" is a good length. I'm very lazy and
don't like to thread my needle often, so I usually use 36" lengths,
but I make the effort to be extra careful with my stitching.Because you're working on canvas with big holes, you probably won't
have too much trouble. But if you do notice any raveling, cut off the ragged
end at an angle right away and then just keep on stitching. Using a needle
that is a little larger than you would normally use also helps.You can do all sorts of other things with Rachel and you might want
to experiment with the leftover threads. We thread a fine metallic through
the tube to make Rachelette. We also thread one color of Rachel through
another to make new colors. It's amazing to see what happens when you do
this. Some pretty awful combinations of colors side by side look just terrific
when one is inside the other.We call the double layer of Rachel "Double Dipped Rachel".
Because it is thicker, you need to stitch on a canvas with larger holes.
7 count plastic canvas would be good. Or, you can use 10 count canvas and
do needlepoint instead of cross stitch. If you haven't done needlepoint
yet, it's basically one half of a cross stitch.STITCHING THE DESIGNStep 1. With black Rachel stitch the first triangle. See Chart
I below.
SPECIAL INSTRUCTIONS IF YOU WANT TO
DRAW AND STITCH YOUR OWN STARIf you wish to draw your own star, draw it on 10 count graph paper to
the size you want. Use either of the methods described earlier.Trace the outline of your star onto the canvas, being sure that the
points line up with one another and that the straight horizontal lines
are all on the same levelORConvert the outline you have drawn into a cross stitch chart by marking
each square of paper where the outline falls.ABOUT CROSS STITCHIf you don't already know how to do cross stitch, we have complete beginners
instructions in the Tips and Guides section of our website.When stitching this design, for the outline of the triangles,
complete each cross stitch as you go. When filling in the colors in the
triangles, do the cross stitch in the traditional manner, working across
the row from left to right and then back again from right to left.ABOUT RACHELRachel is a really cool thread to stitch with. It gives a shiny wet
look and the colors are deep and rich. It was named after the granddaughter
of the woman who introduced it in America. Because Rachel is a tubular
nylon yarn it can ravel easily while you are stitching with it, so special
precautions are necessary. Once it has been stitched though, it is practically
indestructible.It is best to work with shorter lengths of thread because the more you
pull it through the canvas, the more chance that the friction will cause
the thread to ravel. About 18" is a good length. I'm very lazy and
don't like to thread my needle often, so I usually use 36" lengths,
but I make the effort to be extra careful with my stitching.Because you're working on canvas with big holes, you probably won't
have too much trouble. But if you do notice any raveling, cut off the ragged
end at an angle right away and then just keep on stitching. Using a needle
that is a little larger than you would normally use also helps.You can do all sorts of other things with Rachel and you might want
to experiment with the leftover threads. We thread a fine metallic through
the tube to make Rachelette. We also thread one color of Rachel through
another to make new colors. It's amazing to see what happens when you do
this. Some pretty awful combinations of colors side by side look just terrific
when one is inside the other.We call the double layer of Rachel "Double Dipped Rachel".
Because it is thicker, you need to stitch on a canvas with larger holes.
7 count plastic canvas would be good. Or, you can use 10 count canvas and
do needlepoint instead of cross stitch. If you haven't done needlepoint
yet, it's basically one half of a cross stitch.STITCHING THE DESIGNStep 1. With black Rachel stitch the first triangle. See Chart
I below.
 Step 2. With black Rachel stitch the second triangle. See Chart
II below. Where the triangles intersect just skip over the stitch that
is already there. Do not make a double layer.
Step 2. With black Rachel stitch the second triangle. See Chart
II below. Where the triangles intersect just skip over the stitch that
is already there. Do not make a double layer.
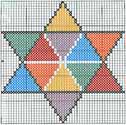
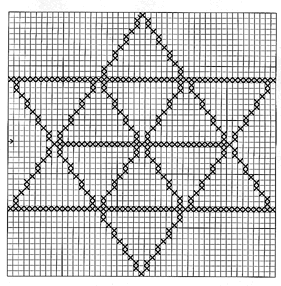 Step 3. Use either white or black to stitch the dividing lines
in the center hexagon. See Chart II.Step 4. Fill in each triangle with the appropriate color. See
Chart III below (click on the chart for a larger version to print out.)
Step 3. Use either white or black to stitch the dividing lines
in the center hexagon. See Chart II.Step 4. Fill in each triangle with the appropriate color. See
Chart III below (click on the chart for a larger version to print out.)
 FINISHING
Cut around the outline of the star, leaving one canvas "thread"
all around. Use your design as an ornament or paste it to a school notebook
or use it to decorate a gift.
COPYRIGHT NOTICE: No part of these instructions/project nor the included diagrams/illustrations
can be reproduced or distributed in any form (including electronic) or
used as a teaching tool without the prior written permission of the CARON
Collection Ltd. One time reproduction privileges provided to our web site
visitors for and limited to personal use only. |
