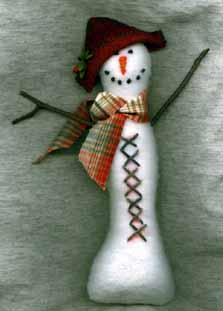
Instructions:
1. Print out patterns for snowman's
body, hat and scarf.
2. Place the snowman's body pattern face down over the 2 pieces
of white felt.
3. Secure the pattern to the 2 pieces of felt with straight pins.
4. Cut out the body following the shape of the pattern.
5. Print out the pattern for the snowman's
face and coat.
6. Place 1 piece of white felt face up and place the transfer
paper face down over it. Cut out the face pattern, leaving about
2" of extra border around the pattern. Use straight pins
to secure the pattern to the transfer paper and the felt. With
a pencil that is blunt, trace the features (eyes, nose and mouth)
of the face over the pattern. This will transfer them to the
felt.
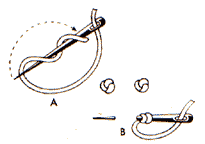 |
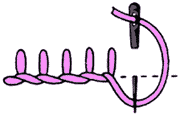
French Knot Stitch
Bring the thread out at the spot you want to make your stitch.
Hold the thread down with the left thumb and wind the thread
two times around the needle (A). Still holding the thread, twist
the needle back to your starting point and put it back through
the fabric close to where the first thread came out. (See arrow).
Pull the thread through to the back and go on to the next stitch
(B). |
7. Using 2 ply of Midnight thread, refer to the diagram for
the French knot stitch to make a French knot for each of the
eyes and then make 6 French Knots to form the mouth.
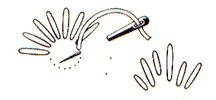 |
Straight Stitch
This is a single stitch, which can be worked in a regular
or an irregular manner. The stitches should not be too long or
too loose. |
8. Using the diagram for the straight stitch and 1 ply Tahiti
Watercolours thread, follow the pattern of the nose going from
left to right to make horizontal stitches and going from top
to bottom. Cut the piece of Watercolours thread to use just the
orange color thread. At the top, the stitches will be longer
and will get shorter as you go down to make a carrot shaped nose.
9. Take the paper with the design for the snowman's coat and
trim the paper to approximately 2" all around the pattern.
Following the same instructions as in Step 6 and 7, trace the
pattern onto the white felt in the appropriate place.
10. Using 3 ply Tahiti Watercolours, use straight stitches to
make the "X's" on the snowman's coat from top to bottom.
Cut the Tahiti thread to use only the green thread.
11. Place the other piece of white felt face down and place the
piece you have just embroidered over it, face up.
12. With 1 ply of Watercolours Snow White, starting at the neck
on the left side and working towards the bottom of the snowman,
use a simple, single stitch around the edges of the felt to attach
the front piece to the back piece. Place the stitches approximately
1/8" to 3/8" apart and no larger than _" long
from the edge. Continue until you have secured the lower body
all the way around the neck on the right side. Do not cut your
thread. The only piece not stitched together yet will be the
head.
13. Take your snowman and spread apart the 2 pieces of felt at
the neck. Pour in the dried beans to fill the bottom 2"
of the snowman. These will give the snowman some extra weight
at the bottom so he can be freestanding. Then fill the rest of
the body with the poly-fill stuffing, making him as "plump"
as possible.
14. Continue stitching around the head from the right side up,
around the top and down to the neck on the left side with the
1 ply Snow White Watercolours. When you are about 1 _ to 2 "
from where you started, do not cut your thread but fill the rest
of the snowman with stuffing. Holding the 2 edges of the felt
together tightly (to keep in the stuffing), finish stitching
the snowman's head closed.
15. Take one twig and insert it into the side of the snowman,
between 2 stitches, approximately 3 _" down on the right
side. Take the other twig and insert it approximately the same
place on the left side. Your snowman has just "popped"
to life!
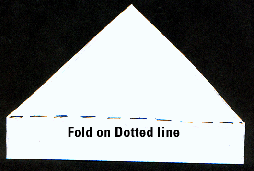
16. Cut out your hat pattern leaving approximately 1" of
paper all around the pattern. Place the 2 pieces of dark colored
felt face up and place the pattern for the hat over them. Secure
the pattern to the felt with straight pins. Cut out the hat following
the shape of the pattern. The triangular shape of the pattern
will form the top of the hat and the rectangular part underneath
it will be folded up to make the brim. See hat pictures below.
17. Using 1 ply of the Midnight Watercolours thread and using
the Buttonhole stitch, start to connect the front part of the
hat to the back on the left side bottom and continue all the
way around the top to other side so that only the bottom is open.
Make the stitches about 1/8" apart and 1/8" _"
long. Do not cut your thread.
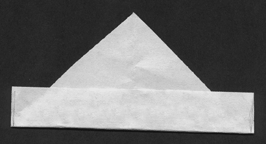
18. When the top of the hat is attached, fold up the flap that
will be the brim, all around. Then continue to stitch the buttonhole
stitch around the edge of the brim on both sides. Put the hat
on the snowman and see him really come to life!
19. Take the scrap piece of fabric and tie it around your snowman's
neck. Look how jaunty and proud he is! Time to name him.
Be sure to come back for Part 2 in an upcoming month.
COPYRIGHT NOTICE: No part of these instructions/project
nor the included diagrams/illustrations can be reproduced or
distributed in any form (including electronic) or used as a teaching
tool without the prior written permission of the CARON Collection
Ltd. One time reproduction privileges provided to our web site
visitors for and limited to personal use only.