Welcome
to this month's class instructed by
on
Dimensional Applique Enriched with Embroidery
-
 Karen's
needlework is a direct outgrowth of her lifelong appreciation for and fascination
with flora and fauna in their native habitats. She describes her work as
dimensional applique enriched with embroidery. In
teaching her own classes she encourages students to experiment with a wide
variety of materials and different groups of stitches to discover how they
relate and how they create pattern and texture. The variety of expressions
that can result from this interplay is almost endless. Karen's
needlework is a direct outgrowth of her lifelong appreciation for and fascination
with flora and fauna in their native habitats. She describes her work as
dimensional applique enriched with embroidery. In
teaching her own classes she encourages students to experiment with a wide
variety of materials and different groups of stitches to discover how they
relate and how they create pattern and texture. The variety of expressions
that can result from this interplay is almost endless.
Karen has always been especially attracted to
the small creatures of nature. The class and pattern example below is a
preserved memory of her discovery last year of a new species of damsel
fly. Using needle and thread, you will be recreating a miniature tableaux
depicting this damselfly, perched on a seed pod, amid some wild grasses.
Watch for our Gallery Feature next month where
we will highlight examples of Karen's creative stitching.
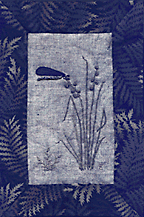
DANDELION DESIGNS: DAMSELFLY SAMPLER
CLASS
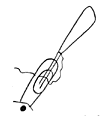
 Damselflies perch with their wings bent backward, parallel
to their body, This is how they are distinguished from dragonflies. The
damselfly is seen here in profile; only one wing is visible. Working this
sampler will introduce you to a contemporary application of a common stumpwork
technique: free standing wired and embroidered elements. Make a twisted
cord from a small piece of Antica and you have a wonderful, realistic
body that stands firm and free above the fabric. The Evening Pond Scape
demonstrates how many of the raised elements of stumpwork can be combined
with appliqué and surface embroidery. Damselflies perch with their wings bent backward, parallel
to their body, This is how they are distinguished from dragonflies. The
damselfly is seen here in profile; only one wing is visible. Working this
sampler will introduce you to a contemporary application of a common stumpwork
technique: free standing wired and embroidered elements. Make a twisted
cord from a small piece of Antica and you have a wonderful, realistic
body that stands firm and free above the fabric. The Evening Pond Scape
demonstrates how many of the raised elements of stumpwork can be combined
with appliqué and surface embroidery.
-
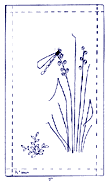
- Click on PATTERN for a larger example
to print out and stitch. Click on STITCHED
PATTERN for a close up of the finished piece.
The finished piece measures 6" x 9"
SPECIFIC MATERIALS:
4" x 7" piece of 32 ct linen, Vermont Fieldstone , Green
Mtn. Hand Dyed linen
6" x 9" piece of Pellon fleece
9" x 12" piece of 100% cotton print for finishing as small quilt
2" x 4" piece of black organdy ribbon for wing
2" square of Heat and Bond Light fusible web
Caron Collection Threads:
Antica, AT-3, 6" for abdomen of damselfly
Soie Cristale, #0020, black, for wing and thorax and legs
#5002 and #5004 for stems of grass
#0925 for fern and initials
Double-Dipped Rachel, #B1210, coffee, for seed pods
TWE/BEADS - 11M81AB: RED AB, one bead for damselfly eye
General Materials:
iron, toweling; wire cutters
4" of #26 or #30 gauge covered floral wire
small sharp scissors with a very fine point; sharp paper scissors
Fine embroidery (#9) or crewel needle; large eye darning needle; straight
pins
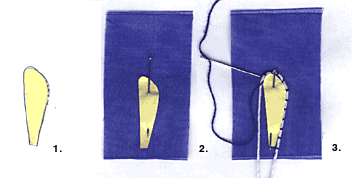
PREPARING THE BACKGROUND FABRIC
Center the pressed linen on the fleece, and baste together 1/4" in
from the edge of the linen.
EMBROIDERING THE DESIGN
Follow the full size Embroidery Design Key or create your own grasses for
the damselfly's perch. The stems were embroidered with two strands of Soie
Cristale silk in a combination of outline and stem stitch. One strand
of silk was used to create the simple fern from lazy daisy stitches worked
along straight stitch stems. Double-Dipped Rachel colonial knots
make good seed pods.
STABILIZING THE ORGANDY RIBBON FOR THE
WING
- You will fuse two pieces of organdy ribbon with
Heat and Bond Light.
1. Set dry iron on silk.
- 2. Place the ribbon on a towel covered, firm
ironing surface.
- 3. Place the web on half of the ribbon, paper
side up. Press for 2-3 seconds. IMMEDIATELY REMOVE FROM TOWELS or it will
stick. Cool.
- 4. Remove the paper from the web and fold the
ribbon in half. Cover with a towel or teflon press sheet and fuse for 2-3
seconds. IMMEDIATELY REMOVE TOWEL or it will stick. Cool.

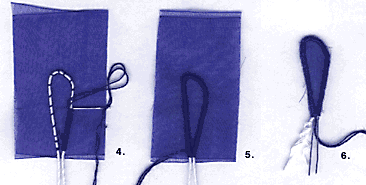
ASSEMBLING THE DAMSELFLY
1. Select the perch site.
2. Break off a 6" piece of Antica. To make a twisted cord,
hold both
ends of the thread and twist one end until the thread starts to kink. Without
letting go of the ends, bring both ends together. The thread should double
and twist around itself, forming a firm cord. If this drives you crazy,
get someone to hold one end for you while you twist. Grab the cord in the
middle, and bring both ends together. The cord is fairly stable.
3. Thread the ends into a large eye darning needle and insert the needle
into the perch site. If necessary, widen the hole by working the needle
in a circular motion. Carefully pull the cord through, leaving a piece
on top of the fabric that is slightly longer than the wing. Pin at the
entry point to keep the cord from slipping. On the wrong side, make on
overhand knot in the cord, as close to the fleece as possible. Leave this
for now.
4. To apply the wing, insert the darning needle
into the fabric, just beyond the body; leave the eye protruding. Thread
the tails of the wing into the eye, and place the two wires into the eye
so that they are parallel with the needle.
Secure the wires in the eye with the fingers of one hand, and pull the
needle
through from below with the other hand. Remove the needle. Gently tug on
the tails to seat the wing firmly against the fabric.
- 5. Carefully bend the wires back against the
fleece. Use the tails to tack the
wires to the fleece only. Also, secure the knot and the ends of the twisted
cord with this thread.
- 6. Outline the thorax with four straight stitches
that share common corner
holes. Beginning in the center, and working out to each side, fill in with
satin stitches taken over this outline. Use two strands of black silk.
- 7. With one strand of black silk, work the legs
in straight back stitches. Add the bead for an eye, and make a small fly
stitch antenna. A colonial knot would also make a suitable eye.
-
- 8. Sign or initial your piece. Finish as a small
quilt or frame it. It would also make a good crazy quilt patch. Congratulations!
DANDELION DESIGNS:
-
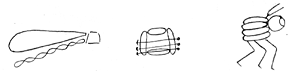
CONSTRUCTING A WIRED ORGANDY
DAMSELFLY WING
1. Cut out a paper pattern. Fuse organdy ribbon according to directions.
2. Pin the pattern to the organdy, 1/8" above the finished edge, or
aligned to a pattern in the ribbon. Gently bend a 4" piece of #26
gauge covered wire around the pattern to establish the general shape. Don't
cross wire ends.
3. Using one strand of silk and a very fine(#9) embroidery/crewel needle,
tack the wire against the pattern with an overcast stitch worked straight
across the wire. Tacking stitches should not extend beyond the wire; they
should be tight and of even tension. Space stitches about an 1/8"
apart, taking more stitches around curves.
-
4. Remove pattern. Using two strands of silk, create a finished edge by
overcasting the wire. Keep the threads flat and the stitching smooth, even,
and straight across the wire. Stitches should not extend beyond the wire.
Tacking will blend in.
5. Finished edge completed. Take a stitch across both wires. On back, make
an overhand knot under a stitch and cut thread, leaving a 4" tail
if possible. Complete any embroidery inside the wing, keeping the wing
flat as you stitch.
- 6. Carefully cut out the wing with small, sharp
scissors. A tiny dot of tacky glue will repair a cut thread. Unwrap the
two wires and cut the cover thread away.
Karen's designs are published under the name,
"Dandelion", and are available from Ellen Nell , Inc. at (800)499-1224
or directly from Dandelion at (410) 329-8020.
COPYRIGHT NOTICE: No part of these instructions nor the included designs/charts can be reproduced
or distributed in any form (including electronic) or used as a teaching
tool without the prior written permission of Karen Cohn of Dandelion. One
time reproduction priveleges provide to our web site visitors for and limited
to personal use only.
|
