| Dyed and Gone to Heaven – An Online Magazine and Needlework Resource |
|
 |
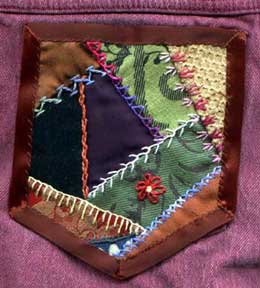
Crazy Patchwork Pocket
Part II (Click here for Part I)
Project by Rita Vainius
--- 
Stitch instructions are on a separate page. Please click here for Diagrams
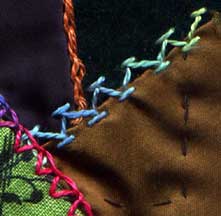
Step 10: With a new color thread (using 1 ply of Watercolours thread of any color), refer to stitch diagram and instruction, to make a series of chevron stitches across a seam on your patchwork pocket.
--
Step 11: Refer to stitch diagrams for feather stitch and chain stitch and then make a series of these stitches on the 2 remaining seams that have not yet been embellished on your pocket. Again use 1 ply Watercolours thread for each stitch.
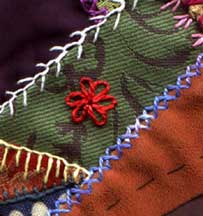
Step 12: Choose one of your larger patches that is a solid color fabric. Choose a Watercolours thread for your flower petals. Refer to the lazy daisy stitch diagram and instructions to make a series of lazy daisy stitches in a circle to create the petals of a flower. Start each stitch in the same center hole and make about 5 - 7 lazy daisy stitches to complete the flower shape.
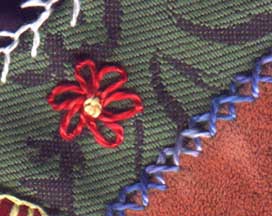
Step 13: Choose a new color for the center of the flower. Refer to the French knot stitch diagram and instructions to make one French knot in the middle of the flower.
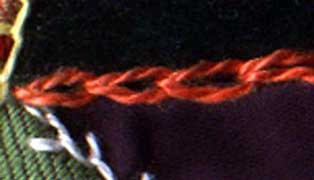
Step 14: Your patchwork and embroidery are now complete. Of course you can decorate it even further with more stitching, buttons, charms, lace and numerous other ways. Another thing about Crazy Patchwork is how crazy you want to get with decorating is totally up to you! But, if you are done decorating this particular pocket, take your satin or velvet ribbon. Fold it in half. You may want to press the seam with an iron to make it more obvious. Take some sewing thread that will blend with the color of your ribbon and thread a regular sewing needle with it. Trim your patchwork pocket to the size of your original traced paper pocket pattern. Place the ribbon so that the middle folded seam lies along the outline of your patchwork pocket. One half of the ribbon will overlap the edge of the front of the pocket and the other half of the ribbon will fold over the edge and overlap the back of the pocket. Then sew the ribbon with small stitches along the edge, securing it to the front of the pocket. Repeat in back of pocket.
Step 15: Using straight pins, secure your completed pocket to your jeans pocket, to hold it in place while you sew it to your jeans. Use the same thread you used to stitch the ribbon to the patchwork. Use small stitches to sew the edge of the pocket (where the seam in the ribbon is) to the outside edge of the pocket on your jeans, shirt or jacket.
Step 16: Crazy Patchwork is complete and ready to be admired and envied by all your buds! If you have a corresponding pocket on the other side of your jeans, jacket or shirt, and are ambitious, you may want to use a totally different combination of fabric shapes, colors and stitches to make a different crazy patchwork for the other side. Now that would really be Crazy, Man and very, very COOL!
COPYRIGHT NOTICE: No part of these instructions/project nor the included diagrams/illustrations can be reproduced or distributed in any form (including electronic) or used as a teaching tool without the prior written permission of the CARON Collection Ltd. One time reproduction privileges provided to our web site visitors for and limited to personal use only.
© 1997 The Caron Collection Ltd. / Voice: (203) 381-9999, Fax: 203 381-9003
CARON email: [email protected] / Webmaster [email protected]