1. Basic removal of all threads for hemstitching fabric preparation
are basically the same, but the number of threads removed &
the methods of dealing with them may differ. I am going to give
the basic instructions here, then as you move down the bands,
be sure & double check the numbers for your thread removal
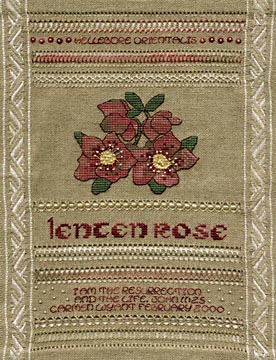
& your method of dealing with them. The stitched model shows
the sampler done on a band. If you choose to stitch the design
on the band you will be unweaving your cut threads over to the
border on the sides of the band & reweaving them into the
back weaving on the decorative edge. If you choose to stitch
the sampler on plain linen, the method I use is the total removal
of the first unwoven thread over to the edge of the fabric. Then
you unweave your 2nd thread only over to the edge of the design
area (where you should have a basting line stitched, running
vertically the length of the fabric). You then thread up the
unwoven thread on your needle & weave it into the space outside
the basting line that was made when you removed your first thread;
weaving it over & under so it once again becomes part of
the weave of the fabric. This is the method I prefer to use,
but is not possible when working with a woven edge band. Even
when you are removing an odd number of threads, this method will
work if when you come to the odd last thread, just unweave it
over to the basting line & weave it in between the threads
going out toward the edge instead of into an empty space. Weaving
in without removing any threads works just fine, but I feel that
using the alternating thread method makes the fabric lay better
& doesn't bulk up the weave unnecessarily. Go to the approximate
center of your fabric & cut the specified number of threads-cut
one at a time. Depending on your fabric, deal with the threads
as instructed above. Do all threads to both sides of your center
in preparation for your hemstitching. If you are working on plain
fabric, find your center on fabric, & run a horizontal basting
line over 42 stitches to either side of center, where you will
turn & run vertical basting lines up & down on both sides
of fabric. Go back & run a vertical basting line up the center
too. If working on the band fabric, run center basting lines
vertically & horizontally.
2. The first band will be your antique hemstitched
band on the top. Band 1 & band 14 are both done the
same, but you will turn your fabric 180 degrees when working
the first band. Fold top raw edge to the back 1/3 inch &
fingerpress it along the same horizontal thread. You might want
to trim any raveled threads. Fold under & fingerpress once
more. Baste-this doesn't have to be neat-just to hold folds in
place while you work your hemstitch. Cut the first 3 threads
above fold at center & prep as mentioned in 1. Antique hemstitch
is worked from the back of fabric. Use 1 strand Anchor #12 Pearl
Cotton/387. Secure working thread in fold of fabric, leaving
a long enough tail to thread up later & stitch fold down
out to edge of border & up along the folds to secure them
neatly. Bring needle up to start 2 threads down into the fold
along left hand side. You will be wrapping 3 vertical threads
& bringing needle back up for next stitch 2 threads down
in fold. Use a sewing motion rather than a stab & be careful
not to catch the front of the fabric as you come down into the
fold. The only part that should show from the front on this stitch
is the wrap around the 3 threads. Bring needle to working side
at 1, go up 2 threads/over 3 threads & go down at 2, sliding
needle under the 3 vertical threads to emerge at 3. Bring needle
across top of 3 threads, pulling slightly at this point. Enter
fabric at 2 once more, but slide needle down between front of
fabric & fold to come up at 4. 4 then becomes #1 of your
second stitch & you repeat this across width of fabric. On
the subsequent bands you will not be working with folded fabric,
so your stitches are going to show & it doesn't really matter
if you stitch from the back or not. There are 2 schools of thought
on this & one is just as valid as the other-it is your choice.About
1 or 2 inches from the end of your row, count your threads by
3's (or whatever number you happen to be stitching over) &
if you see that you will end up with an odd number of threads
(say 4); go ahead & make one of your wraps with 4 instead
of 3 before you get to the end of the row-this is called compensating
& is much less obvious if you do it before your last stitch.
3. Band 2. Count down 5 threads from bottom of band
1 (count from the cut-this is the bottom of the band). Cut next
8 horizontal threads-prep fabric. Work Serpentine Hemstitch using
1 strand Wildflowers Cherry Cordial. Work this just as you did
the first hemstitching from left to right along bottom of cut
section, only you will be gathering 4 threads for your stitch
instead of 3. Bring your needle back to the working side 2 threads
down as you did before. When you finish the row, end your thread
& turn your fabric 180 degrees to work the top part. Work
this the same as the lower part except you will gather 2 threads
from each bunch. This will mean that your first stitch will
be a compensating stitch-gathering only 2 threads; then start
gathering 4 threads with your next stitch & so on.
4. Band 3. Go to center of fabric & count down
11 threads to bring you to the baseline of the backstitched lettering.
Do the backstitched lettering using 1 strand Needle Necessities
#103. This is done over 1 thread & is provided on a separate
chart. A word of caution here-for the most part I've had no problems
ever with Needle Necessities bleeding when pressed with a damp
cloth or even washed-this one bled-so use caution. If you have
doubts, it is better to err on the side of caution & stitch
a bit on a doodle cloth & test it. Or iron it with a dry
press cloth. The small Jessicas are also stitched using 1 strand
Needle Necessities #103. Stitch 5 per side with 3 threads between
each Jessica & 3 threads away from lettering. Although it
takes 5 graph squares to show the stitch, it actually covers
only 4 threads, so I offset them from each other (lining one
up with top of lettering & the next up with the bottom of
lettering) so they dance across the fabric. Stitch a Mill Hill
Petite Bead 40123 in the center of each one.
5. Band 4. Count down 7 threads from base of band 3,
cut next 4 horizontal threads, withdrawing them to within 2 threads
of start of decorative band (or basting stitches). Skip next
4 horizontals, then cut & prep the next 4. Work regular hemstitch
across outer cut sections using 1 strand Anchor Pearl Cotton
#12/387. Gather 4 threads per stitch & go down 2 threads.
If you have a compensating stitch, be sure you work it on the
same threads for both edges. Work Italian Hem stitch from right
to left from the front with 1 strand Wildflowers Cherry Cordial.
Gray arrows show path on back of fabric, black ones path on front.
Come up 4 threads in from right hand border in 1, take thread
across 4 threads to go down in 2 . Bring needle back to front
in 1, slide it into the fabric at 3, going under 4 threads to
bring it out at 4, wrap it back over to go into 3 again, turning
it to slide diagonally across back of fabric to come out at 5;
which then becomes 1 of your next stitch. This stitch works best
if sewn, rather than stabbed & remember that these are pulled
stitches.
6. Band 5. Count down 6 threads from cut section on
bottom of band 4 & prepare your fabric exactly as you did
for that one. Work outer sections with regular hemstitching using
the same thread as before. Work Diamond Border on uncut section
using 1 strand Ginnie Thompson Flower Thread/100 or 1 strand
Anchor Pearl Cotton #12/White. Work from right to left across
the top section first. Black arrows show path on top, gray arrows
path on back. Bring thread to the front in center of uncut threads
3 threads out at 1. Take it back to the right across 3 threads
to go down at 2, bringing it back out at 1 again. Take it up
& in at 3, sliding it under 3 threads to the left; bring
it back over to the right & down at 3 once more emerging
at 4. Then down at 5,over to left for 3 threads to come out &
start the whole sequence again. Pull all of the horizontal stitches
tight. When you reach the end of the top row (you might want
to start a new thread here); turn your fabric 180 degrees &
work the other side as a mirror image of the first. This stitch
also works better if done with a sewing motion. Your horizontal
stitches across the middle of uncut section will share holes
with the stitches from the first trip.
7. Band 6. Work all cross & 1/4 stitches first,
then backstitch, chain stitch, straight stitches & then beads.
All black triangles stitched with 2 strands Waterlilies Cherry
Cordial. Play with the colors-stitch the blooms petal by petal,
in vertical rows or in horizontal rows-it's up to you. All x's
stitched with 2 strands Needle Necessities 103. All leaves &
stems, o's stitched with 2 strands Needle Necessities 1331. All
backstitching done with 1 strand Anchor Floss 382. Chain stitching
in centers of flowers done with 1 strand Needle Necessities 162.
Stitch these starting where: is & stitch in a circle till
centers are filled. Long stitch filaments with 1 strand of Needle
Necessities 162. These are not charted-you add them where you
think they look best. At the end of each filament, stitch on
a Mill Hill Petite Bead 40123 for the anthers. Realize that you
are looking directly at a flower center so cluster 3 or 4 beads
in the center ( you wouldn't see their filaments) & radiate
the other filaments out from them.
8. Band 7. I call this one String of Pearls, it is
an Interlaced Band strung with pearls as you stitch it. Count
down 6 threads from bottom of band 6, cut next 8 horizontal threads
& unweave to within 2 threads of woven border as you did
for bands 4 & 5. Work basic hemstitch on top & bottom
sections as before, gathering 3 threads per stitch, going down
2. To work this you will treat each cluster of threads after
your hemstitching as 1 thread to do the interlacing. Work this
from the front-right to left. Anchor a length of the #387 Pearl
cotton (make it a long one-you don't want to run out in the middle
of this) along the right side, bringing it to the front in the
center of your cut area. Take needle out to the left over the
first 2 clusters; call them A & B, start to the back between
B & C (needle is now facing right), swing your needle up
under B, down over A & flip needle so it is again facing
right. Trust me-it works. You may want to practice your tension
on a doodle cloth on this one. Now string a 2.5mm Creme Pearl
from SJ Designs, take it all the way to the base of the thread
& do another stitch, string a pearl, do a stitch, etc. You
can also adjust the tension with your needle as you go.
9. Band 8. Cross stitch lettering, including backstitches
with 2 strands Needle Necessities 103.
10. Band 9. Count down 6 threads from band 8 &
prep fabric the same as for bands 4 & 5, gathering 4 threads,
going down 2 for each stitch. Work Four sided Stitch over uncut
horizontal threads using 1 strand GTFT/100 or Anchor Pearl #12/White.
Work on right side of fabric from right to left, over 4 threads.
Arrows same as previous charts. Come to the front at 1, go down
4 threads to right at 2, bringing needle out above 1 at 3. Take
needle down 4 threads to right at 4, coming up in 1 again. Go
down at 3, taking needle diagonally across back to come up 4
threads to the left of 1 & repeat across row.
11. Band 10. Hemstitched Chevron Border. Count down
8 threads from bottom of band 9, cut & prep next 3 horizontal
threads, skip next 6 threads, cut & prep next 3 horizontal
threads. On this one you will work the pattern on the uncut section
before doing the hemstitching on top & bottom of the cut
sections. Use 1 strand 36" length of Waterlilies Cherry
Cordial to work the pattern. Work on the front from left to right,
using a sewing motion. Bring needle to the front below uncut
stitches 2 threads out from left side at 1. Take needle up over
the uncut threads, 2 threads to the right & enter the fabric
at a diagonal angle with the point facing left to emerge at 3,
loop your working thread so it lays to the top right & take
your needle 4 threads to the right to enter fabric at 4 at a
diagonal, bringing your needle back out at 2, pulling your stitch
through over the working (looped) thread. You are now
at 2. Take your needle down over uncut threads & 2 threads
to the right, entering the fabric at 5 at a downward diagonal
angle to bring it out 2 threads to the left to emerge at 6. Lay
your working thread in a downward loop going back to the lower
right. Take needle into fabric at a downward diagonal to enter
at 7 & emerge at 5, once more bringing your needle out over
the looped working thread. This sounds horrendously complicated,
but it really isn't once you get the pattern-use a doodle cloth
& stitch as you read the instructions-things always make
more sense with a needle in hand. After this-the rest is a piece
of cake. Continue on across row, I cannot stress enough the importance
of coming out over the working thread-it is what makes the stitch
work. Using 1 strand of the Anchor Pearl/387, do regular hemstitch
on either side of band; making your clusters over 4 so they lay
at the points of the chevrons or you can stagger them for a lacier
look. On the model I went for the wraps at the points.
12. Band 11. Using provided alphabet & graph; chart
& center your name & date for 3rd line of verse area.
From center bottom of band 10, count down 11 threads which will
bring you to the baseline of the first row of verse. These are
stitched over 1 thread using 1 strand Needle Necessities 103;
leaving 2 threads between each line. Scatter Mill Hill Petite
Bead 40123 randomly over open areas on either side of verse.
13. Band 12. work exactly the same as you did in Step
8, Band 7 except when you do the interlacing use 1 strand Wildflowers
Cherry Cordial & eliminate the pearls.
14. Band 13. This is called a Ladder Hemstitch. Count
down from cut area on bottom of previous band 6 threads &
cut next 6 threads. Prep fabric & work basic hemstitch on
both edges, gathering 3 & going down 2. Work on the front
going from left to right using either 1 strand Anchor Pearl #
12/387 or 1 strand Wildflowers Cherry Cordial. When you reach
the opposite side, turn fabric 180 degrees & work back across
other edge. You may have compensating & if you do, be sure
& work it on the same stitch on both edges.
15. Band 14. Do Antique Hemstitch on this end exactly
the same as you did at the top.
MATERIALS LIST:
12" x 8" 28 ct. nat/white linen Band/#975501
from Martin Winkler GMBH/Access Commodities
other recommended fabrics would be 28 count linen from Wichelt
in either Lambswool or Shell-these would have to be cut about
12"x10" for finishing the sides.
Waterlilies Cherry Cordial
Wildflowers Cherry Cordial
Needle Necessities 103, 1331, 162
Anchor Pearl Cotton #12/387, Anchor floss 382
Ginnie Thompson Flower Thread 100 or Anchor Pearl Cotton #12/White
Mill Hill Petite Bead 40123
SJ Designs 2.5mm Creme Pearls
Kits for Lenten Rose, which include the Needle Necessities
threads and the Pearls from SJ Designs, are available for $3.50
with a self addressed envelope, with 3 -33 cent stamps attached.
The Caron Collection threads used are readily available at most
needlework shops.
Wichelt Imports, Inc.; N162 Hwy 35; Stoddard WI 54658
Beads from Mill Hill available through your local retailer. For
information on your nearest retailer call 1-800-447-1332, Fax
608-754-0665. Internet: millhill.com or P.O. Box 1060, Janesville,
WI. 53547-1060
Material for model courtesy of Caron Collection; 55 Old South
Avenue; Stratford, CT 06497. Phone: 203-381-9999 Fax: 203-381-9003
Material for model courtesy of Needle Necessities Inc.; 7211
Garden Grove Blvd #BC; Garden Grove, CA 92841. Phone: 714-892-9211
Fax: 714-892-9131
Anchor Floss for model courtesy of Coats & Clark; Two LakePointe
Plaza; 4135 South Stream Blvd.; Charlotte, NC 28217
Pearls from SJ Designs; 1542 Aberdeen St.; Chicago Heights, IL
60411. Phone: 708-754-7657 for information on retail locations.
Model stitched on 8" wide 28 ct. nat./white linen band #975501
from Martin Winkler GMBH available through Access Commodities
Inc.; P.O. Box 1355; Terrell, TX 75160. Wholesale only.
The Flower Thread Company; 1397 Barnwell Drive; Sumter, SC 29154-8724.
Phone: 803-499-2105. www.FlowerThread.com
This chart & stitching instructions may be reproduced
for free distribution only and may not be kitted or sold in any
way, shape or form without prior written permission from Carmen
R. Wyant/Columbine Designs; 56560 Hwy. 83; Swan Lake, Mt. 59911
Phone: 406-754-2569 e-mail: cnd2821@montana.com
"Lenten Rose" Copyright (c) 2000 Carmen R. Wyant