Please respect that this design is copyrighted and is for
your own personal use and is not for resale in any format.
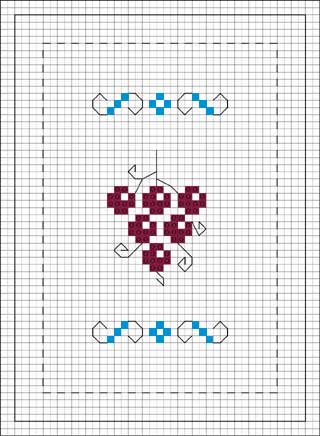
Fabric: 28 count Permin Linen Colour Shell
Design Size: 33 stitches wide x 47 stitches high
Cut two pieces of 14 count / 28 count piece of fabric approx
5 _"" x 7" (one for the back and one for the front
of the design).
This design can be worked on Aida or Evenweave fabrics.
If you work this design on an evenweave fabric then every square
on the chart represents working over two threads of the fabric.
SYMBOL
|
THREAD COLOUR
|
STITCH
|

|
Caron Collection
Wildflowers - Bordeaux
|
Cross Stitch use as it is
|

|
Caron Collection
Soie Cristale #2001
|
Cross Stitch use 2 strands of thread
|

|
Caron Collection
Soie Cristale #2010
|
Backstitch use a single strand of thread
|
Instructions
Complete all the cross stitches first.
Caron Collection Wildflowers is a single ply thread and should
be used as it is. Work each individual cross stitch before moving
onto the next to help to create a continuous colour flow.
The Soie Cristale is a 12 stranded silk thread and you should
use 2 strands for the cross stitch and a single strand for the
backstitch''
The dotted black line on the chart is where you should stitch
the front and the back together. The solid black outer line is
where you will cut the fabric once the stitching is completed.
I would suggest using Fraycheck or similar around this cut edge
to prevent the fabric from fraying.
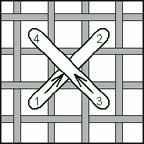 A Cross stitch
on evenweave fabric.
A Cross stitch
on evenweave fabric.
Cut out another piece of fabric the same size for the back
and work your initials and the date on this back piece
This embroidery has been created from a larger sampler design
called
A Good Vintage and is available on my website.
Heirloom Embroideries 66 Hull Road, Hessle, Hull. England
www.heirloom-embroideries.co.uk
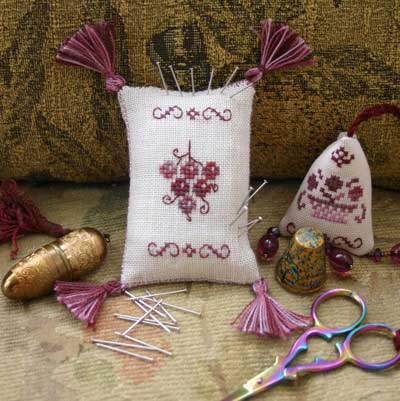
To Make Into a Pincushion
1. Place Fraycheck or similar around the cutting edge line
as indicated on the chart to prevent fraying. Wait for it to
dry and then cut out the two pieces.
2. Place the two pieces of fabric, right sides together and
sew around three sides of the fabric at the place indicated on
the chart. The two side edges and the bottom edge. Leave the
top edge open.
3. Fold over the top edges of the fabric to the back of the
embroidery and lightly press so it holds its position.
4. Carefully turn your fabric the right way round so the right
side of the embroidery is now on the outside.
5. Push the two top edges of the fabric together, with the
pre-folded seams now on the inside. With matching thread, carefully
ladder stitch the two sides together. When you get to the middle
stop sewing and through the remaining gap fill with some dried
uncooked rice or bran (this gives it some weight) or some fibrefill
toy stuffing. You may prefer to make a small muslin bag filled
with the stuffing of your choice and then place it inside the
pincushion prior to stitching the seams together to prevent the
filling from coming through the linen fabric. This could depend
on the weave of the fabric you have used. Now finish stitching
up the remaining gap.
6. In each of the four corners apply some small tassels or
apply a beaded fringe around the four sides to make it more decorative.
Designed by Carol Tinson 2006 ©
Heirloom Embroideries 66 Hull Road, Hessle, Hull. England
www.heirloom-embroideries.co.uk