| Dyed and Gone to Heaven – An Online Magazine and Needlework Resource |
|
 |
Back to Main Online Class Page
Winter Tobacco Road
By Sue Lentz
Part II of II
Click here if you missed Part I
Winter Tobacco Road is one of a series of four making up the Tobacco Road Series designed by Sue Lentz. Spring Tobacco Road was featured as an On-line Class earlier this year. Stitchers have eagerly been awaiting this next installment. Summer and Fall Tobacco Road complete the series and will be featured at a later date. Sue states, "I love the Caron threads. They are very inspirational and the colors are marvelous. I was not familiar with all the fibers, but I am now! I believed I used every one in the four Tobacco designs. That was my goal - to use all the Caron fibers." Actually, Sue began Tobacco Road as a single design, but confesses, "One thing lead to another. Pretty soon, that turned into Spring [Tobacco Road], followed by all the others. Have I retired? Well, it seems like I have just switched jobs!"
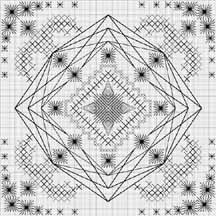
Okay, Thin Solid Lines have been added. Use 1 strand White Kit Kin for these and work them just as you did the previous long lines (previous page). You will also find some additional stitching in the center area. Use 1 strand (stitching twice) or 2 strands of the White Kit Kin for straight stitches worked between the Blue Metallic.
Click on chart 6 for full size version.
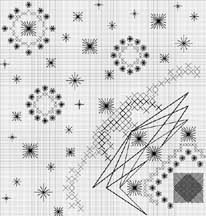
Those funny looking things indicate bead placement. I tried two new graphing techniques for beads here and I found both worked very well for me. Hope they do for you too.
All beads used are Mill Hill #02019 Iridescent Honey Seed Beads
Now to explain the graphing.
You see long open lines with a dot in the center. The dot is the seed bead (not Bugle). Come forward at one end of the open line; thread your bead; then go to the backside at the other end of the open line. This method will also make your beads lay correctly so they contour to your piece. They will flow.The second technique is rather bizarre. You will also see just plain black dots. I found that trying to do an exact count for bead placement in these areas totally ridiculous. So I simple indicated an area where a bead should go just place one in the closest vicinity to the dot and you will be fine. The beads in this center area should look like they just fell into place. Believe me, it was a joy to secure these beads without counting.
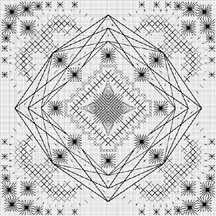
Click on chart 7 for full size version.
One quarter of the large version. Place beads of snowflakes where ever you please for a more Wintry appearance.
Click on chart 8 for full size version.
For more information on Sue and her designs, see her previous Designer Spotlight at http://www.caron-net.com/apr02files/apr02des.html
Sue Lentz
W 12219 Eagle Road
Athelstane, WI 54104 - 9229
Phone: (715) 757-3619
Fax: (715) 757-3300
E-Mail: [email protected]
Please See Our ARCHIVES for FEATURES You May Have Missed
© 1997 The Caron Collection Ltd. / Voice: (203) 381-9999, Fax: 203 381-9003
CARON email: [email protected] / Webmaster [email protected]